|
28 – 29 October 2020
Not in the garage the rest of this week. Doing some planning and research. Planning for the lift of the body and how to ensure it's straightforward and safe. I could use the scissor lift to raise the body and roll out the powertrain; but then I will have the bodyshell on the lift and have to figure out how to get it out of the garage for disposal. The design of the lift makes it difficult to put a wheeled dolly in the middle and roll out. So, the plan is to remove the majority of the subframe bolts while on the lift, and leave a subframe bolt in each corner and the top mount bolts in place to keep the subframes in place. Then put the wheels on, drop the car down, remove the remaining subframe bolts while it is a bit higher up on the lift and roll it out onto the drive. Undo the top mount bolts. Then use my engine hoist to lift the body off and roll the powertrain out. I should be able to use my balance bar to level the load too. The bodyshell can then be dropped onto a pair of heavy duty saw horses where I can extract any other bits I need before disposing of it. Research focused on understanding the fuel system,and ECU wiring. I understand how the fuel injection system works on my TVR, but I will need to know how the MX-5 one works to be able to adapt it to the new chassis. The fuel pressure regulator is in the fuel tank (part of the fuel pump) and there is no return fuel pipe from the fuel rail back to the fuel tank. My understanding is that the fuel is pumped out of the tank outlet, down to the filter where the flow splits, one route goes back to the fuel tank and the fuel pressure regulator. The other goes forward under the car where it passes through a pulsation damper on the bulkhead and another one on the fuel rail and then into the fuel rail where it terminates. The pressure in the fuel system is about 60psi so pipe joints are critical and any pipework will need to be able to cope with that. More investigation needed on what the options are for fuel lines and joints. The other area is the ECU wiring and sensors and also how they interact with the cluster and start/charge system. The more I look at it the more I think an aftermarket ECU is the way to go. The Mazda ECU interacts with a lot of other systems; Immobiliser (I think this is paired with the ECU), cooling system, charging system, and some of the instrument cluster gauges. Still need to understand the speedo and how that is driven. Need to decide if I can hack the Mazda engine loom to work with an aftermarket ECU. If I go for a new engine loom but then I have to splice in or find the right connectors for the sensors, unless I can find one for my engine. There are several sites hosting pdf copies of the manuals, which is great but it takes a bit more digging to find the one that applies to your particular car as Mazda tended to issue update notes for particular years and systems, so you have to read the base manual and then refer to the update notes to find the differences for your car. The other complication is that they are for the US market; its not always clear which side of the car a component might be. Sometimes they are the same and other times they are swapped for the LH drive car. Comparison with what is on the car is vital. Wheels have also been on my mind. I really like the look of the Weller steel wheels but I would want them a in a steel finish and 8inch seems quite wide. The other option I like is the MINI One steel wheels which are cheap to buy but then need spacers to get them to fill the wheel arch. Doing some youtube video browsing I was reminded about 'wheel banding'. Take a standard steel wheel, cut off the front edge, weld in a band of steel to increase the front dish, then weld the old front edge back in. The wheels are as strong as the original (a lot of lorry wheels are made this way) and are tested to ensure they don't leak. This used to be very popular back in the day when alloys were hard to come by so is in keeping with the idea for my car. I can use any 15in/16in steel wheel with the right bolt pattern, I can pick up a set of steel wheels for £50, I can get the banding and painting done for less than a set of Wellers will cost. I can get them made to fit the arches exactly as I want and should not need any spacers. Need to check that the inboard side of the wheels won't foul anything especially at the front.
0 Comments
27 October 2020 Back in the garage this evening for a couple of hours. Tidied up the loom and identified a few connectors I missed in the rush to get the loom out! Found that the loom for the boot could be disconnected where the main earth and battery positive go through the body, this made it much easier to get the cables down the hole. At the front figured out how to undo the quick connect pipes for the fuel regulator (just as well as the tool I ordered doesn't work). A pair of small screwdrivers slid up the pipe released the clips and allowed the pipe to be disconnected. Tidied up and labelled a few more of the parts already removed, cable tied bits together so they don't get lost. I separated the loom into the smaller subsections and cable tied the various loose bits which made it much easier to man-handle into a plastic bag for safe storage. Released the handbrake from the handbrake cable and took it out of the car. At the rear wheels I undid the nuts holding the hsndbrake cables on and disconnected them. I also undid the brake pipe that comes from the master cylinder and joins to a 3 way connector on the subframe. Found a power steering pipe to disconnect between the rack and the pump which I missed – must not forget that before lifting the body. 24 October 2020 Back in the garage today. Completed pulling the loom out of the engine bay and back in to the cabin. Getting to the ECU required drilling out 2 rivet and then 4 nuts. The loom is piled up in the drivers side of the cabin. Disconnected the power steering lines and unbolted the fluid reservoir, removed the radiator and air filter housing. I undid the roll bar mountings from the body and also disconnected the brake hard lines from the subframe bracket. I need to chop the brackets out and send to Andy to be welded onto the new chassis. Also disconnected the clutch hard line where it is bolted to the body shell. The clutch line takes an odd route from the offside across to the nearside and then a joint takes it back to the clutch slave cylinder on the offside again. I won't be doing that on the new build! Also on the nearside by the clutch line bracket is an engine earth that was removed. I disconnected the carbon canister and associated pipework apart from the fuel lines. I will need a tool to release the fuel hoses which is on order. I moved to the rear of the car, undoing the wiring in the boot, removing the rear lights, aerial and the boot lock (which has a solenoid release on it). I pulled all the wiring back in to the cabin. The main battery cable and earth need to be pushed down through the body before I can lift it off the subframes. I removed the screws holding the fuel filler neck to the body, 2 of them unscrewed but the other 2 were rusted solid, so I drilled the heads off. I undid the hose clamps, removed the filler and breather hoses from the tank and withdrew the filler pipe. Then I drained the fuel tank, there's no drain plug on my car so I undid the screws holding the fuel pump/level assembly to the top of the tank and carefully lifted it out so I could insert the pipe into the fuel and syphon it out. I used a plastic fuel syphon pump to drain the fuel in to a fuel can. Underneath the car my electric impact wrench made short work of the nuts and bolts holding the various underbody cross members that need to be removed to get to the exhaust. I undid one of the bolts holding the back box on but the other will need to be cut off with my angle grinder, but that will need to wait for the fumes from draining the fuel tank to clear! Things left to do before I can lift the body, disconnect the handbrake cable, undo the fuel lines, remove the exhaust, disconnect the brake hard lines at the back, remove the starter motor wiring, undo the suspension top bolts and the subframe bolts. 18 October 2020 Not much progress this week as we went away for a weeks holiday. Much needed with the Covid-19 restrictions we've faced this year. Got back yesterday and cleared some space in the garage, I moved the interior parts I probably won't need (doors, bonnet, wings, roof) into my shed and the bits I will probably use (seats, steering wheel etc) into some storage space in the garage. I spent Sunday afternoon in the garage, I started by stripping the loom out of the dashboard along with the remaining switches. I left them connected to aid identification later on where I could. In the cabin I undid the 3 bolts holding the heater, disconnected the pipes in the engine bay and removed the heater from the cabin. I spent some time releasing the loom from the interior of the car. Unclipping the loom from the body, the remaining electrical connections and earth points. I pulled out the carpet to allow me better access. In the engine bay I disconnected the fuse box from the loom and moved that onto the top of the engine. There were a number of relays behind the fuse box that I released from the bodywork. I removed the front bumper to get better access to the wiring at the front. I unclipped the loom that runs down the offside wing, labelling connections as I undid them. The front lights were removed, (two bolts at the top and the remaining connector popped out of it's retainer. The horns and an unidentified box in front of the radiator were removed. I also removed the bonnet lock it might come in useful later. Back in the cabin I undid the steering column at the bulkhead universal joint and pulled it out. I released the throttle cable and undid the clevis pins for the brake and clutch pedal. The nuts in the footwell that hold the brake servo on were undone and the other bolts holding the brake and throttle pedals so I could remove them. In the engine bay I undid the brake pipes and the vacuum pipe to the servo and removed the brake master cylinder. I undid the nuts for the clutch cylinder and removed that and the pedal. I carefully fed the loom from the nearside wing back though the firewall into the cabin. Then I did the same for the loom that connects to the engine through the centre of the car (most of the engine sensors are on this loom). Lastly, for today I undid and removed the pinch bolt on the universal joint nearest the steering rack and also undid the nuts holding the rubber boot to the firewall. The lower steering shaft was very tight in the universal joint and I had to use a long drift against the upper part of the shaft to gently tap it, to release it from the joint. Then I could withdraw it through the firewall. Some of this work may be unnecessary if I keep with my plan to use aftermarket dials, ECU and wiring loom; but for now I am keeping my options open. I will probably need some of the connectors off the loom for the ECU wiring. Using an aftermarket loom and dials will require solving some other issues like driving the speedo, tacho and supplementary dials. However it will mean I have a new loom which will be much simplified (and lighter) without all th wiring for things like mirrors, windows, wipers, heating. I'll also be able to design the power distribution to fit the Replicar instead of having to use the one used in the MX-5. 5 October 2020 Spent a few hours in the garage this evening and removed the dash. Relatively straightforward, just needed to work methodically through removing the mounting bolts and disconnecting the loom, extracting the instruments and lowering the steering column. 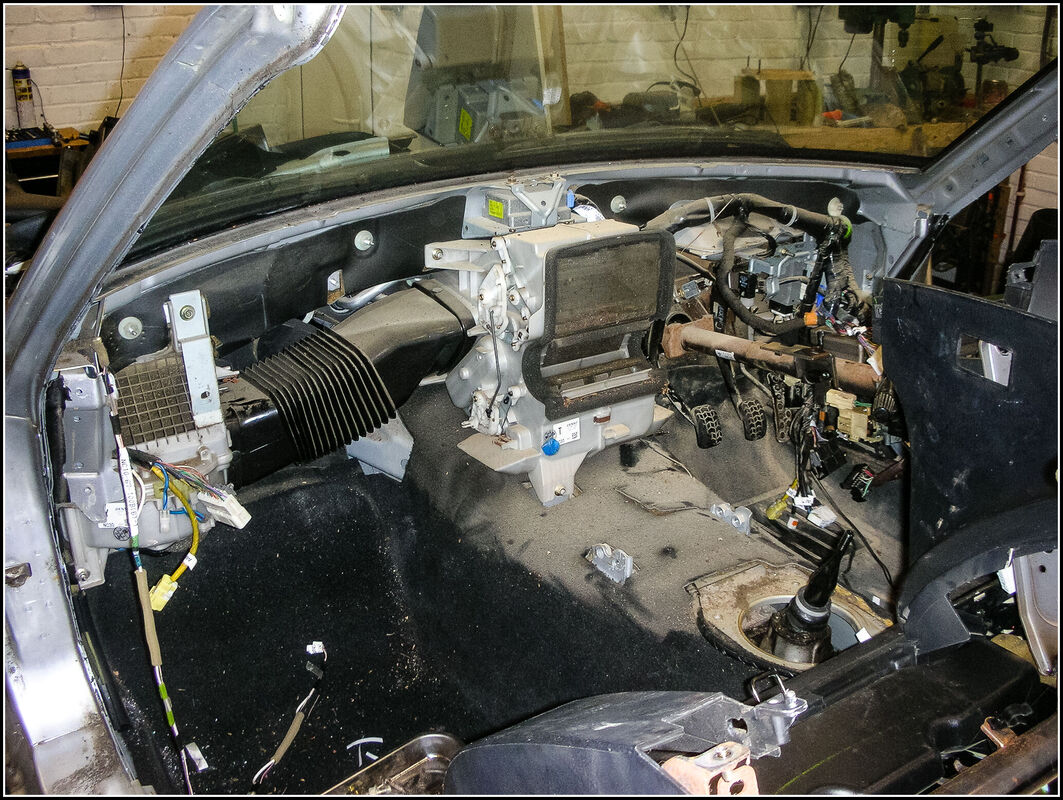 3 October 2020 The order for my Replicar has been placed with Andy at ANC Sportscars. Today was the first day of stripping the car. I started with draining the radiator and expansion tank (removed), the washer fluid bottle (removed). I disconnected the front and rear nearside flexible brake hoses and drained the brake fluid down from the master cylinder. I popped out the plastic fasteners holding the inner wing covers in place and removed them. This allowed me to remove the bolts holding the wings in place, there is one sneaky 10mm nut that has to be removed between the wing and the body, socket on a long extension from the wheel arch sorted that. Unplugged the indicators and I could take the front wings off, followed by a load of leaves and dirt that were trapped behind the wings! 4 October 2020 Up early to go and collect the replacement engine another 1.8VVT with all the ancillaries. Fitted easy in the rear of my Subaru Legacy estate, strapped down to a small pallet. Started by removing the doors, access to the hinges is easy with the wings off. First I removed the check strap pin then shut the door. TI disconnected the door wiring at the bulkhead. I removed the rubber cover then pulled the connector block out of the body. It was held in by tabs on each corner. Once it was out I could lever up the green clip and then the two halves came apart. I undid the hinge bolts from the bulkhead top and bottom, then carefully opened the door and lifted it off. The wind deflector was removed by undoing two screws each side and releasing the wires for the built in speaker. (part of the Euphonic sprcification). Next I took out the seats, 2 bolts at the front and two at the rearand a wiring connectionfor the heated seats and seatbelt sensor. I removed the plastic trim from around the door pillar – a couple of torx screws and some clips and it popped off. Then I undid the seatbelt bolts, and unclipped the pretensioner wiring from the seatbelt reel. The passenger side lower bolt was very stiff due to some rust on it. Next I removed the centre console, 2 screws in the rear pocket and two either side at the front under some covers. There were some clips holding it to the side of the transmission tunnel that popped off and then it could be lifted out when the window switch wiring was unplugged. I popped out the trim clips from around the rear of the hood (I raised the roof to get to them) and then a few in the seat area and the whole carpet behind the seats lifted out. This gave access to the nuts holding the rear of the hood on, I went round and removed all of those (there were 2 tucked behind the seat belt mounting and then the metal strips that hold the rear of the hood in place could be removed. The heated rear screen wiring was unplugged and then I undid the bolts holding the frame to the body (3 each side) and lifted the hood off. I removed the screws and bolts holding the metal covers on the fuel pump that will ease the disconnecting when the time comes. I pulled off the rubber seal around the front of the doors and over the windcreen, removing the hood clips as well, there were 2 plastic trim clips holding it on near the hood clips, then it pulled off easily. I undid the 3 Phillips head screws from the steering cowl and removed that. I unscrewed the gear lever rubber gaiter and removed the trim from around the centre console. I removed and unplugged the switch panel at the bottom of the centre console (seat belt light, heated seat switches, headlight aim, cigarette lighter and removed it. I removed the door switches and unplugged them. I went round and pulled the wiring back into the cabin. Then it was time for a bit of a tidy up, sort and bag up the fasteners. I labelled all the electrical connectors I had undone as I went with a cheap labelling machine. All the electrical connecters have some sort of latch that needs to be pressed before they can be unplugged. I used small and large envelops to store screws and small components in. Larger items were marked with either a printed label or a tied on card label. 2 October 2020 I've been thinking a lot this week about the engine problem, and I decided to find a good secondhand one rather than try to fix this one. It's going to need at least a crankshaft grind and new bearings and I don't know if anything else is damaged. To get an machine shop to clean it out and do the necessary work is going to be at least £1000, there are plenty of secondhand engines available for much less than that. I did a bit of searching and found one not too far away that looks like a good option. £150 for a 1.8 VVT, with 90k miles on it. It comes with all the ancillaries which I might be able to sell to recoup a bit of the cost. Picking it up early on Sunday morning. Saturday I will start the strip down of the car body. The plan is get the car down to the skate and then swap the engine over, it can sit in the garage until then (suitably covered). I've ordered an engine hoist, balance bar and engine stand from SGS to help with lifting the body and also for working on the engine, they should be here early next week. Started making a parts tumbler using a 1/4 sheet vibrating sander as the motor. It will have a square wooden base with wooden blocks in each corner then 4 springs mounted on each block. The sander will be mounted on another plank of wood and then hang upside down with the plank of wood sitting on top of the springs. Then a plastic bucket on top of the plank. |
Archives
January 2021
Categories |
 RSS Feed
