|
20 Sep 2020 Cleaned up some of the parts in my parts washerl also used some wire wheels to clean up the alloy water inlet and outlets. Need to find a less time consuming way of cleaning small parts. Replaced the cam and crankshaft oil seals. Read the torque setting for the camshaft cap bolt wrong (specified as inch pounds not foot pounds). Result one snapped bolt. I ordered a set of Sealey left hand drills and bolt extractors. Also ordered some replacement camshaft cap bolts online. ordered a replacement lower timing cover as mine was cracked around most of the bolt holes, and a new o-ring for the water pump outlet. Fitted the new water pump and gasket, also the inlet pipe gasket and o-ring torqued up, to the right value….. 21 Sep 2020 I drilled out the bolt using one of the left hand drill bits I used a small piece of plastic pipe that fitted inside the bolt hole to hold the bit icentrally. When I drilled into the bolt the left hand turn of the drill unscrewed the bolt until I was able to grab hold of it. I was careful to cover the area around the bolt hole with a cloth and tape to prevent any swarf getting into the head or onto the cam bearing. After carefully removing the cloth I used a clean cloth to mop up around the bolt hole. I cleaned the threads out with a clean cloth and then ran a bolt in and out a couple of times by hand. Cleaned the other plastic timing belt covers, intake pipe and other plastic and rubber pieces with degreaser and wipes. Wire brushed the crank and water pump pulleys then degreased and painted them black, also painted a couple of brackets from the VVT cam cover. The cam cover is going to be painted at a later date. Removed and cleaned up the VVT pipe which will remain metal coloured. 22 Sep 2020 Fitted the cam caps with a very light smear of sealant, inserted the oil seal and torqued up the caps correctly! Waiting for a new o-ring to seal the water pump outlet pipe to the block. Measured and rdered new copper washers for the VVT oil feed pipe from Simply Bearings. The metal tube spacers on the damaged lower timing belt cover had got stuck in the block. Managed to pull one out easily with pliers. The other one iwas more stubborn, soaked it in penetrating fluid and left it for a few days, if it doesn't pull out then I will need to get a drill on it but I'll wait until the body is off and access is better. 24 September 2020 Refitted the the water pump outlet, cam sprockets, crankshaft sprocket, timing belt, crankshaft pulley and covers. Timed the engine and torqued up the crankshaft bolt. 25 September Started well and got the rest of the engine back together started to fill the radiator only to see water coming out from the nearside of the engine. On investigation the water pump inlet was leaking from the small pipe used to connect to the thermostat housing. It's a common problem as the pipe rusts and and eventually a hole appears. Cleaning up the housing had exposed a weakness in the rusty pipe. My first thought was to find a replacement but a new one was over £100, second hand was around £30-£40, but looking at the pictures of the ones available, they looked worse than mine. I decided to try to repair mine by replacing the pipe. 10mm steel pipe was readily available at my local DIY store for a few pounds. Drilling out the old pipe was easy enough. The bend in the pipe is very tight but with some heat and careful bending I was able to make a piece approximately the same. It took a couple of attempts to get a bend I was happy with. I did several trial fittings of the inlet on the car to make sure the angle was right so when the hose was fitted it didn't foul anything. This required a bit of trimming and a small amount of additional heat and bending. I used some JB Weld to secure the new pipe into the housing and left the inlet loosely in place with the hose connected while it cured 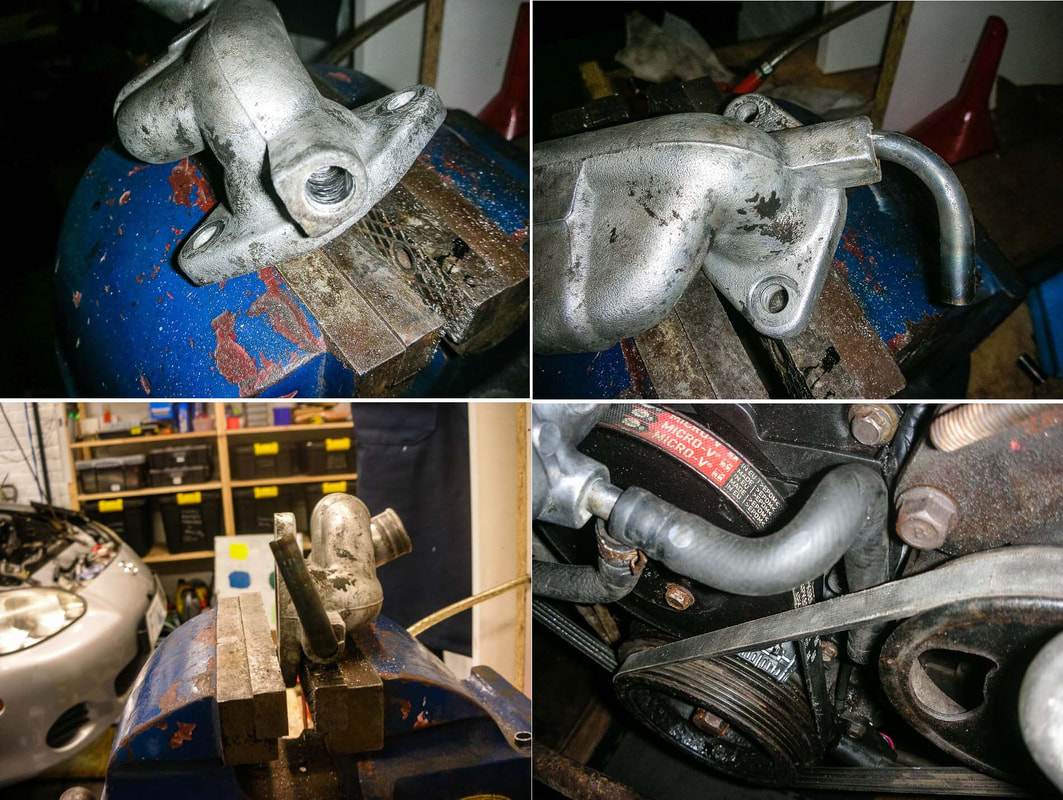
0 Comments
Leave a Reply. |
Archives
January 2021
Categories |
 RSS Feed
