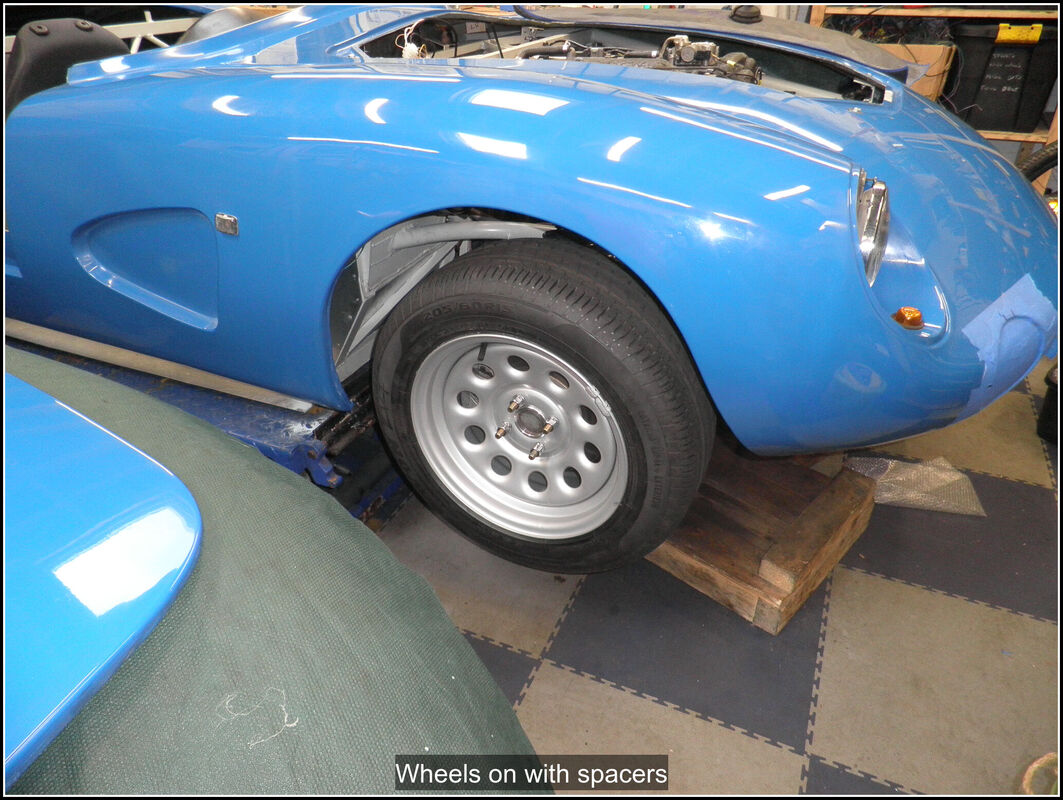
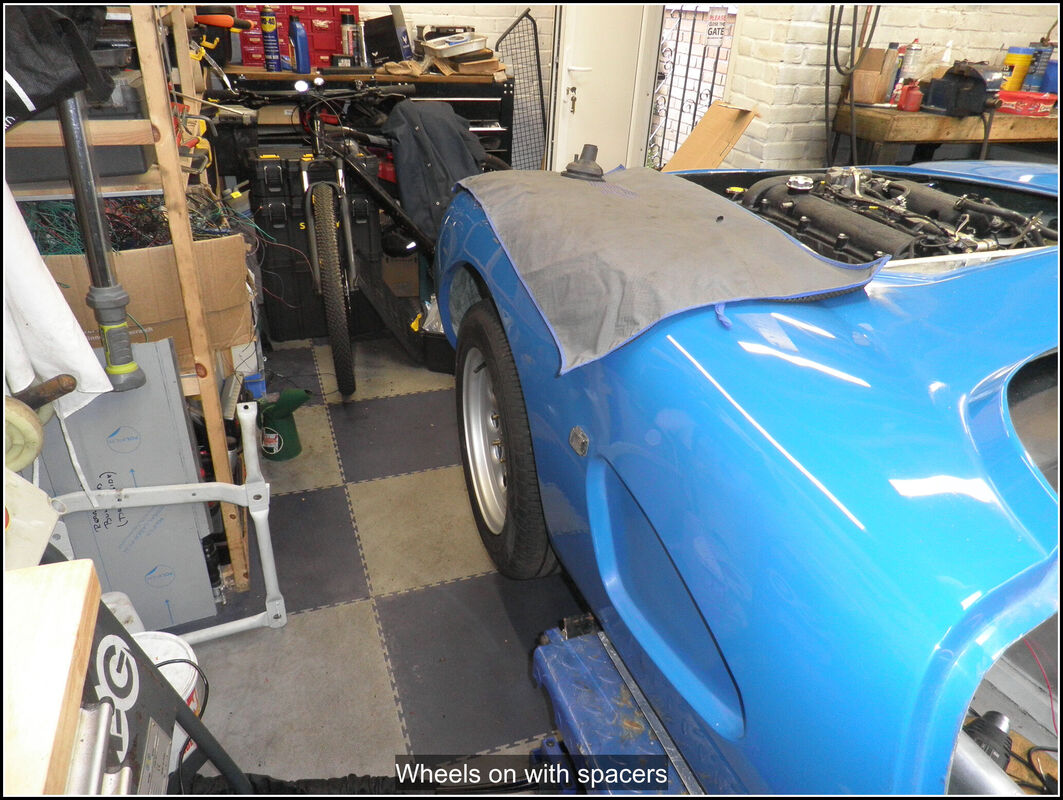
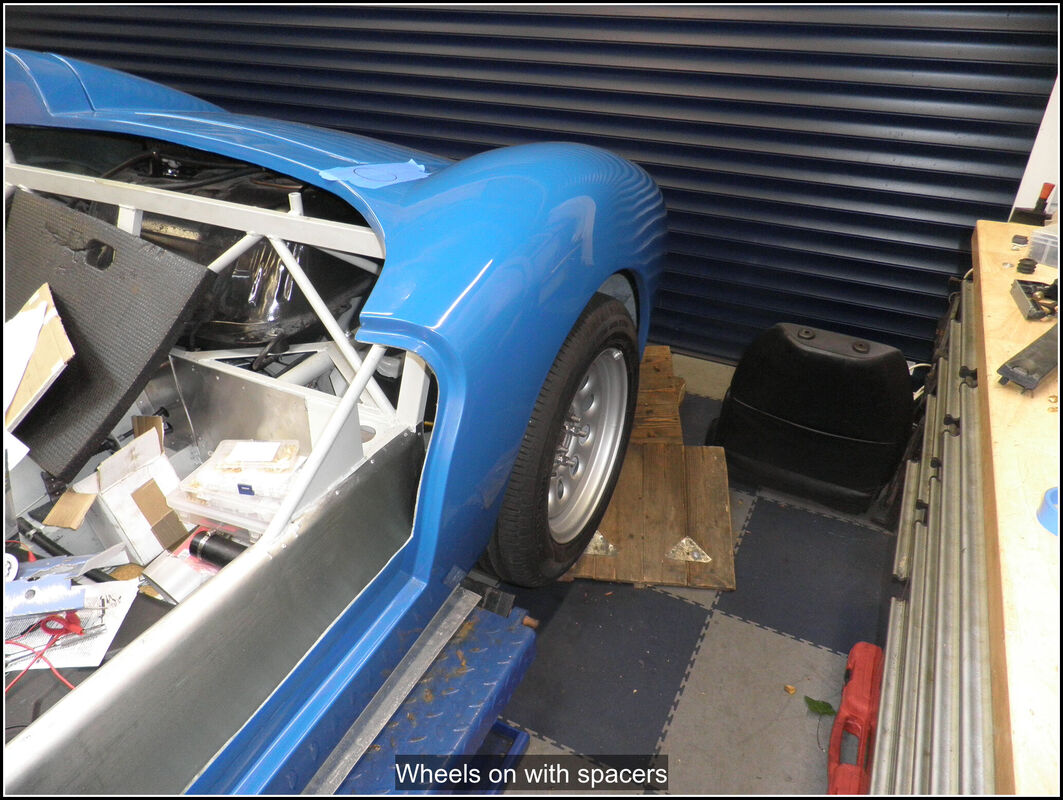
|
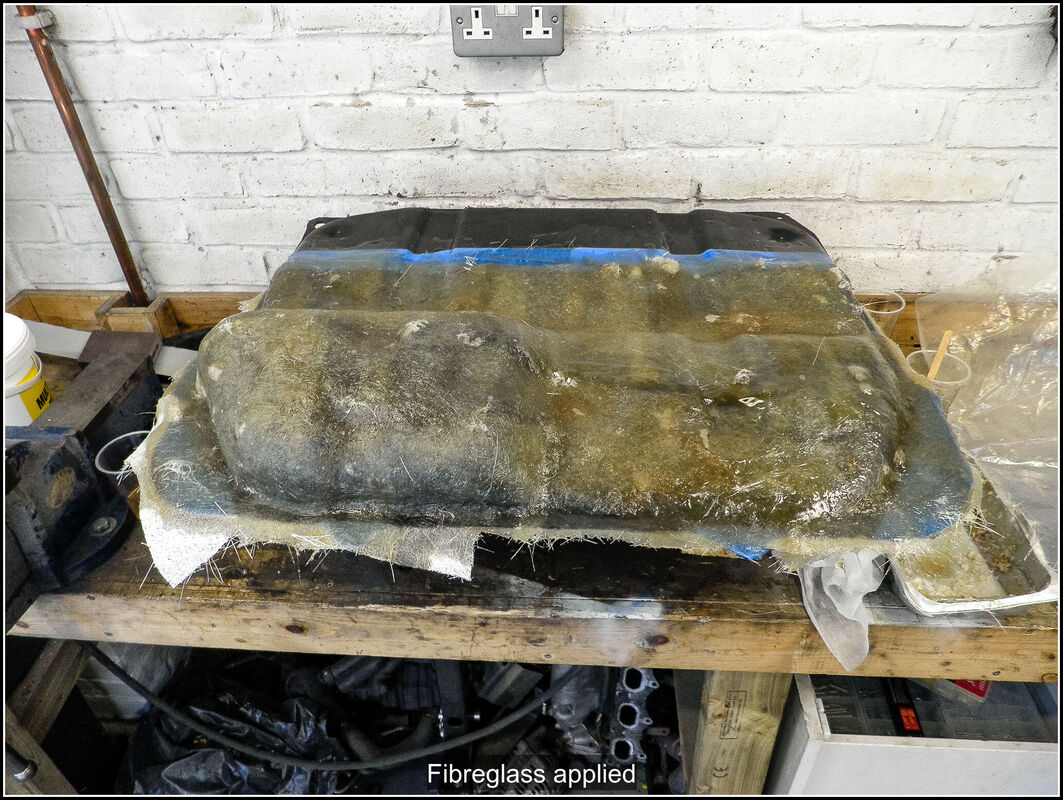
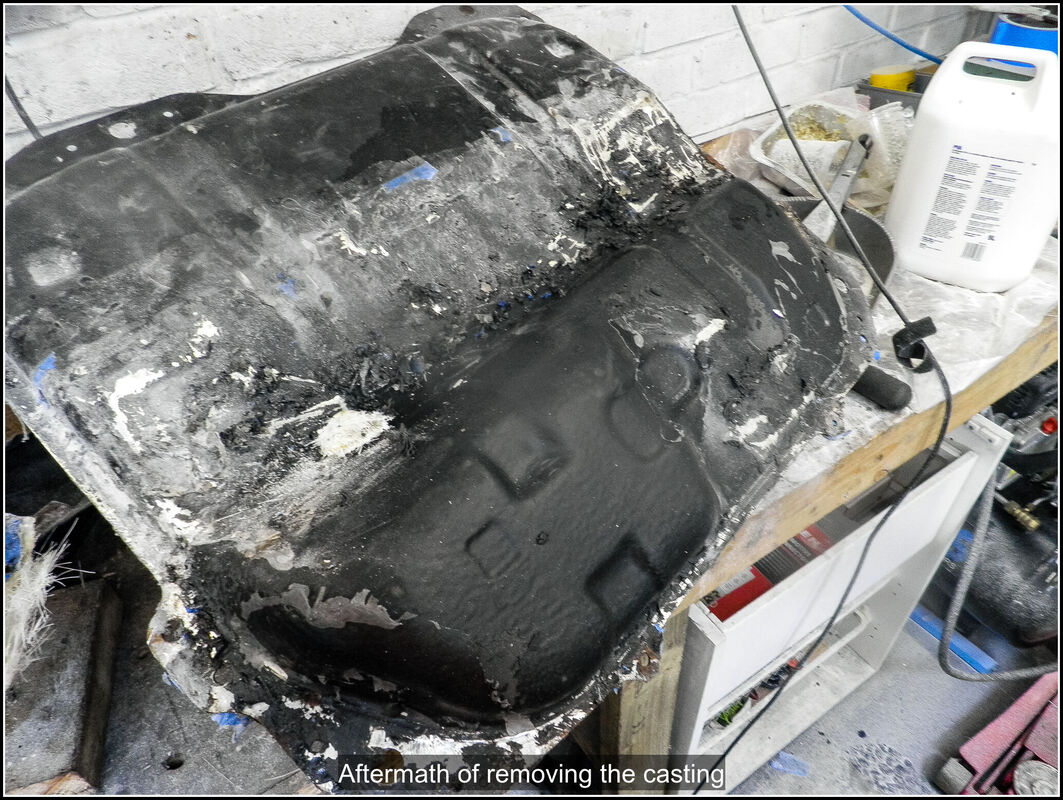
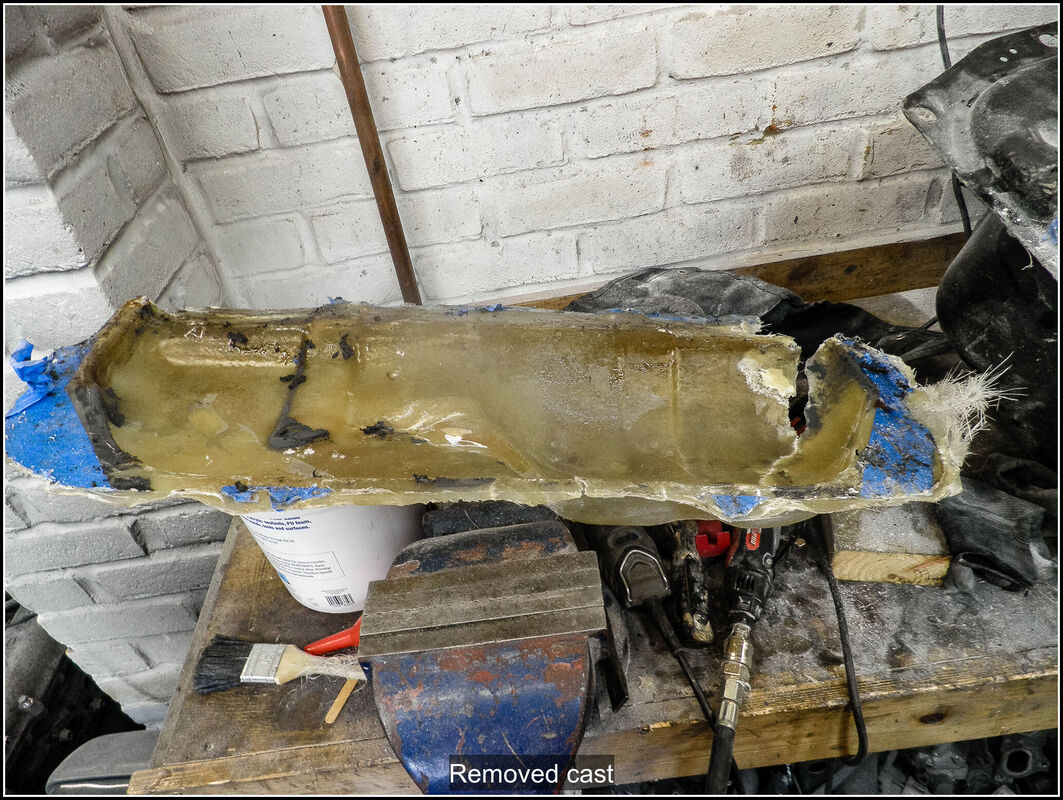
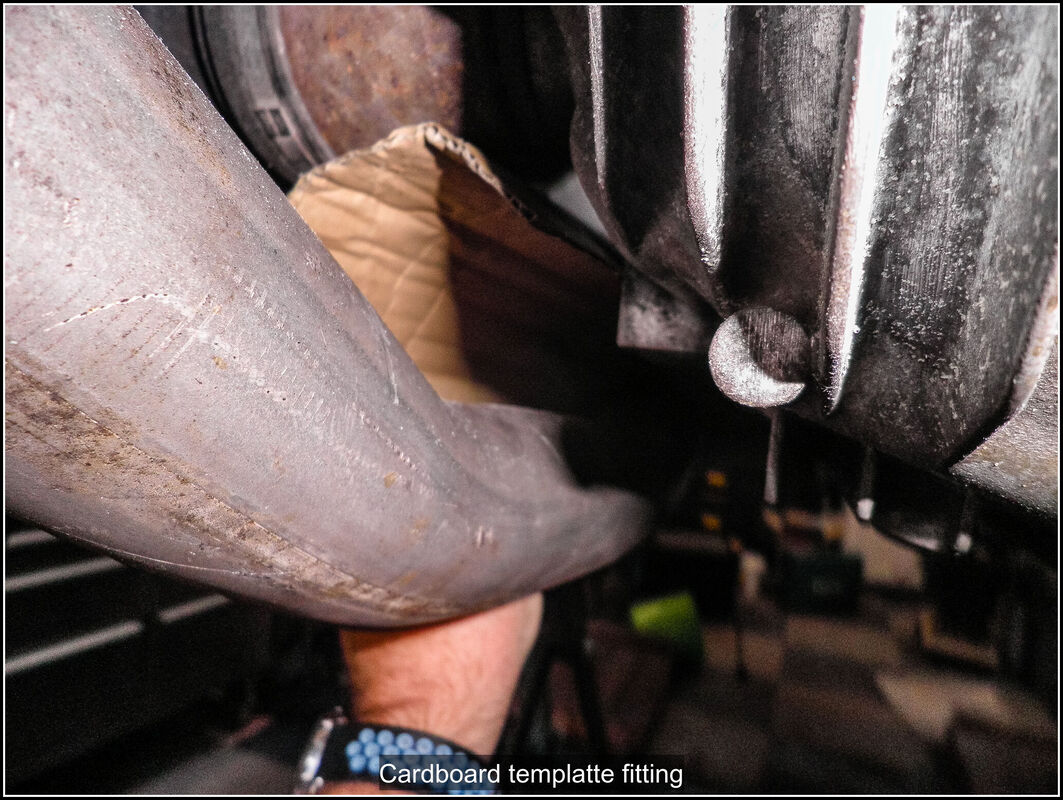
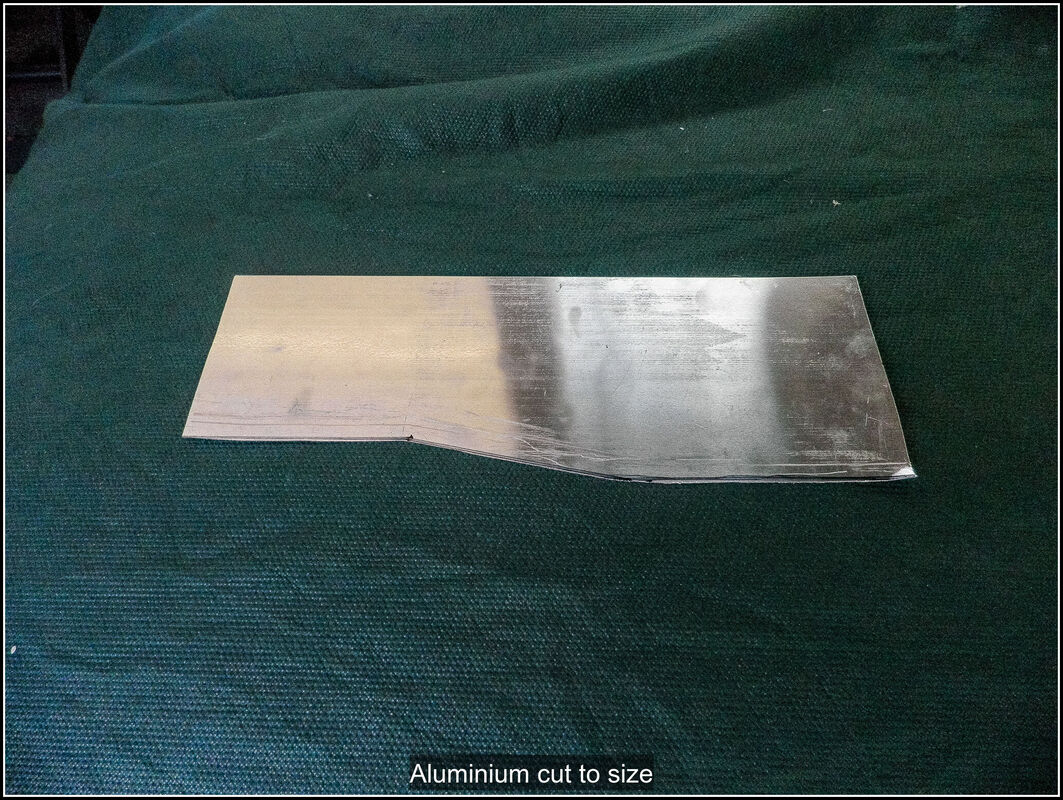
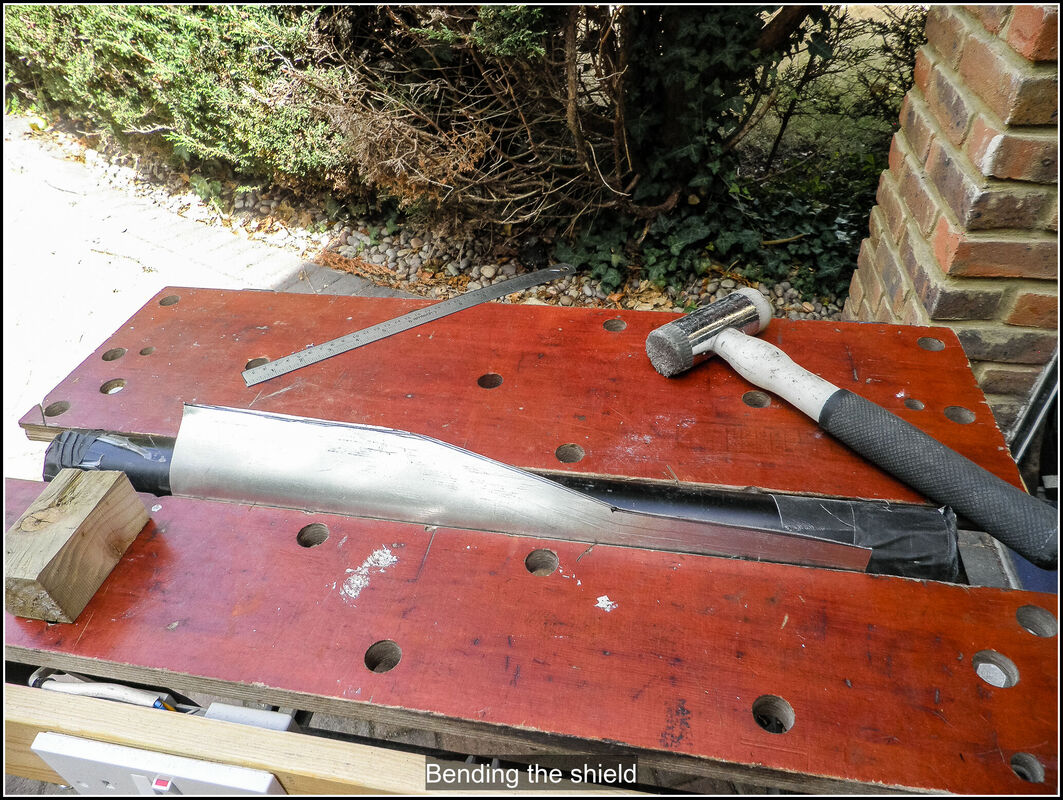
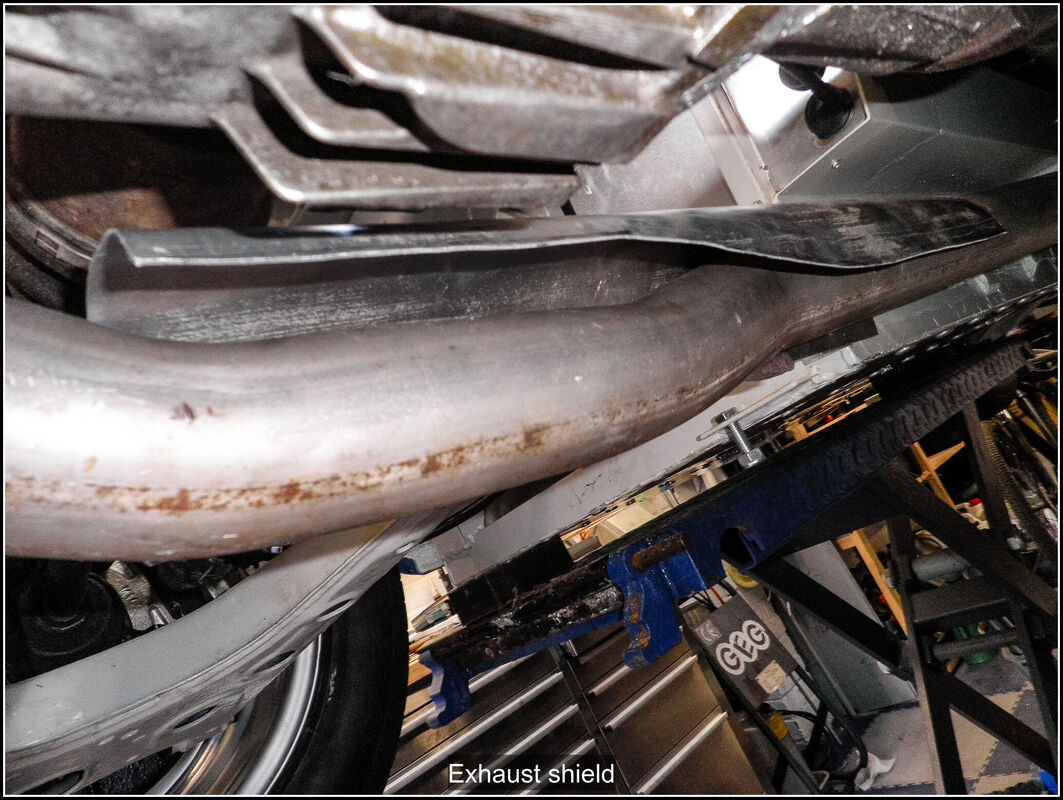
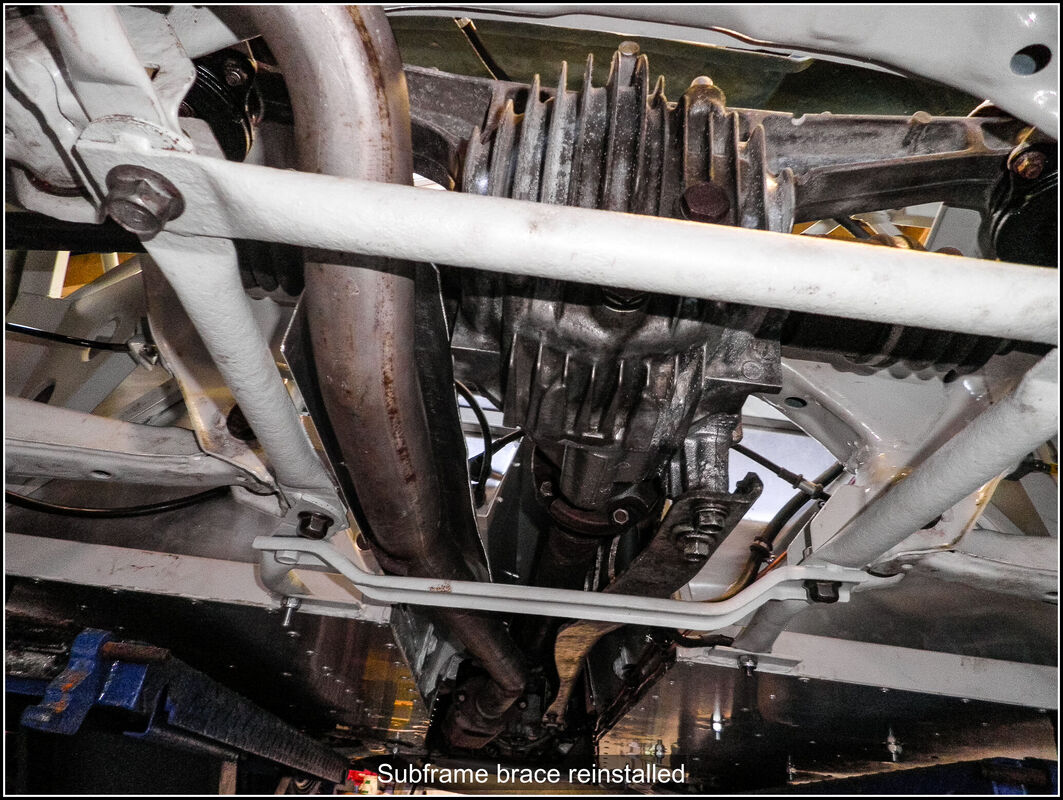
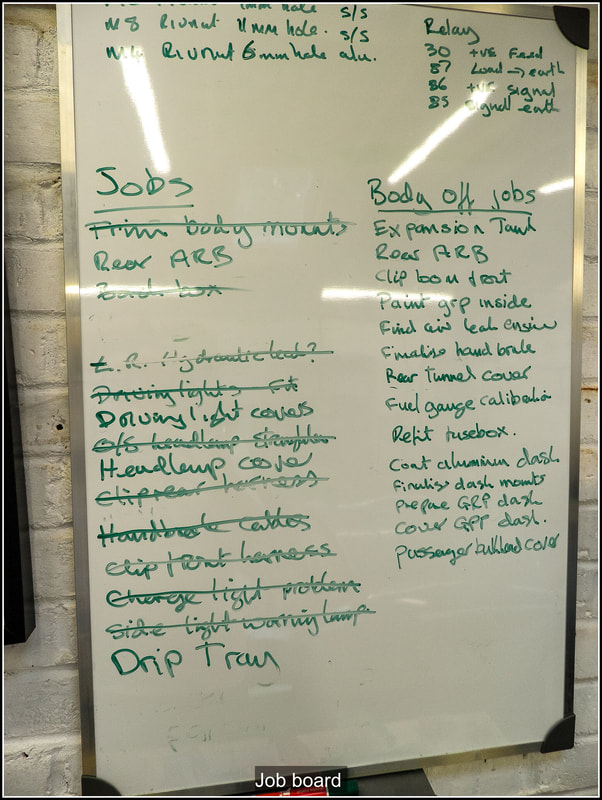
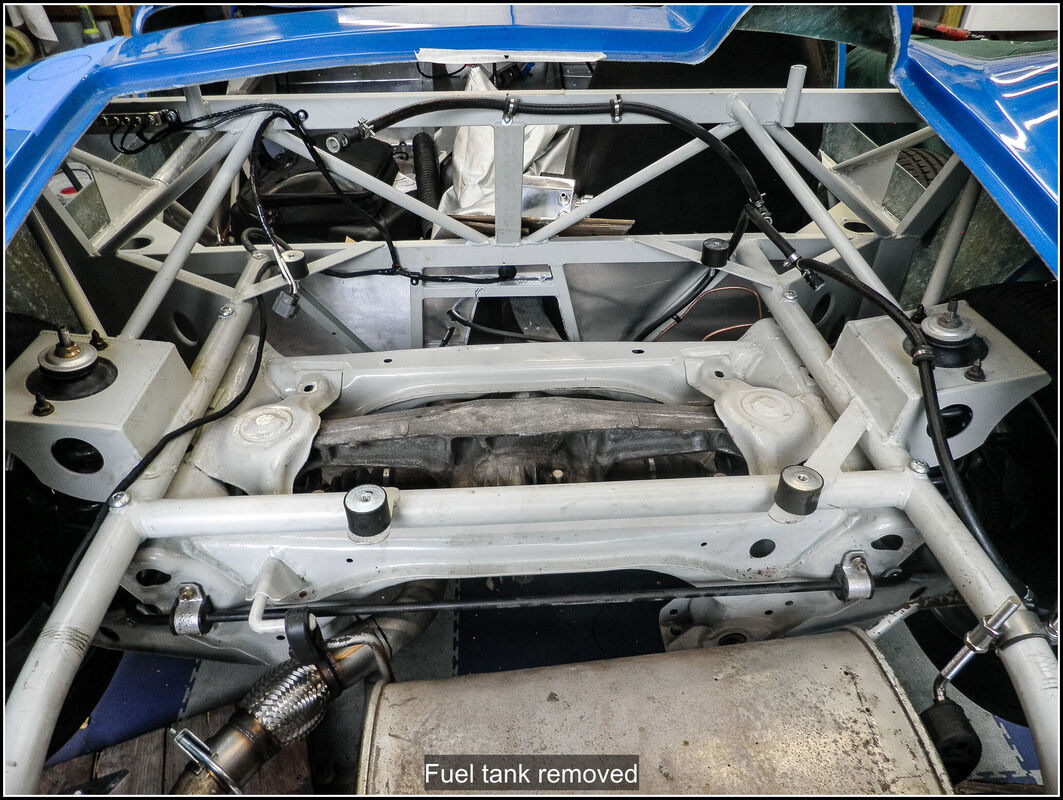
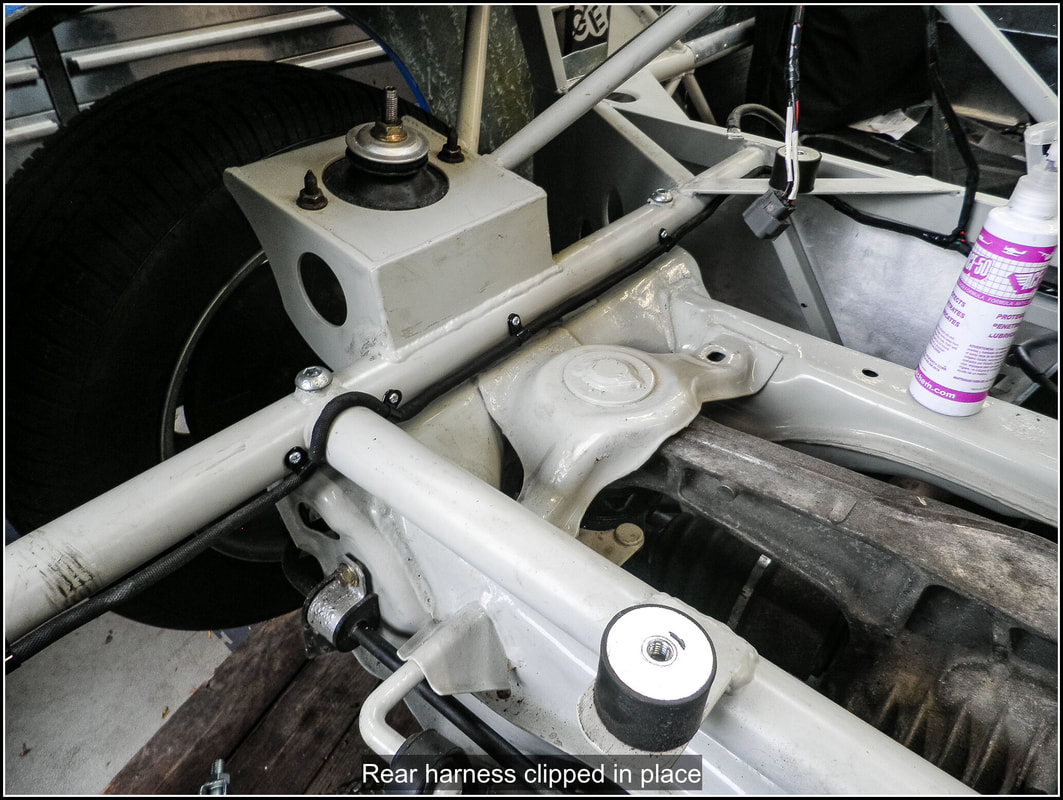
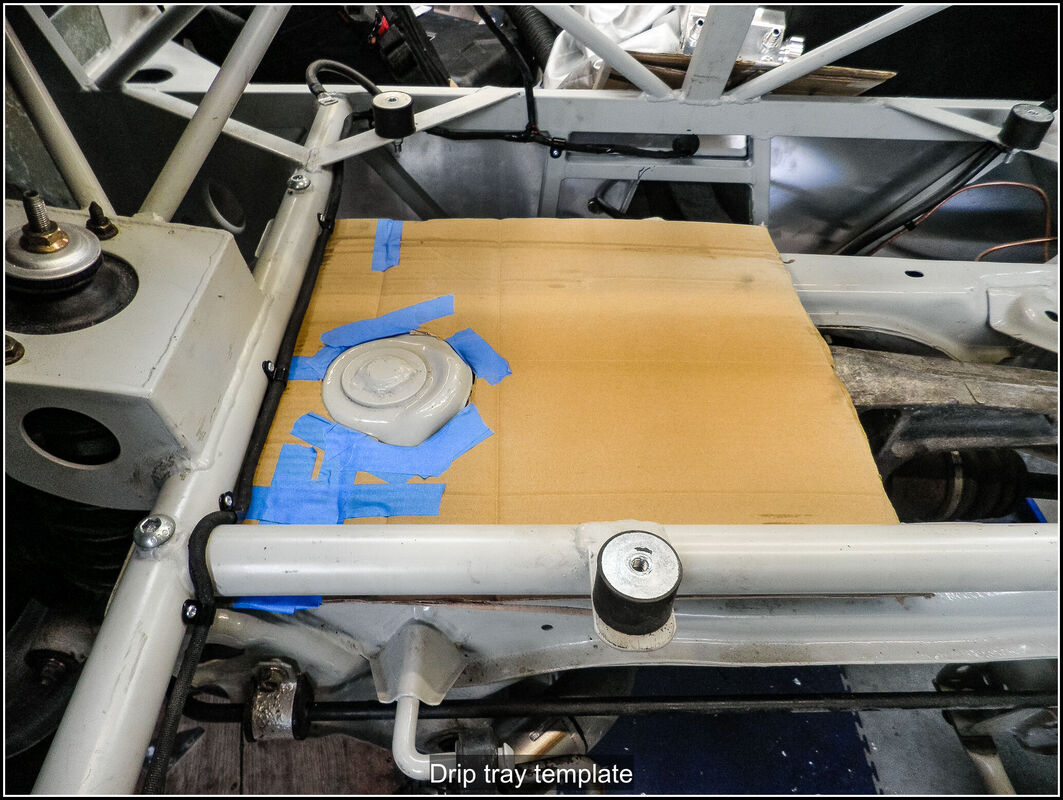
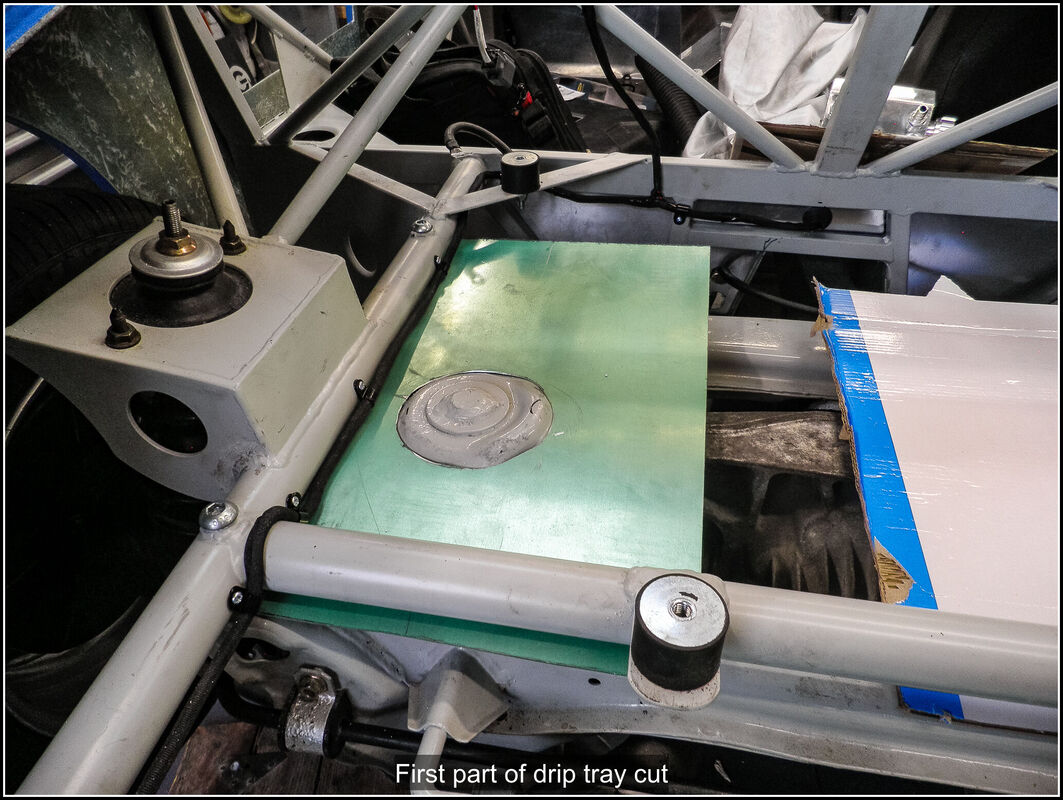
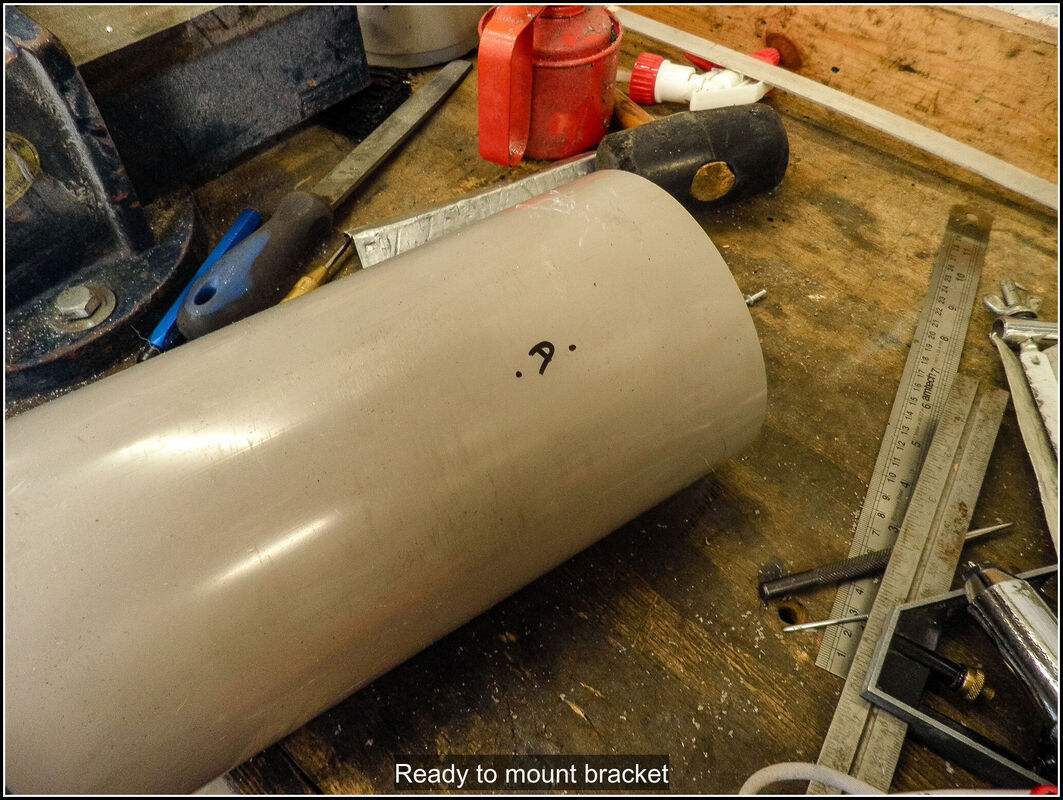
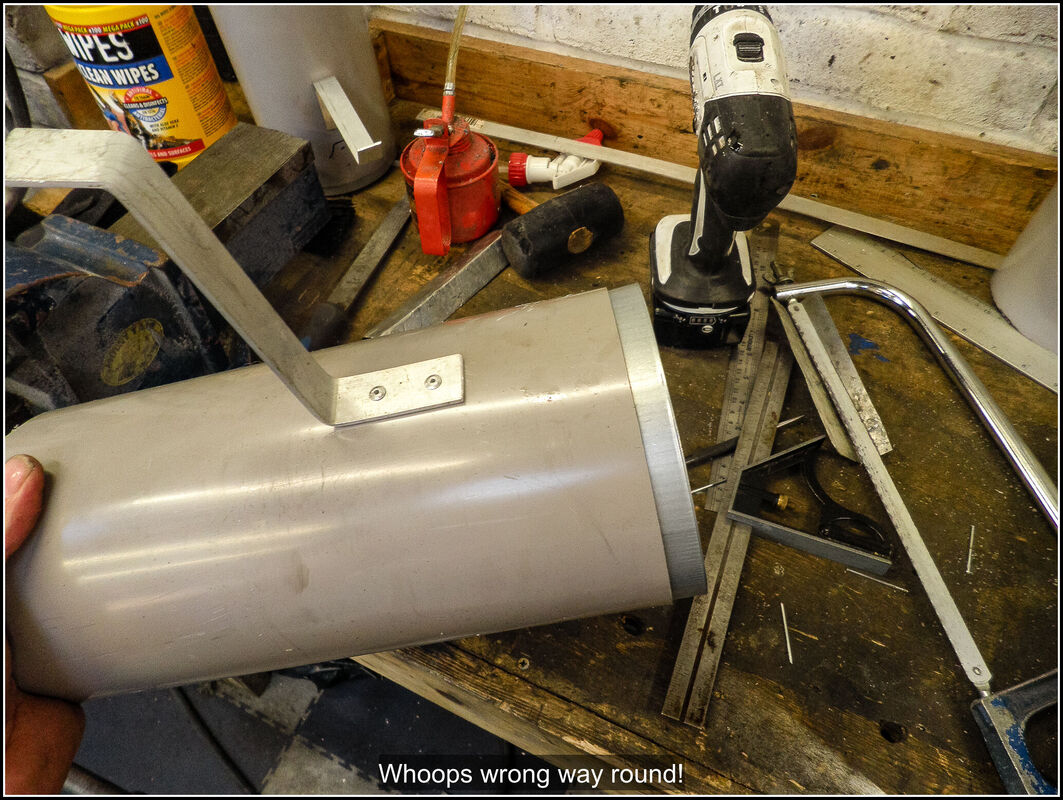
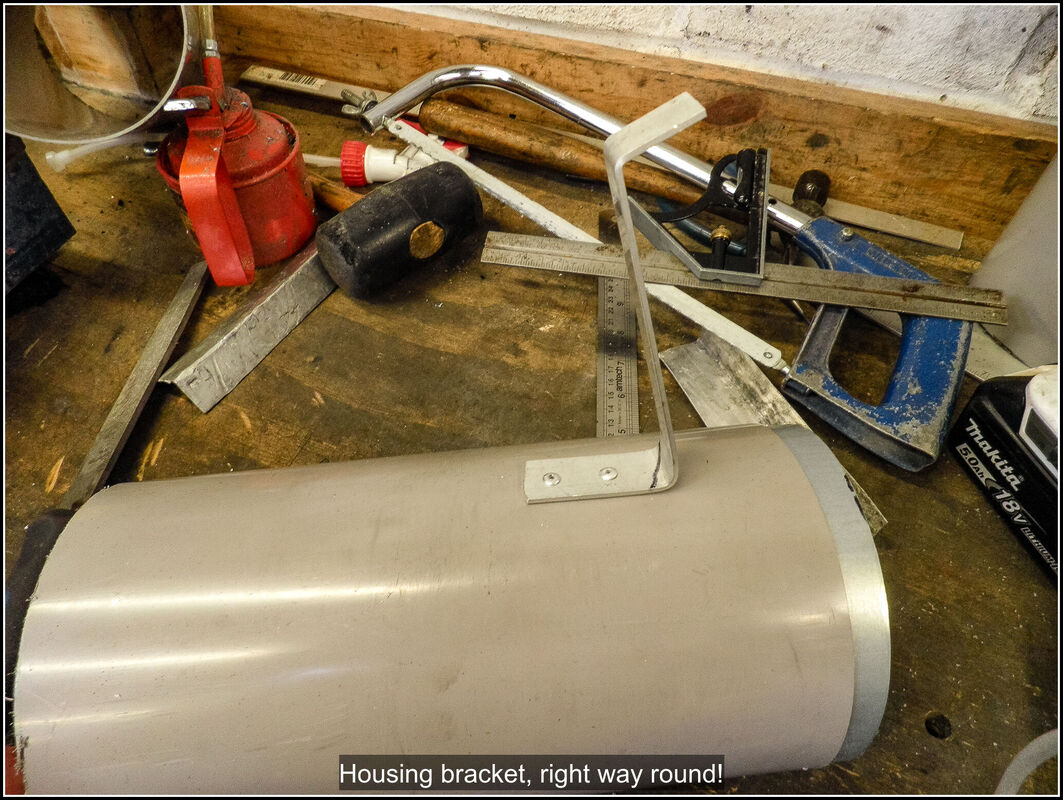
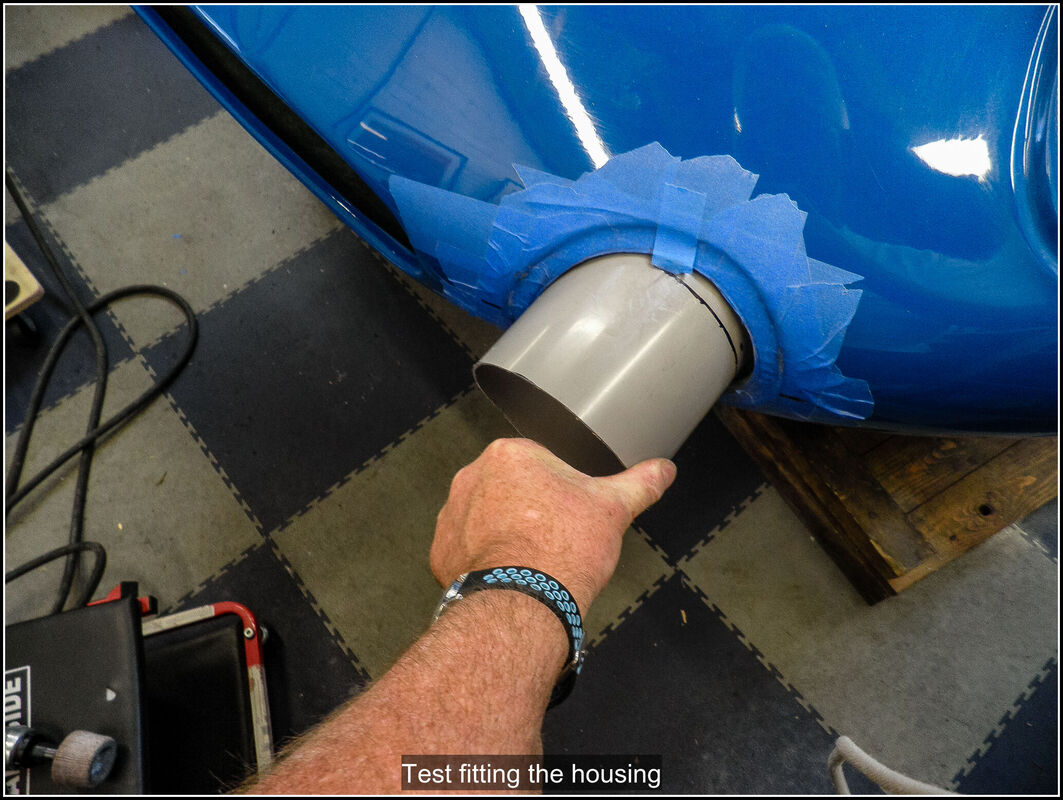
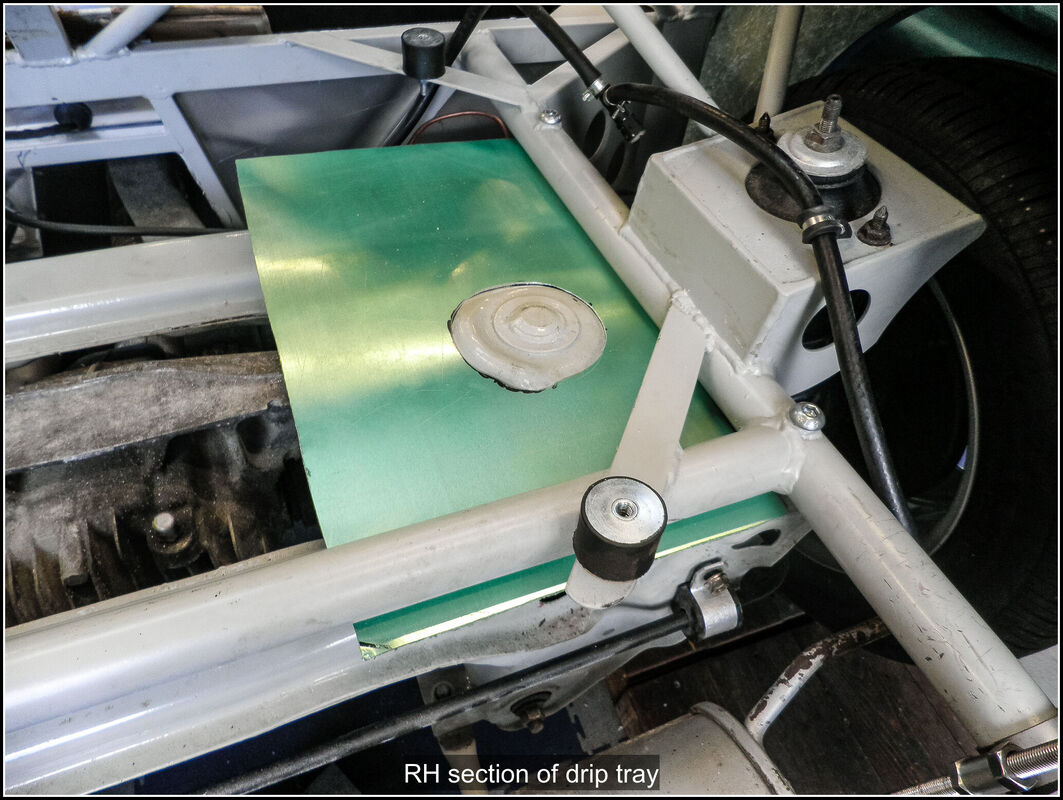
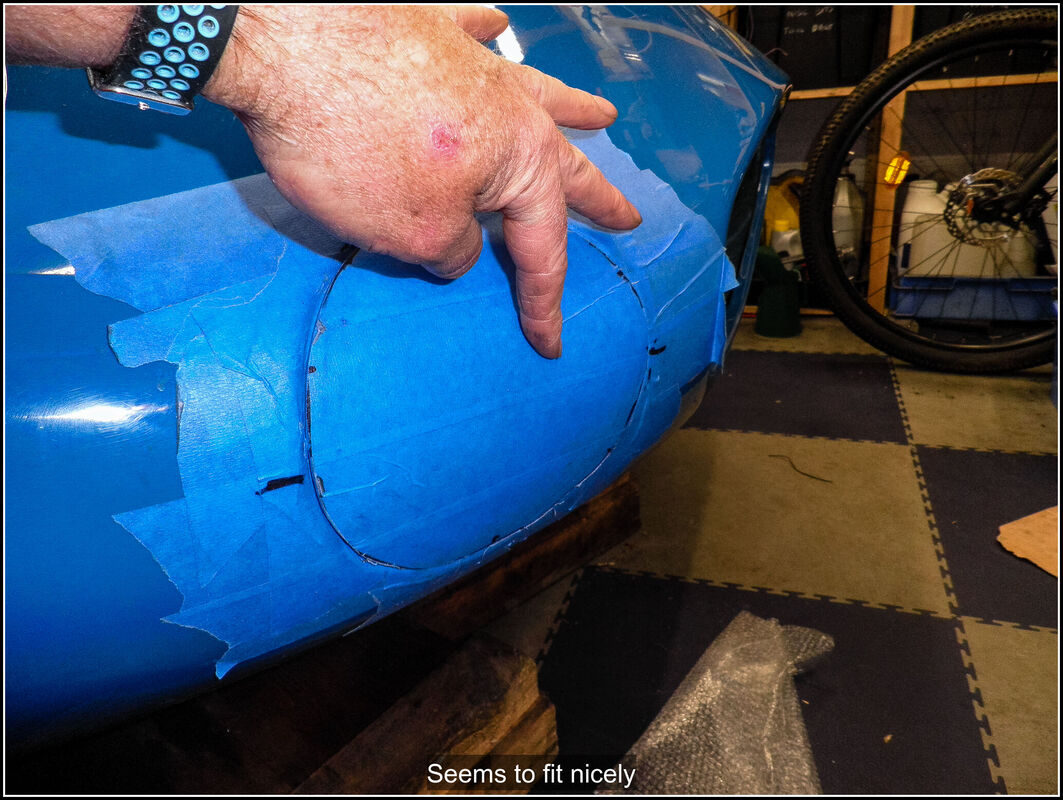
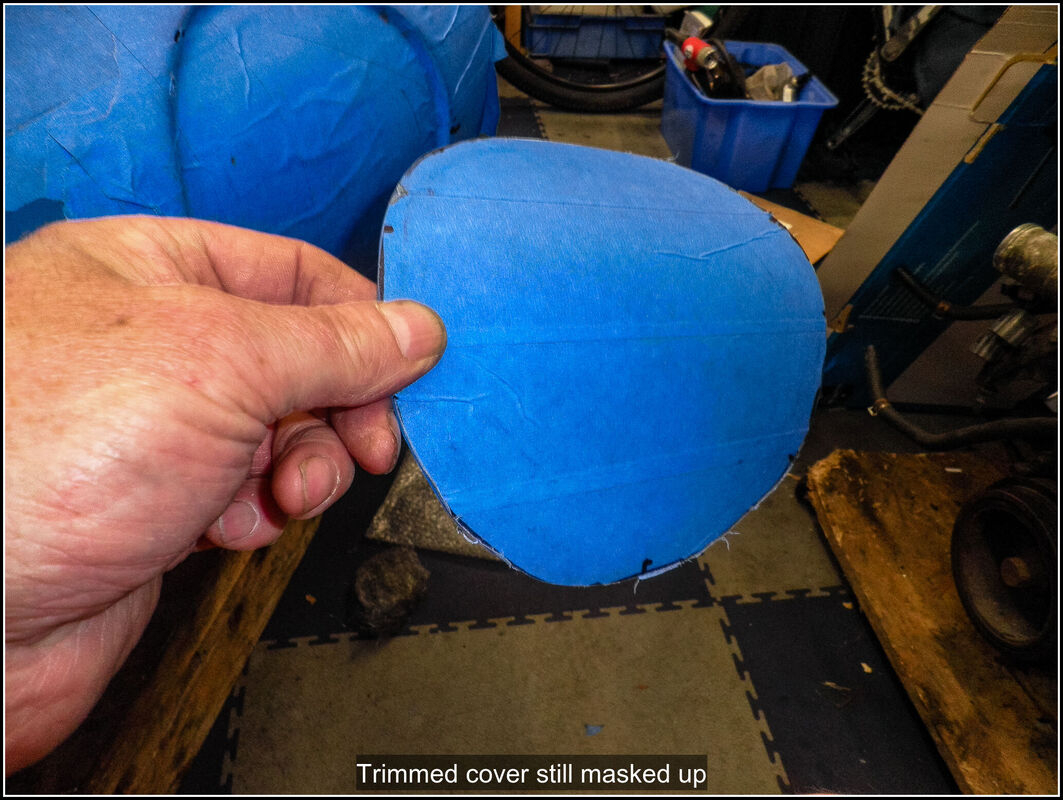
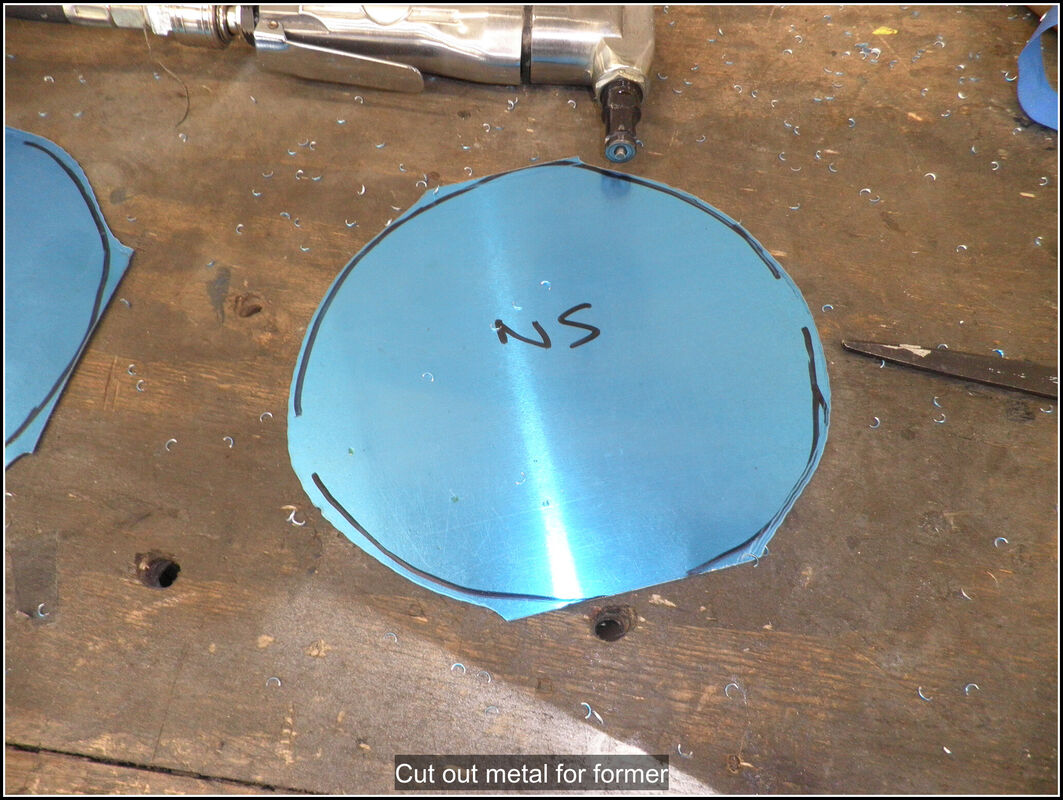
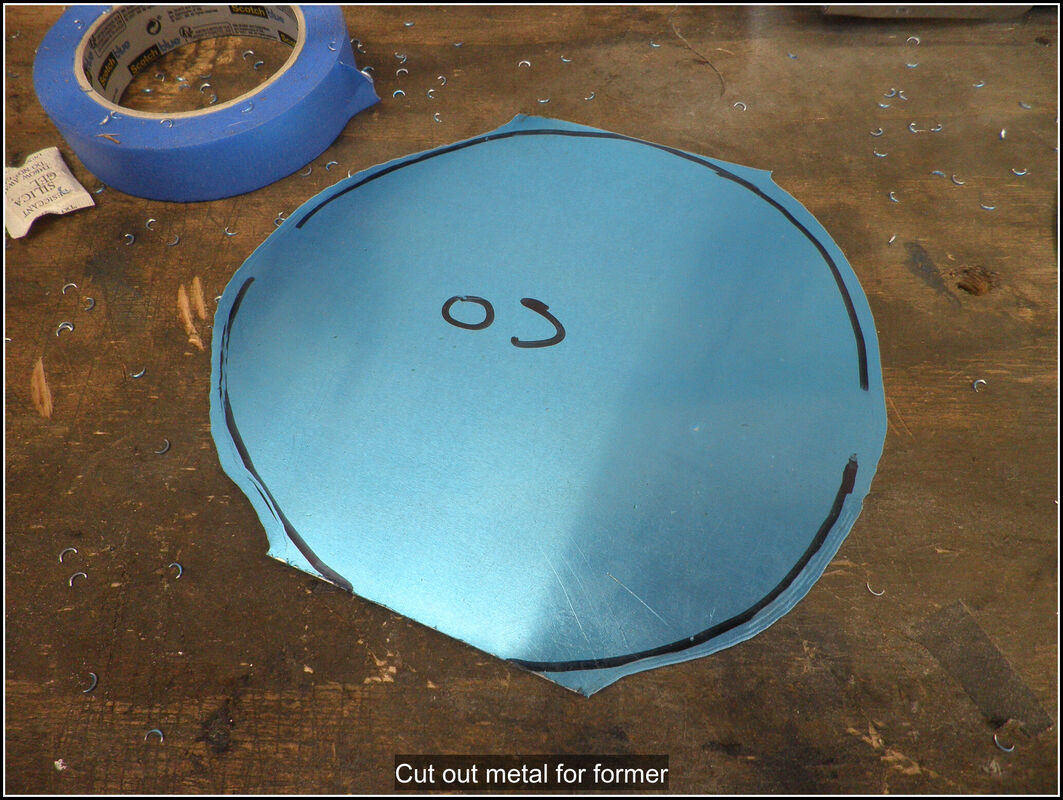
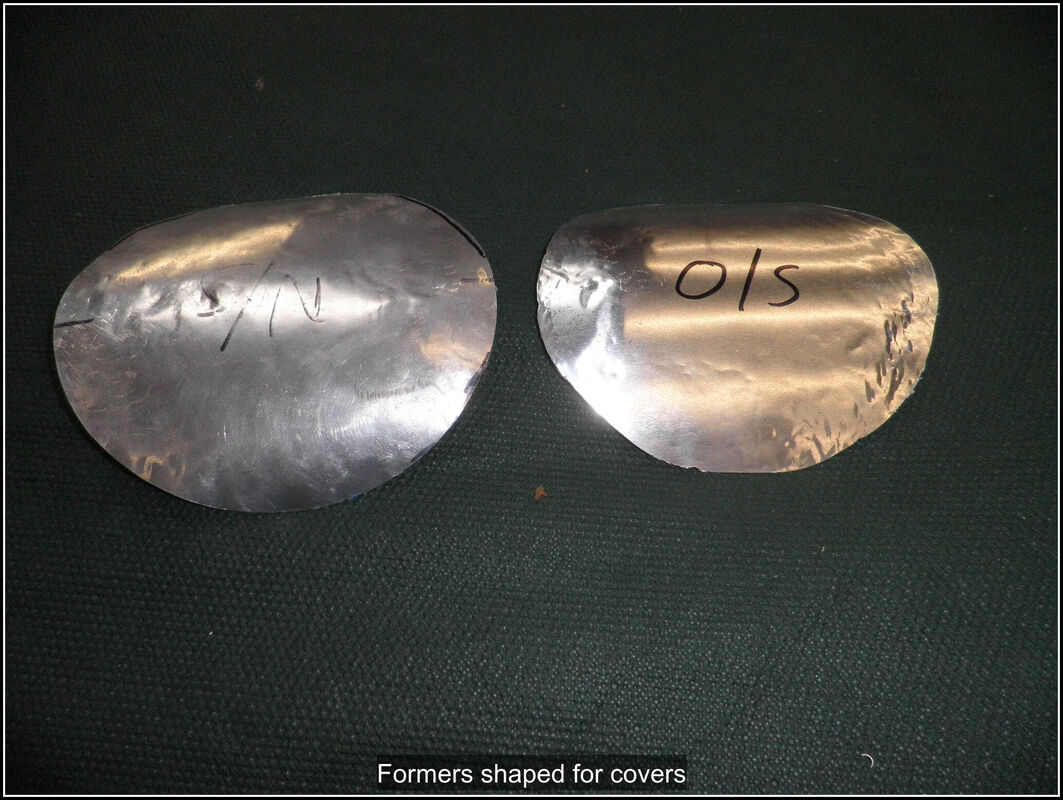
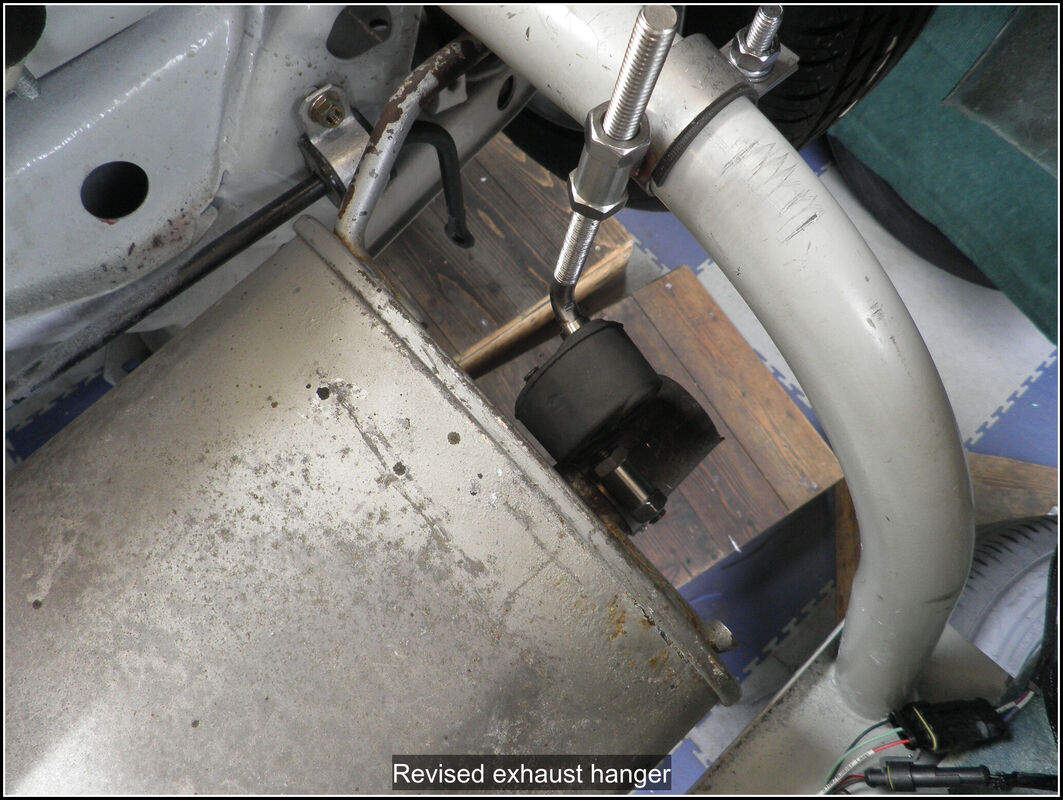
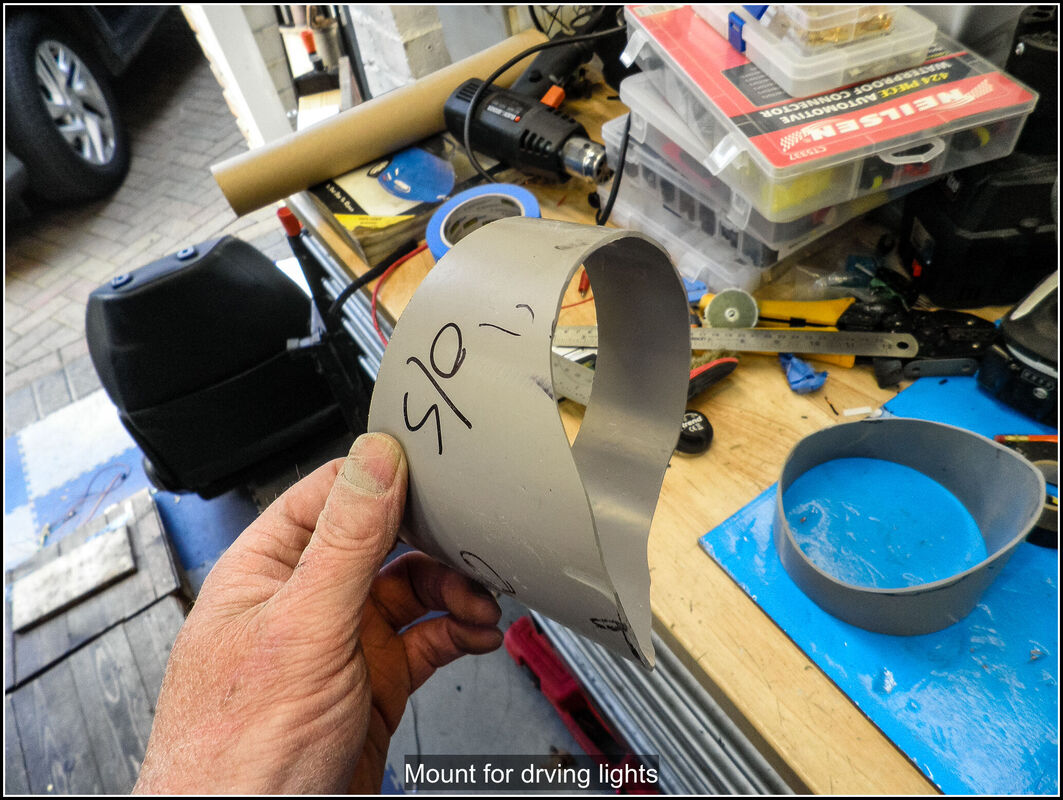
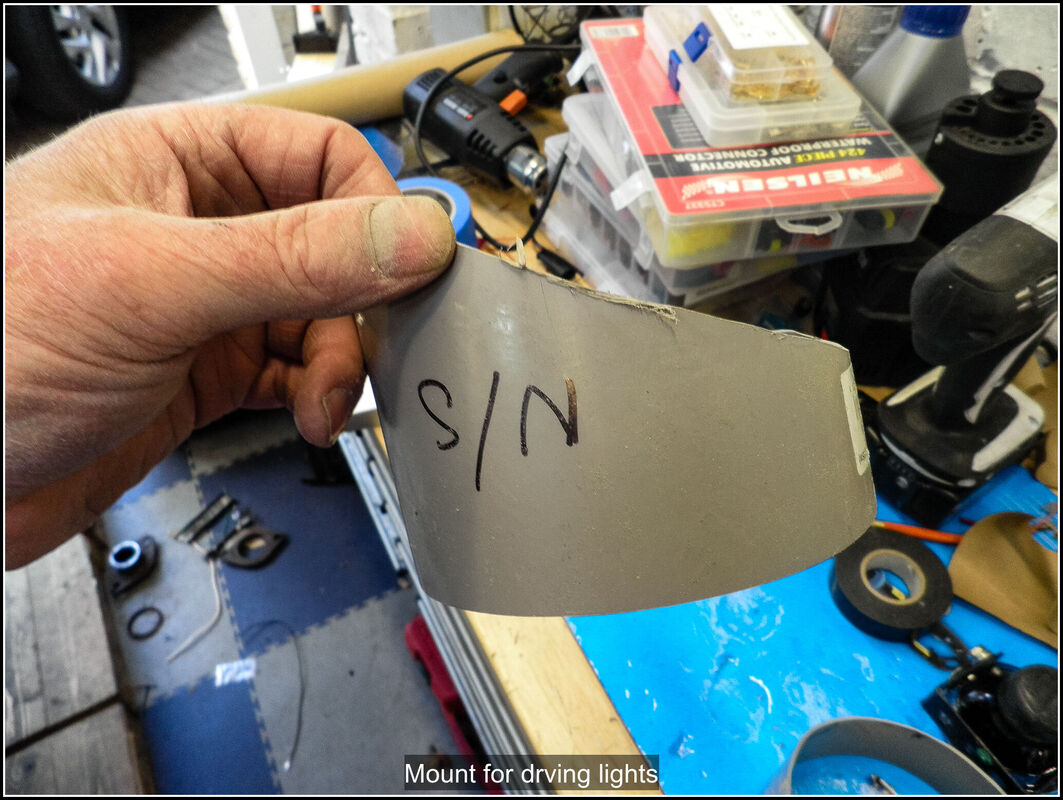
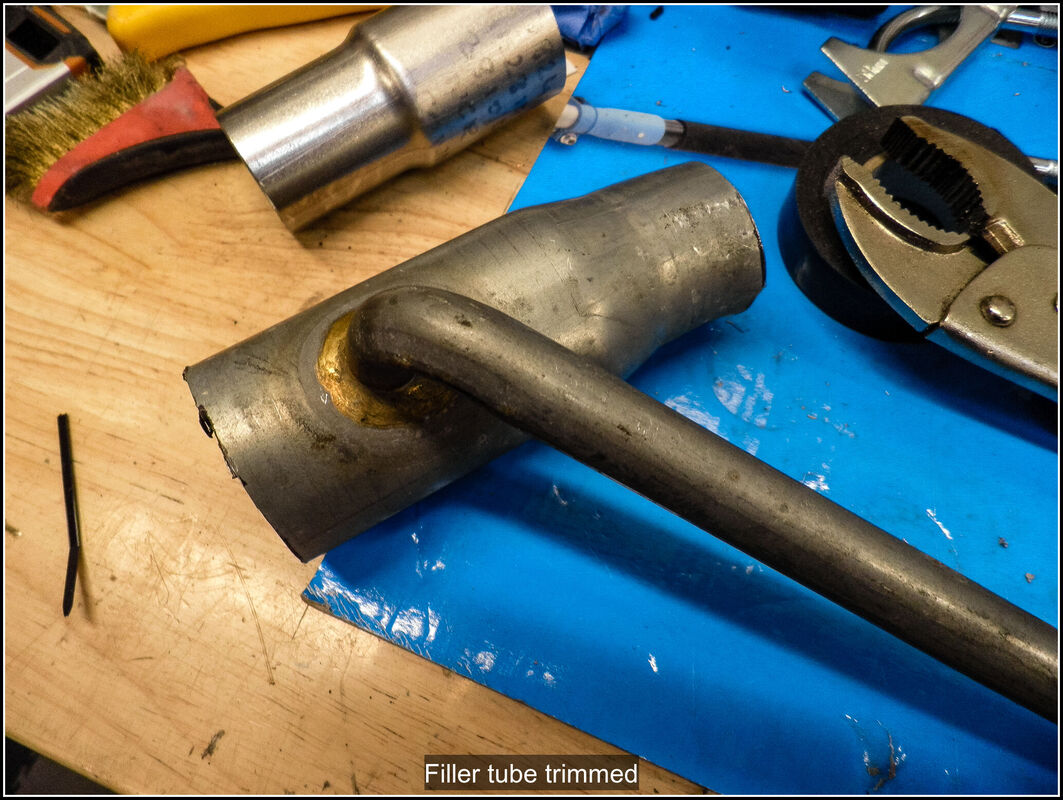
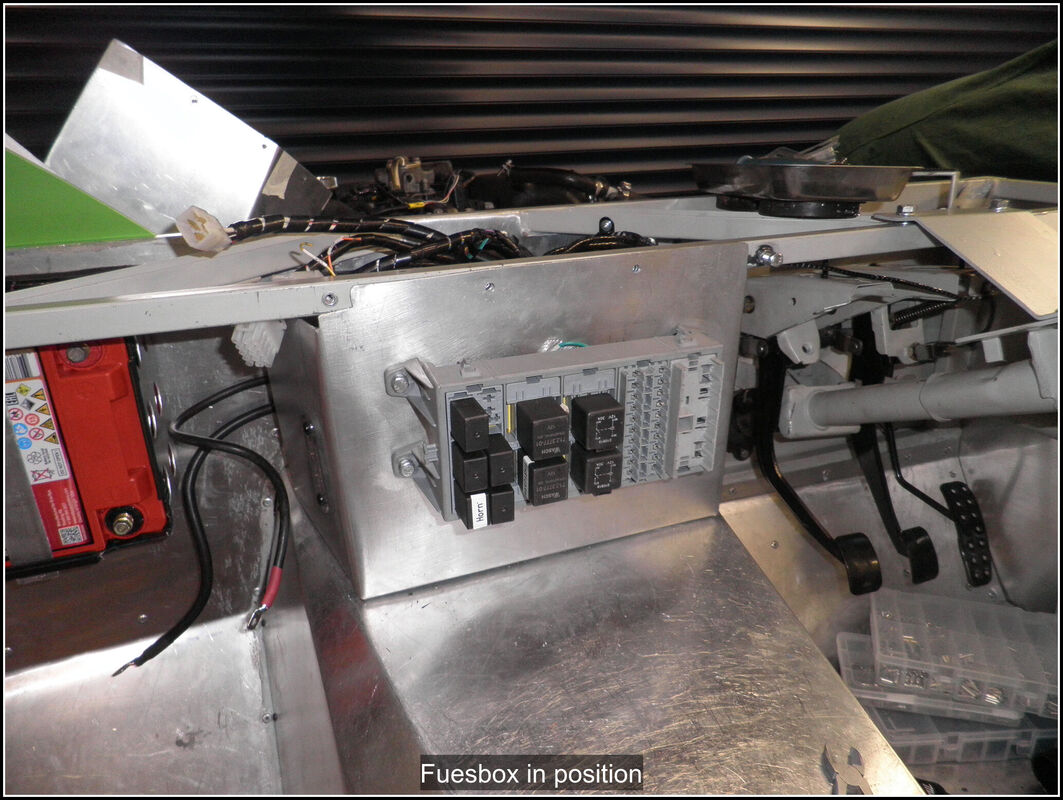
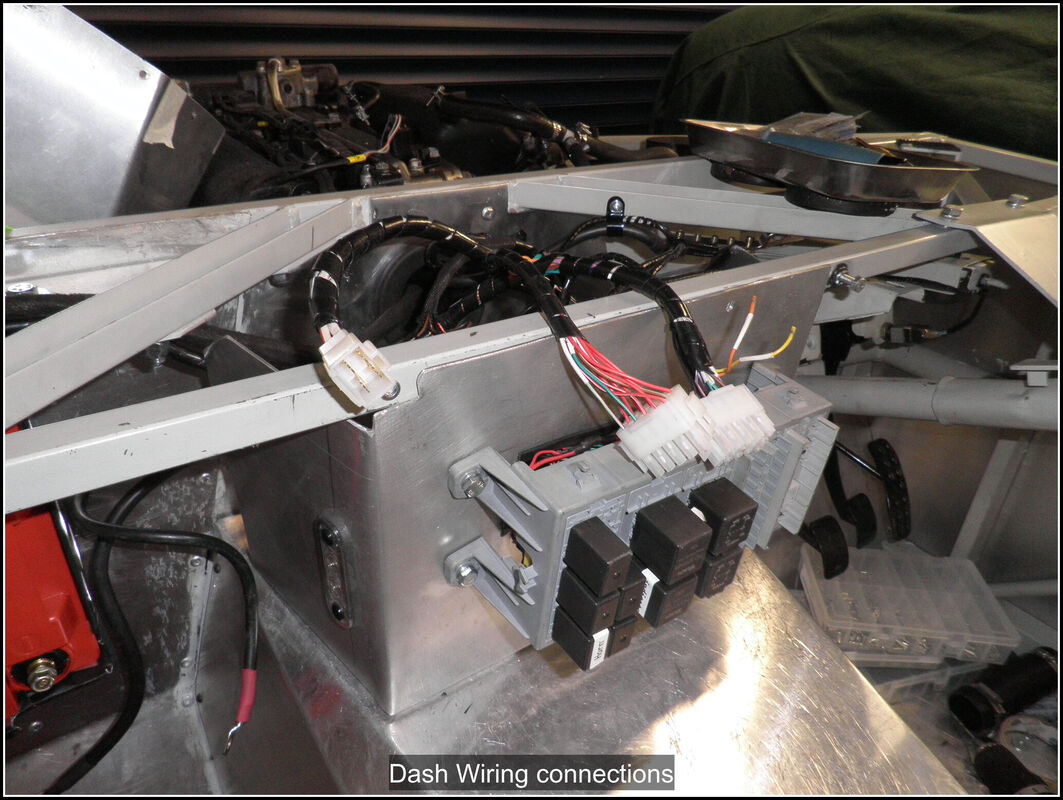
23 July 2022 I've been doing a lot of thinking about the drip tray. I was trying to come up with a way of making a mould so I could make the drip tray off that. Then I had an idea – I can use the underneath of the fuel tank. If I use that as the plug and make the drip tray that shape I can then mount that to the chassis below the tank. The finish can be quite rough, and I'll cover it in some of the GRP sealer I'm going to paint the inside of the shell with. As long as it doesn't stick to the tank! I made a start on that by turning the tank over and putting it on the bench. I decreased it with some all purpose wipes and a bit of brake cleaner. Then I taped over the holes round the edge. The tank is covered in some sort of rubber coating, which I left on there. I applied several coats of PVA glue as a release agent, I wasn't sure how much dilution I needed but in the end I decided I used less than 1:1 just so it was thin enough to brush out. I left the PVA to dry fully overnight. In between coats I finished of the termination on the front loom for the driving lights then I wrapped the loom and added p-clips for the wiring in the body. The chassis loom is temporarily strapped to the chassis with tie wraps. I'll add some p-clips later on when the body is off. 24 July 2022 I cut up enough chopped strand mat to cover the fuel tank with a couple of layers, then mixed up some resin and applied it to the fuel tank. I let that cure for a while then applied overlapping mat and resin. I then left that to dry overnight. Tomorrow we will see if it comes off the fuel tank or not! 25 July 2022 Well that didn't go to plan! It took about 3 hours of prying and levering with scrapers, screwdrivers, and pry bars to get the cast off the fuel tank. There is damage to the drip tray but I think it is repairable. The coating on the underside of the fuel tank is heavily gouged from the tools I used. The fibre glass has released quite well in terms of the surface finish but the bond was much to strong. I think if I have to do something similar again I will invest in some wax or similar. I'll respray the underneath of the tank with Raptor or something similar once I've cleaned it up. The drip tray needs cutting down to fit in the space and repairs to some parts but I think overall I am counting that as a success. 30 July 2022 I tried trimming the drip tray to fit in the space. However by the time it fitted there wasn't much left. It needs a significant amount of fibre glass adding back yo make it work. So I've scrapped that idea. It was a good idea I think, it just didn't work as I planned, but that's part of the build experience. You try something sometimes it works, sometime you have to give up and try something else. I learned a bit about taking casts in fibreglass too. I found some Dinitrol stone chip in the garage so sprayed over the underside of the fuel tank to cover up the mess I'd made of the coating. 1 August 2022 Did some thinking about what the purpose of the drip tray was; to me it's to stop fuel dripping on the exhaust. I also did some thinking about the tank and how it was installed in the MX5. It wasn't inside the body it was slung underneath and there wasn't a drip tray on that. So I decided to make a simple shield to go over the top of the exhaust pipe. Any fuel dripping on it would run down and drip on the floor. Providing there's an air gap between it and the exhaust it shouldn't be too hot. I made up a cardboard template and then cut it out of some thin aluminium and bent it over my sand filled pipe former. I made a cutout for the exhaust hanger. I made some brackets and bolted it to the subframe and the chassis near the prop-shaft tunnel. While I was under the car I put the subframe brace back on the car. I will need to make up a smaller plate to cover the last bit under the subframe. That pretty much completed my list of jobs for this stage, next time the body will be coming off and then I've got a list of things to tackle. Biggest one is to track down the engine rough running I encountered last time I ran it. I'm hoping it's a simple air leak.
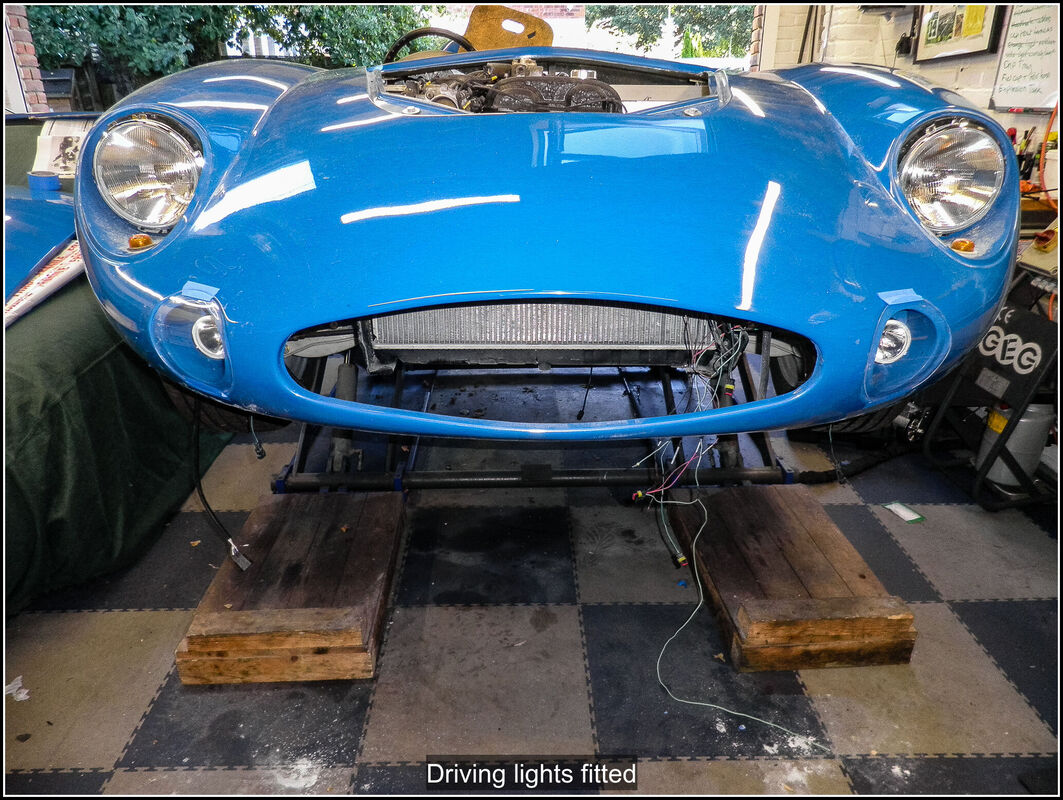
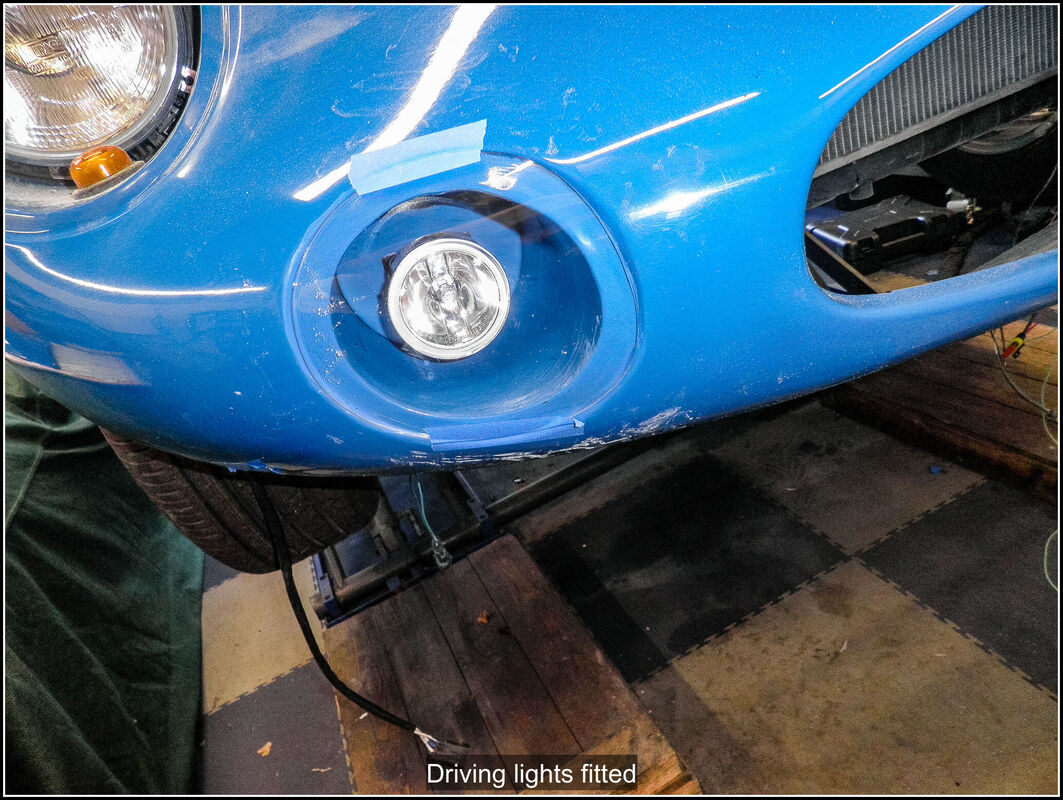
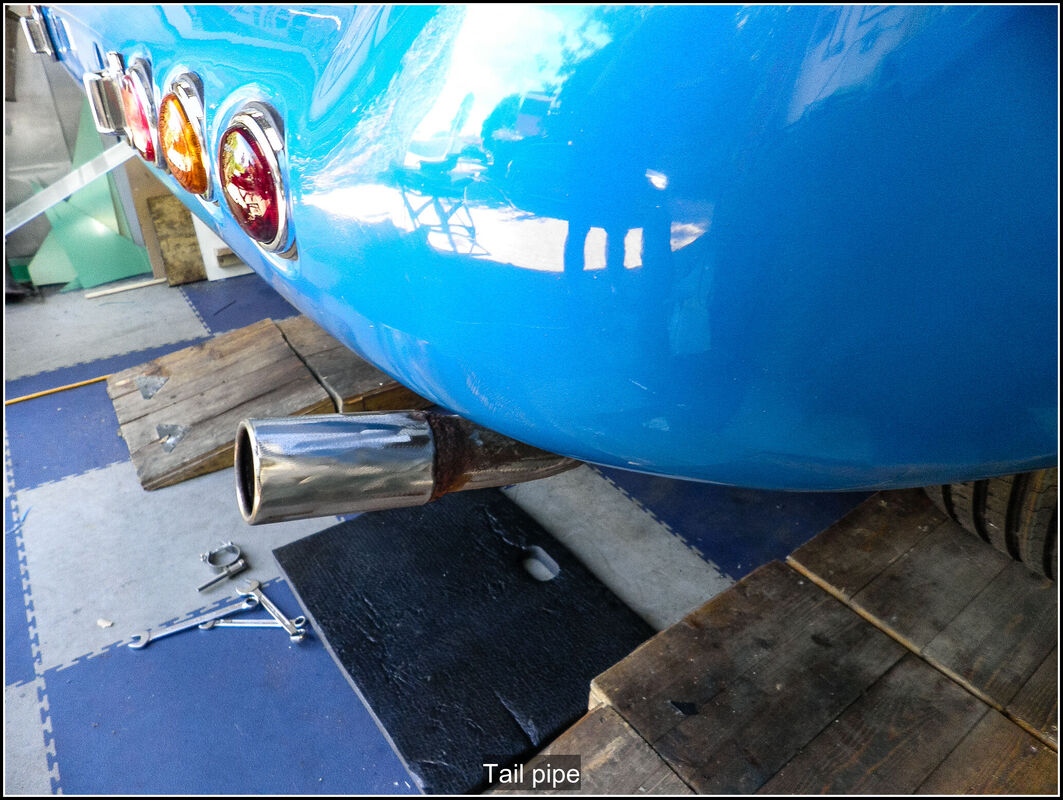
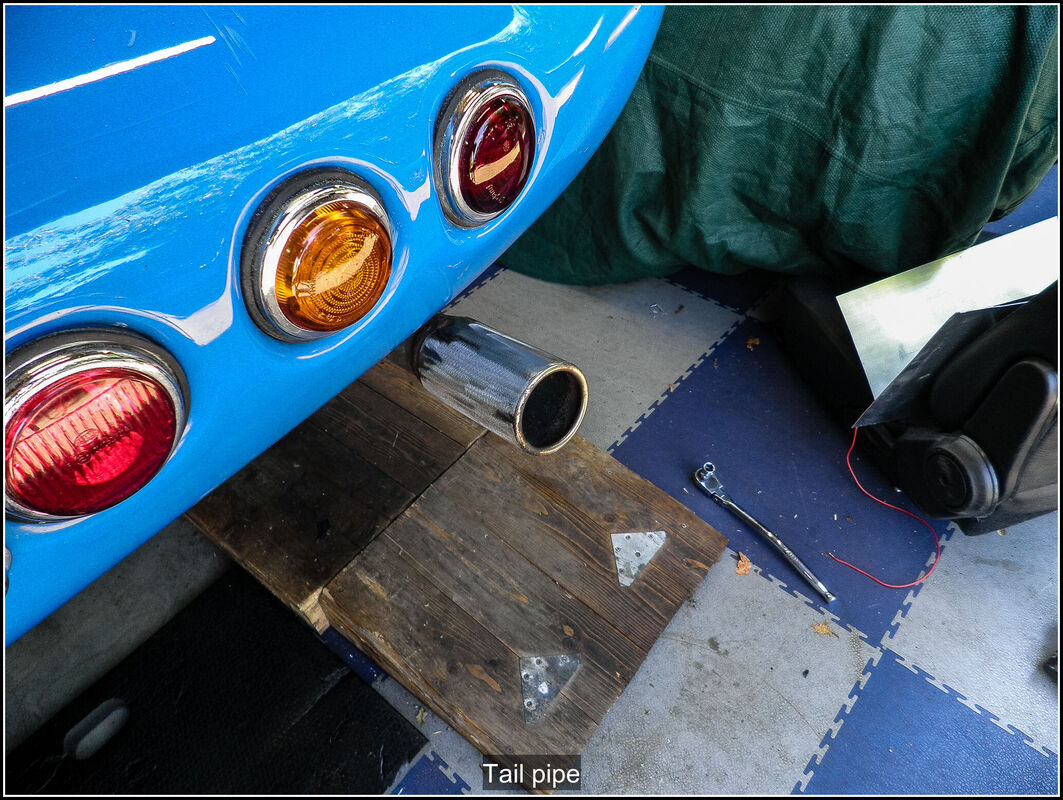
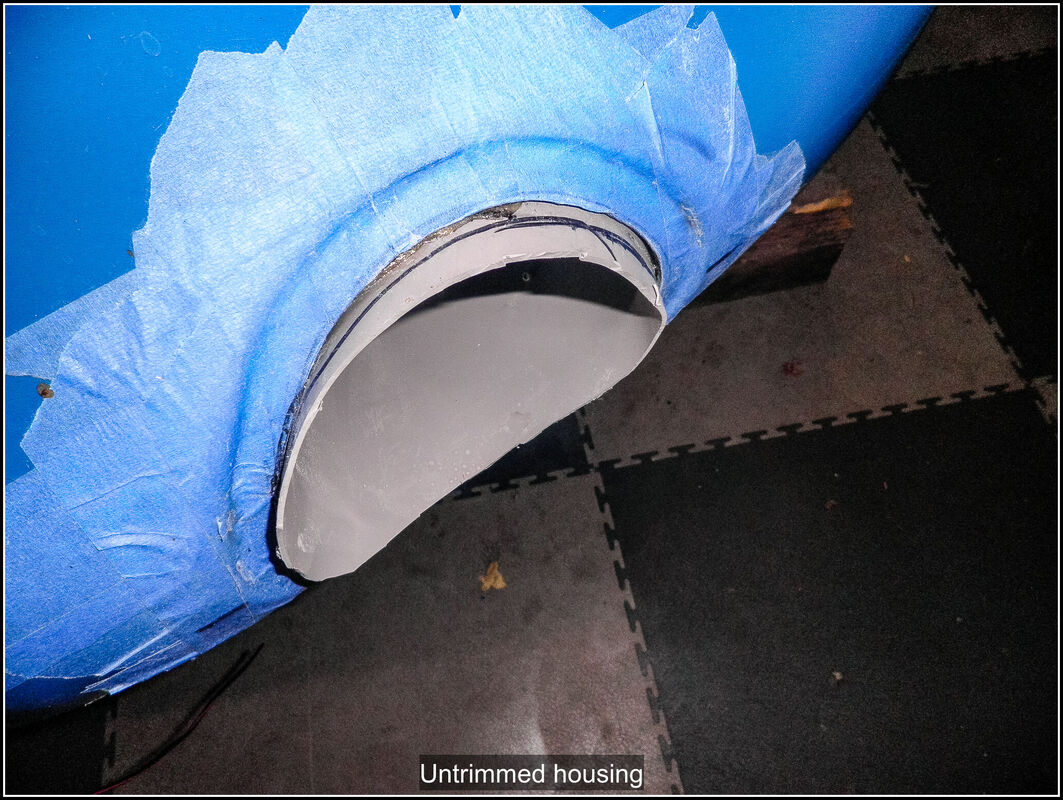
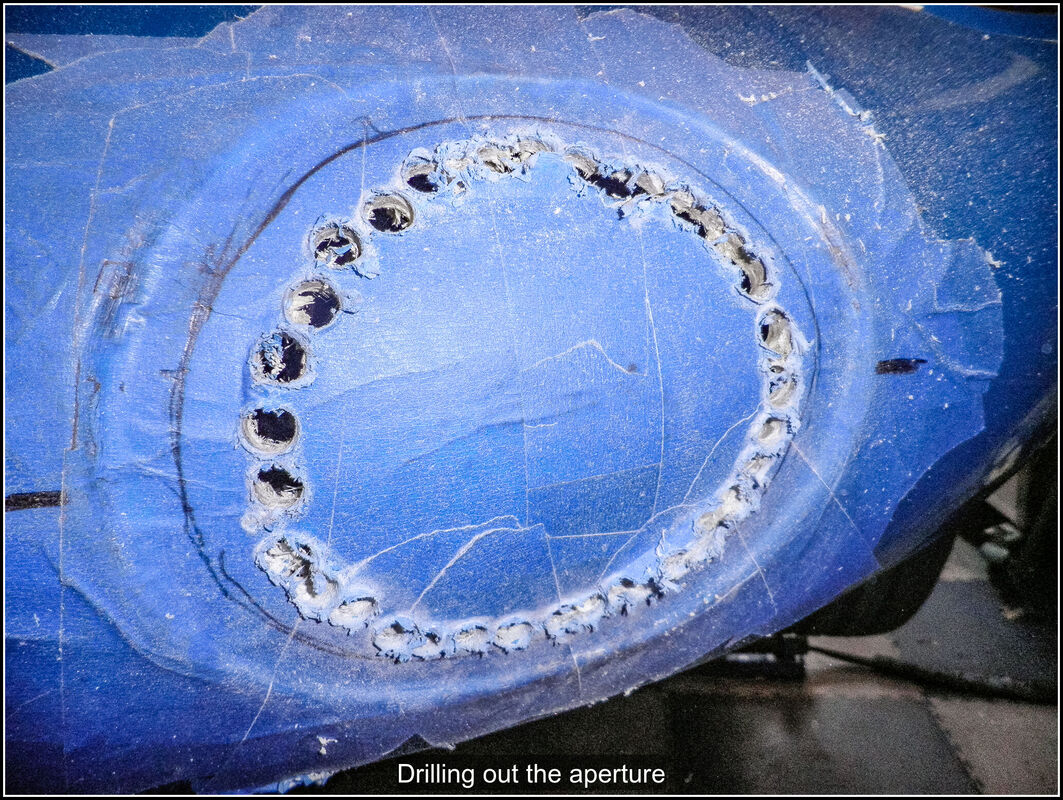
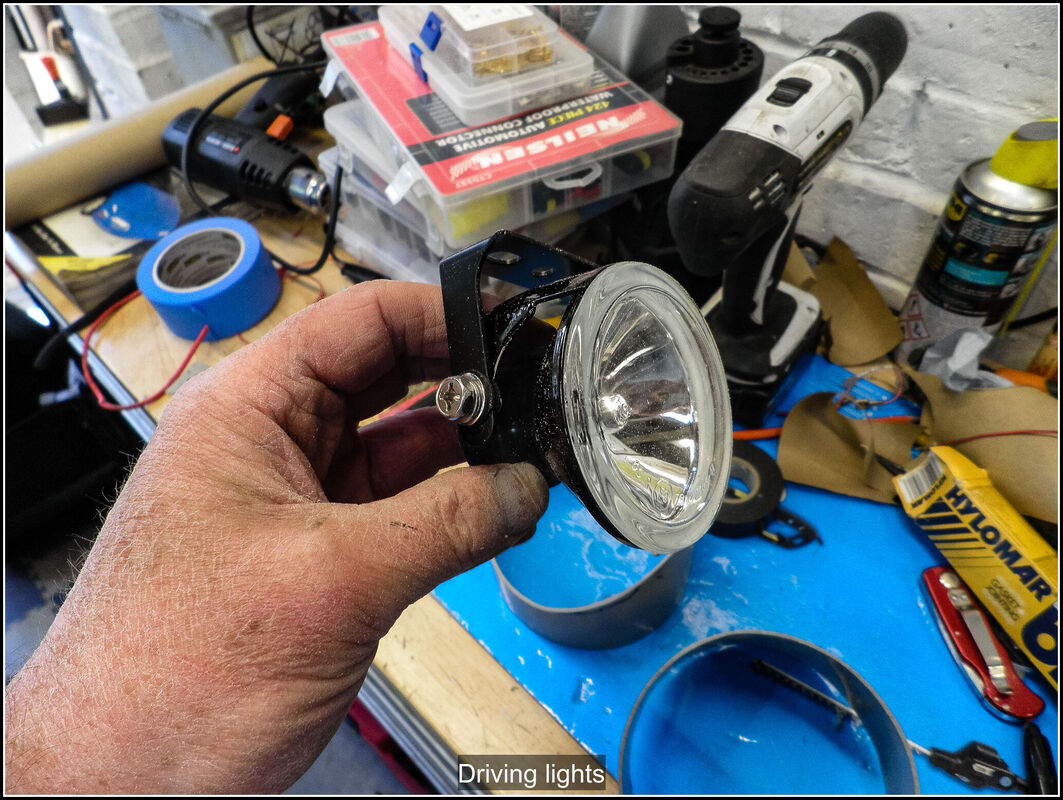
0 Comments
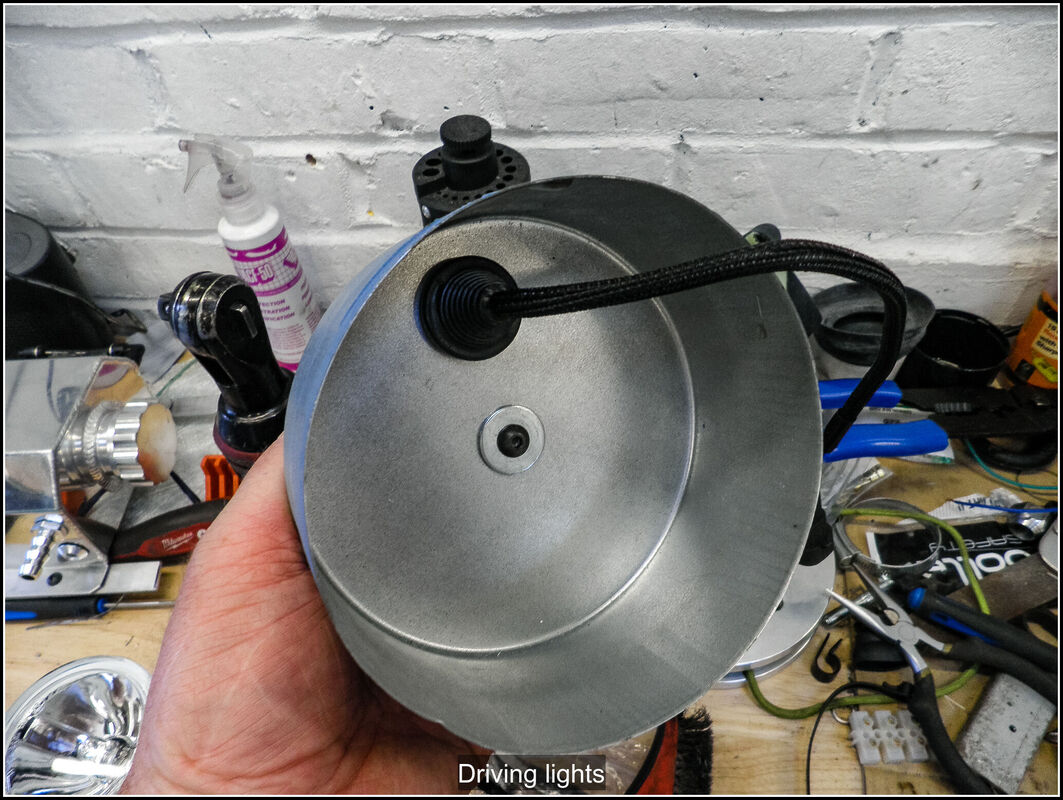
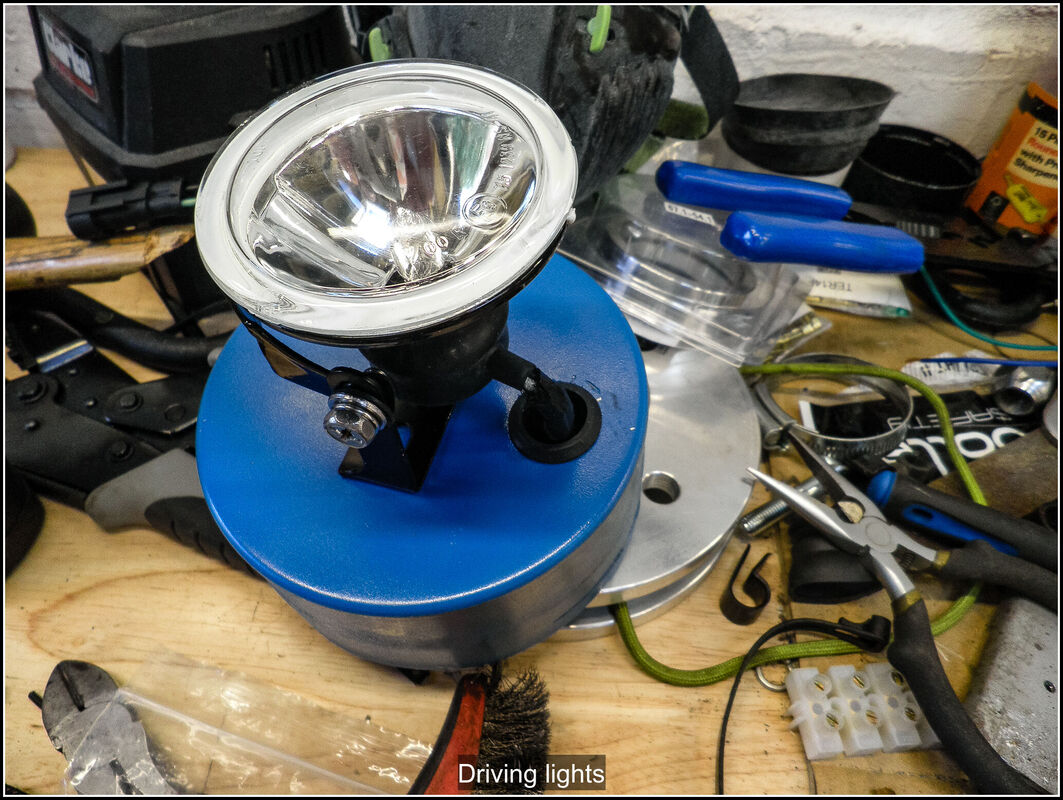
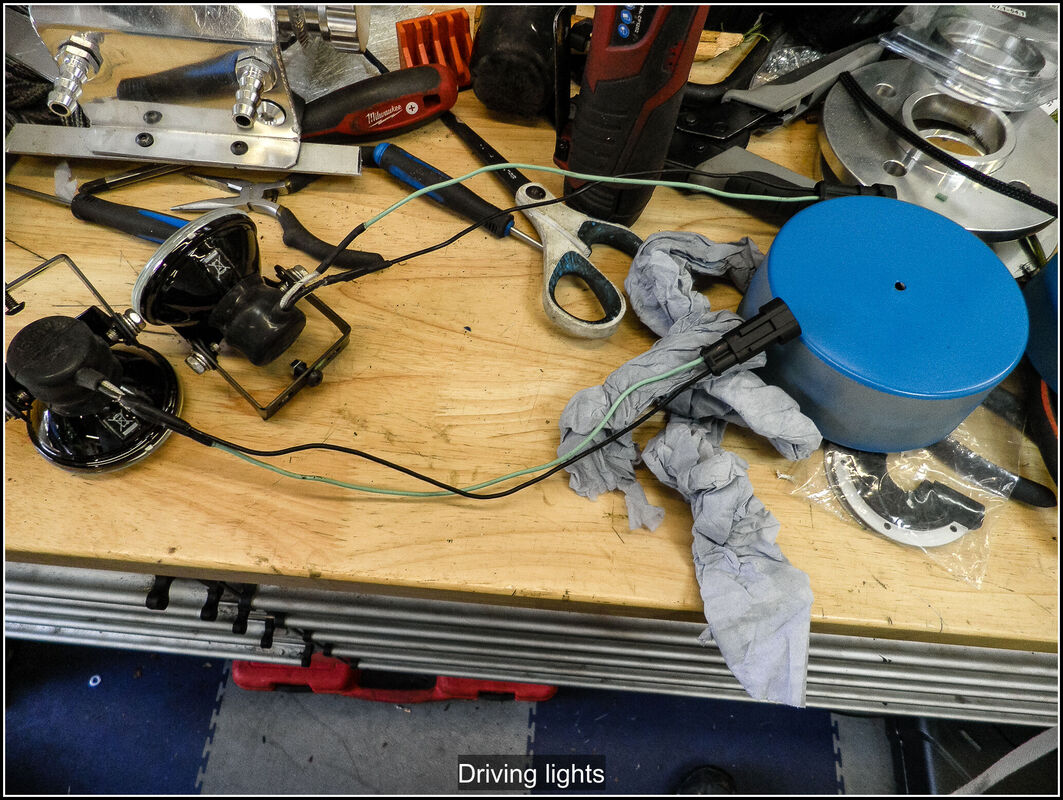
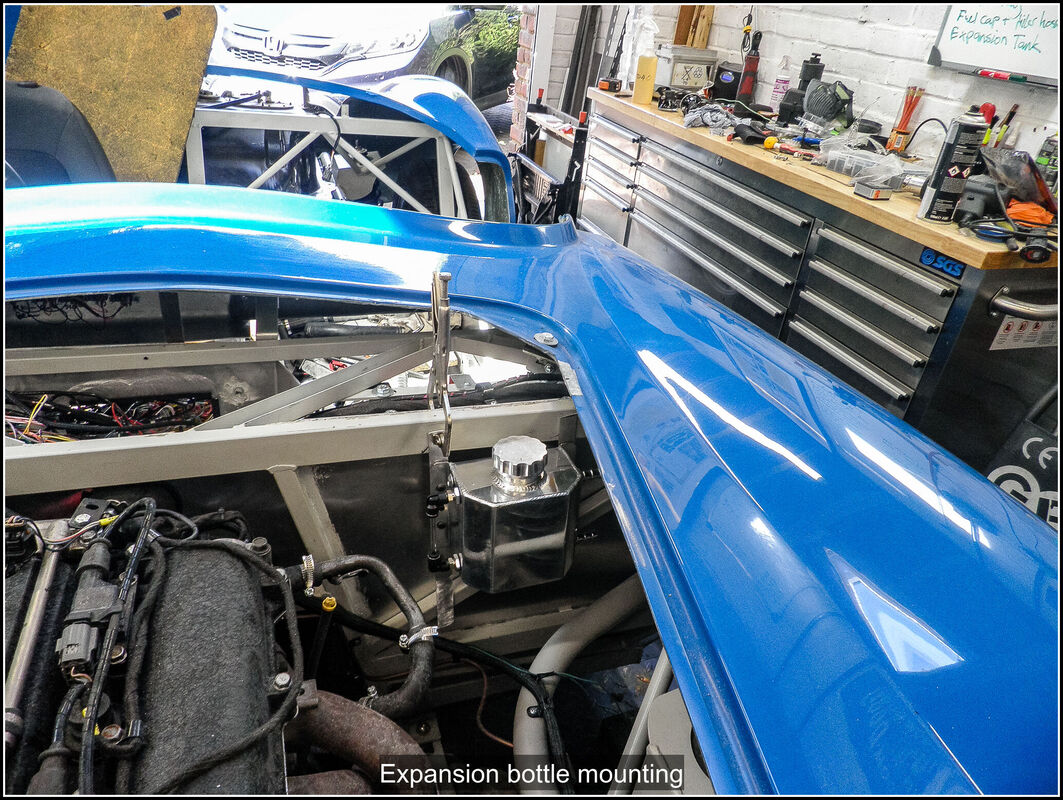
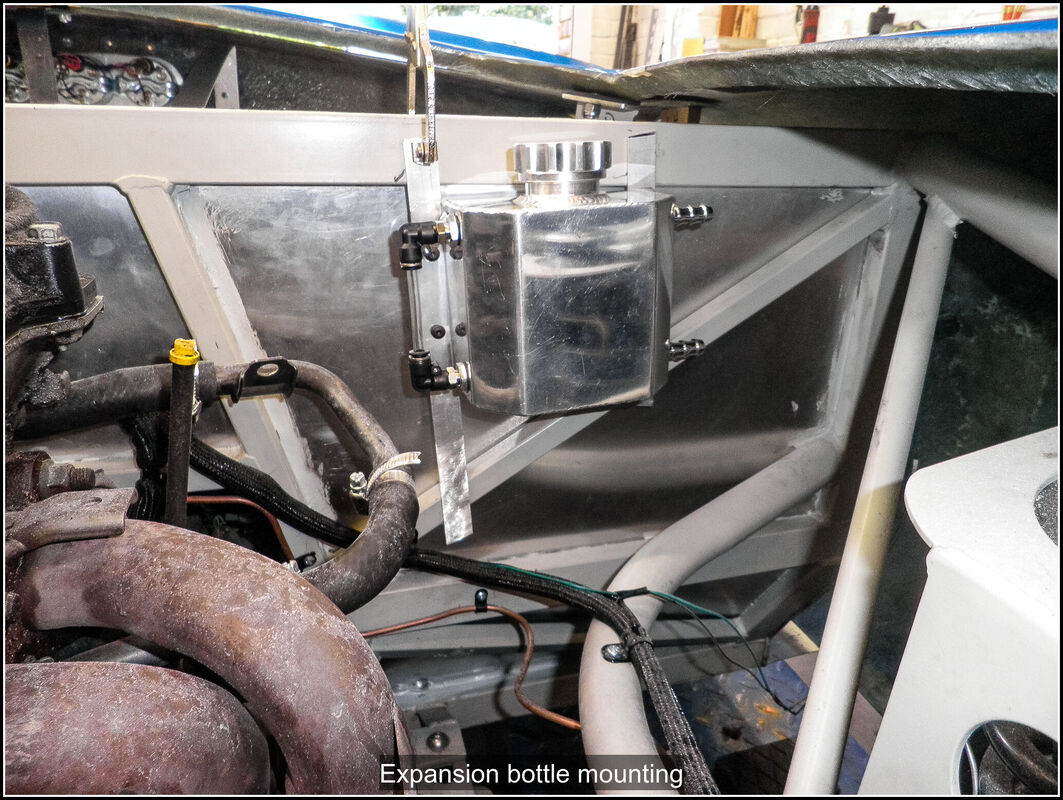
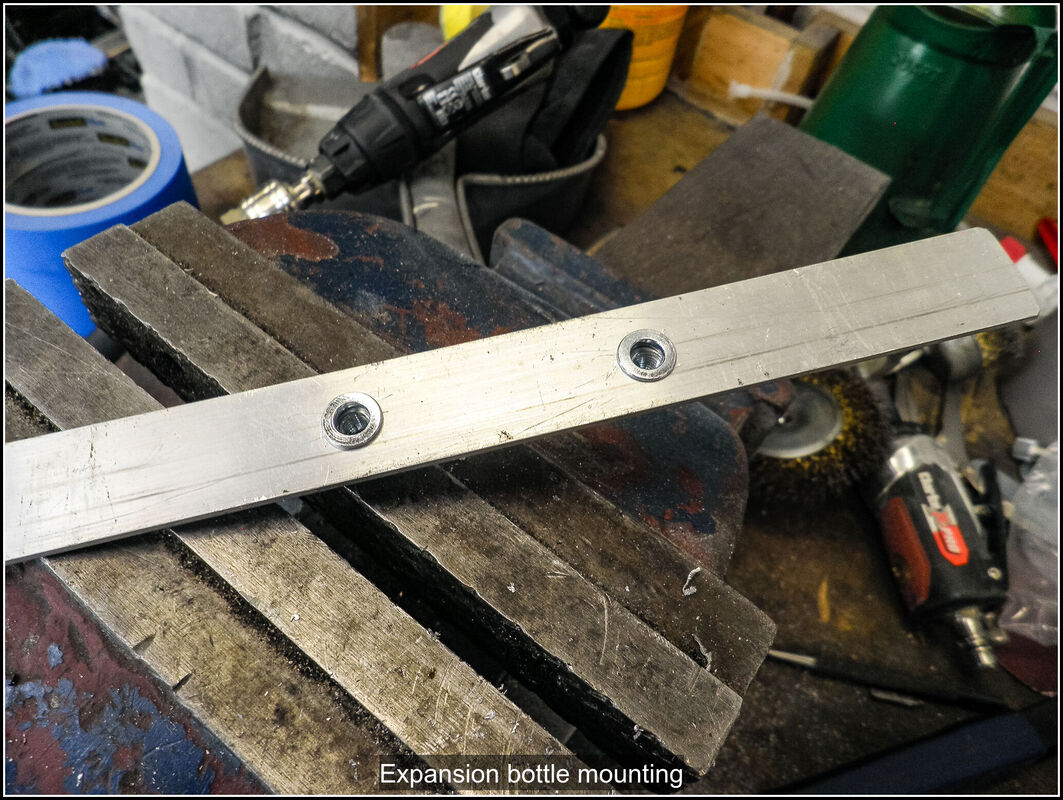
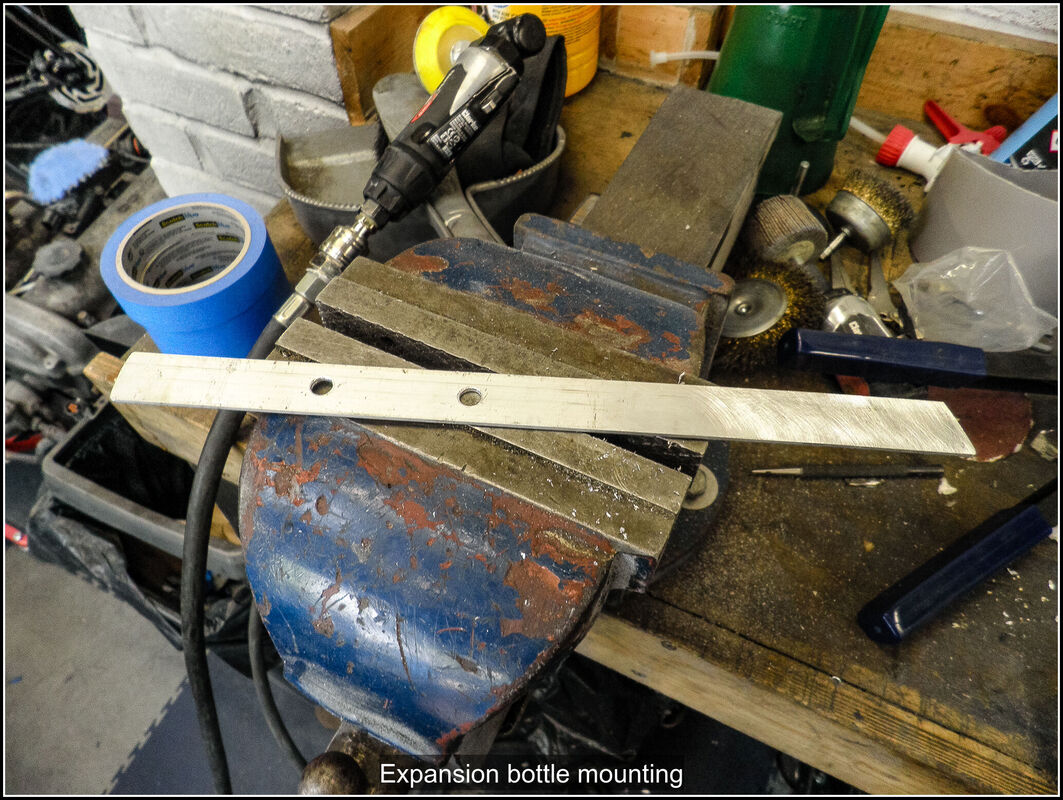
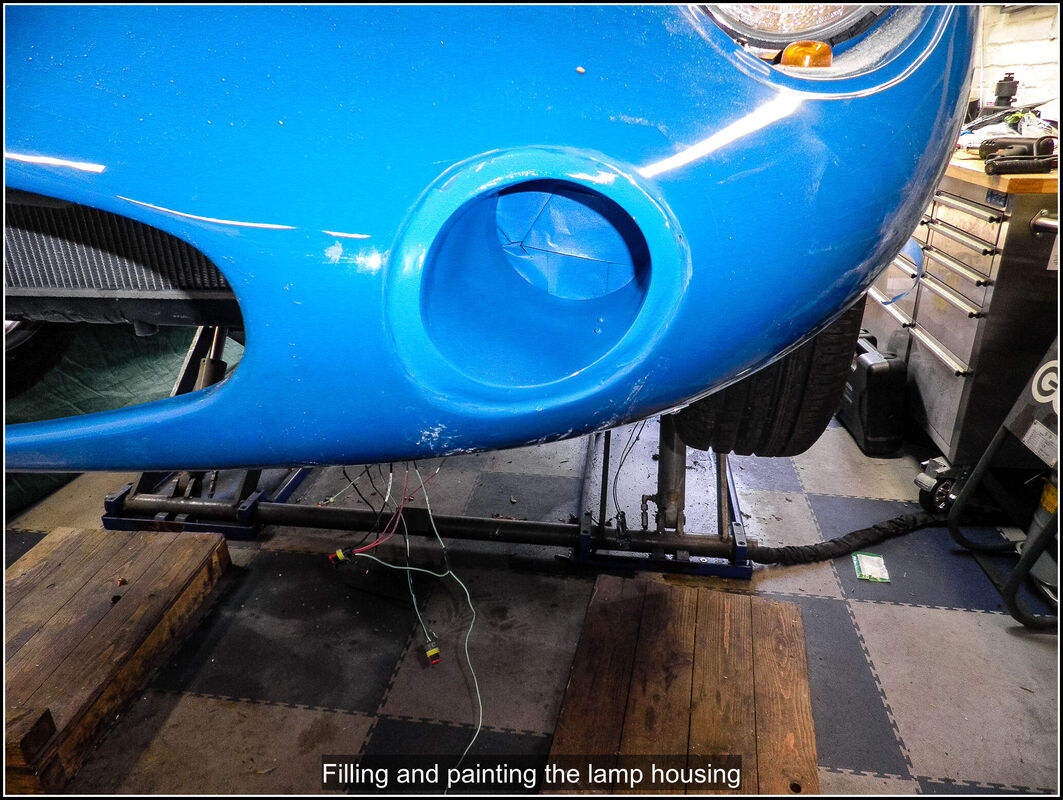
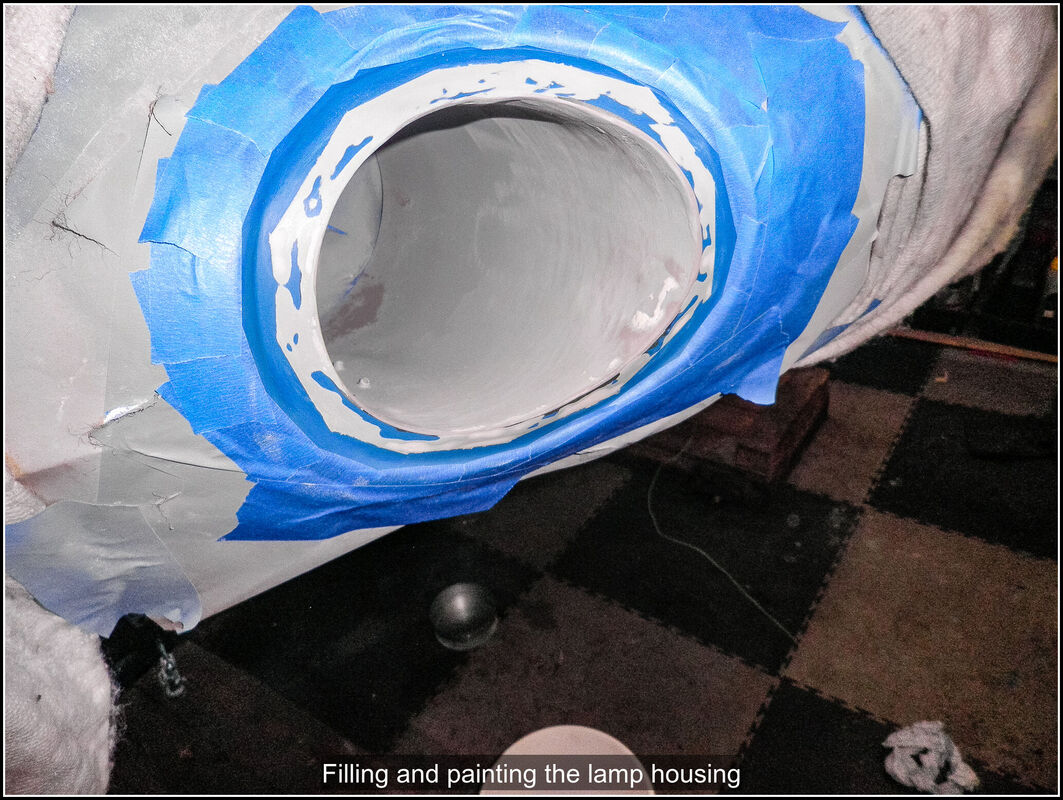
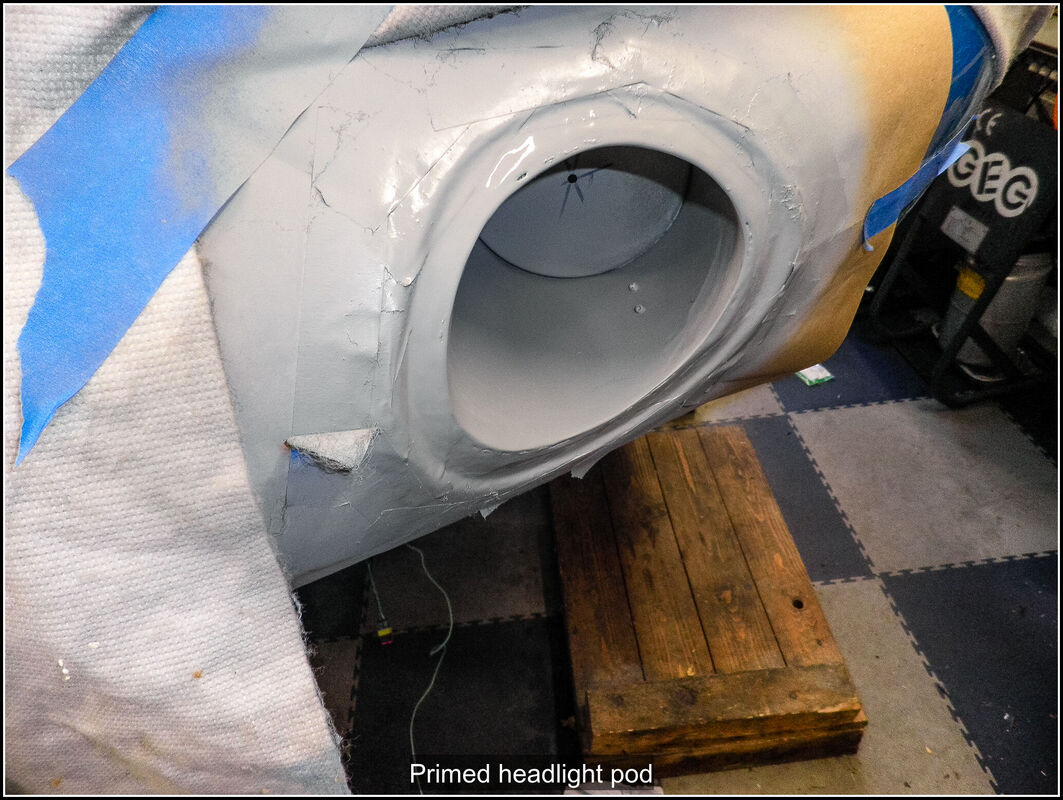
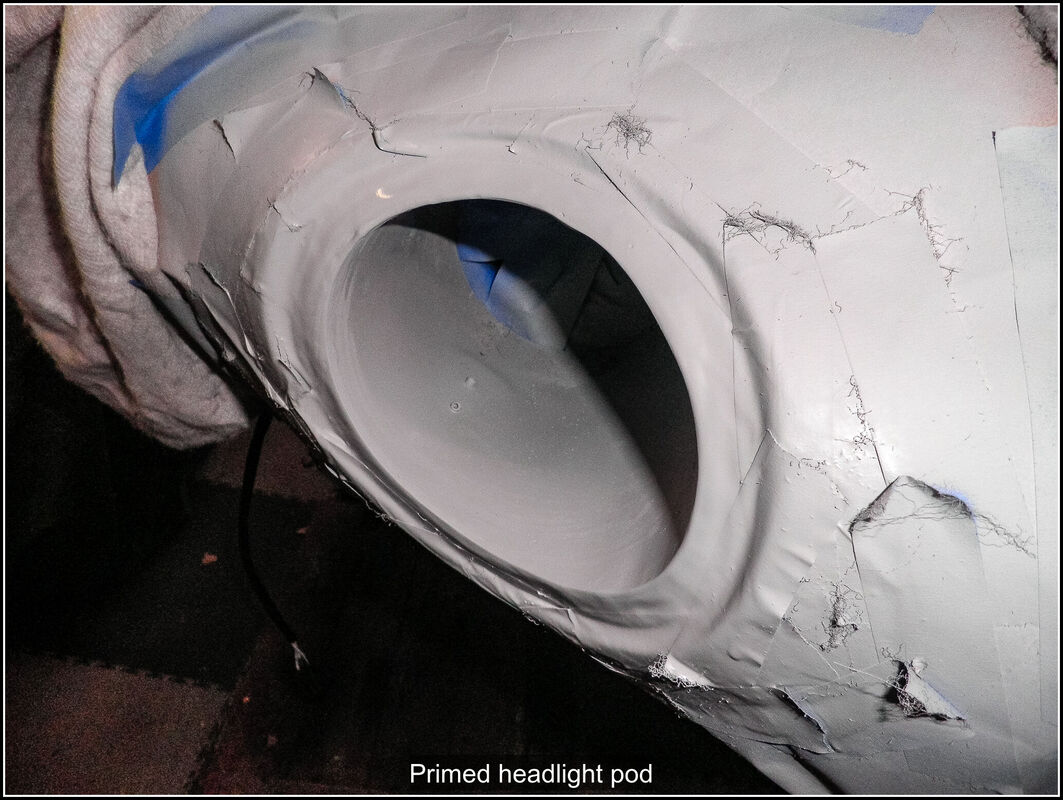
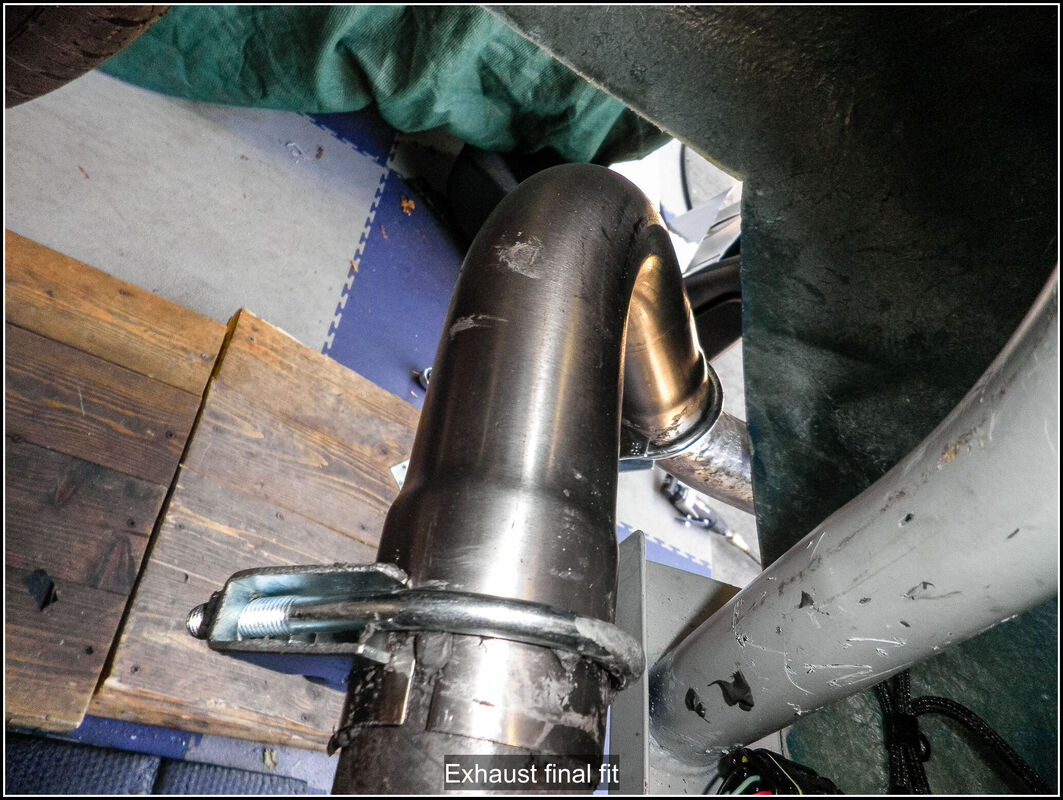
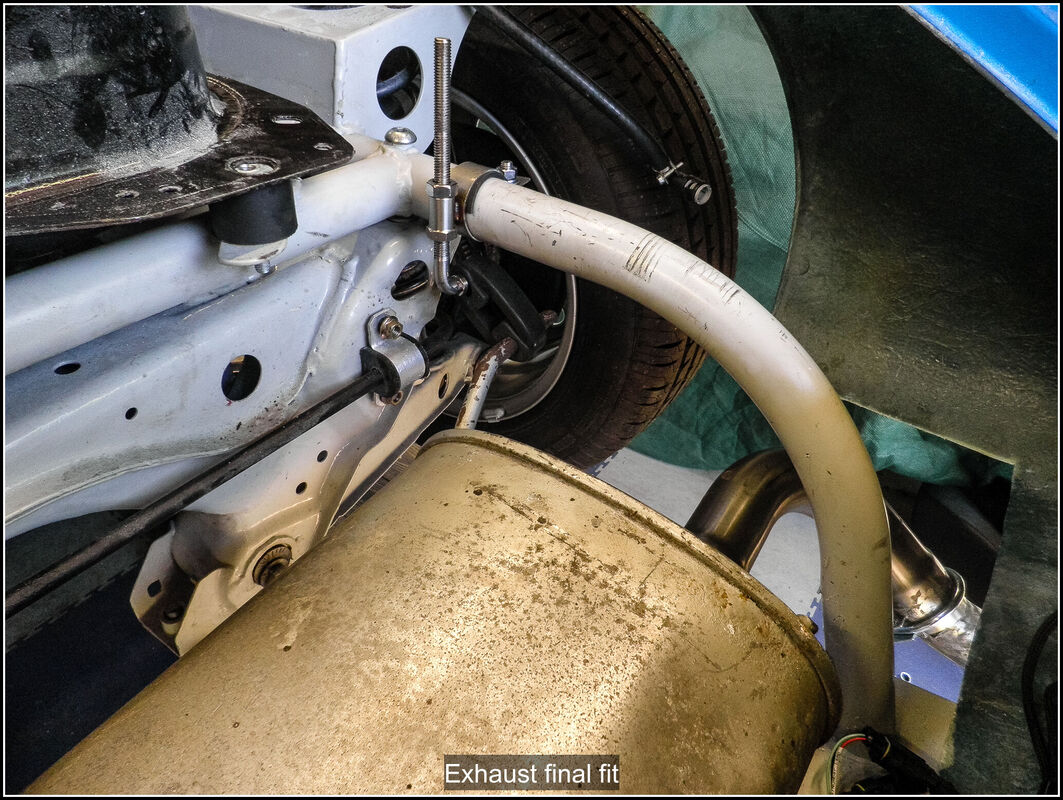
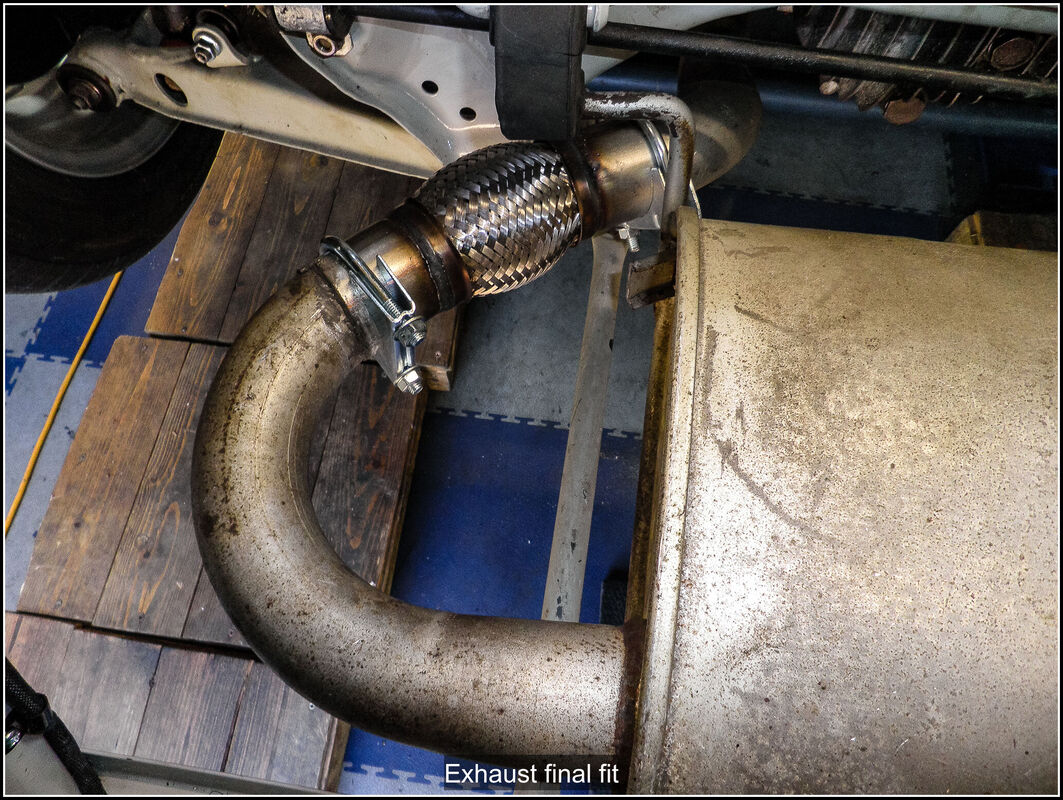
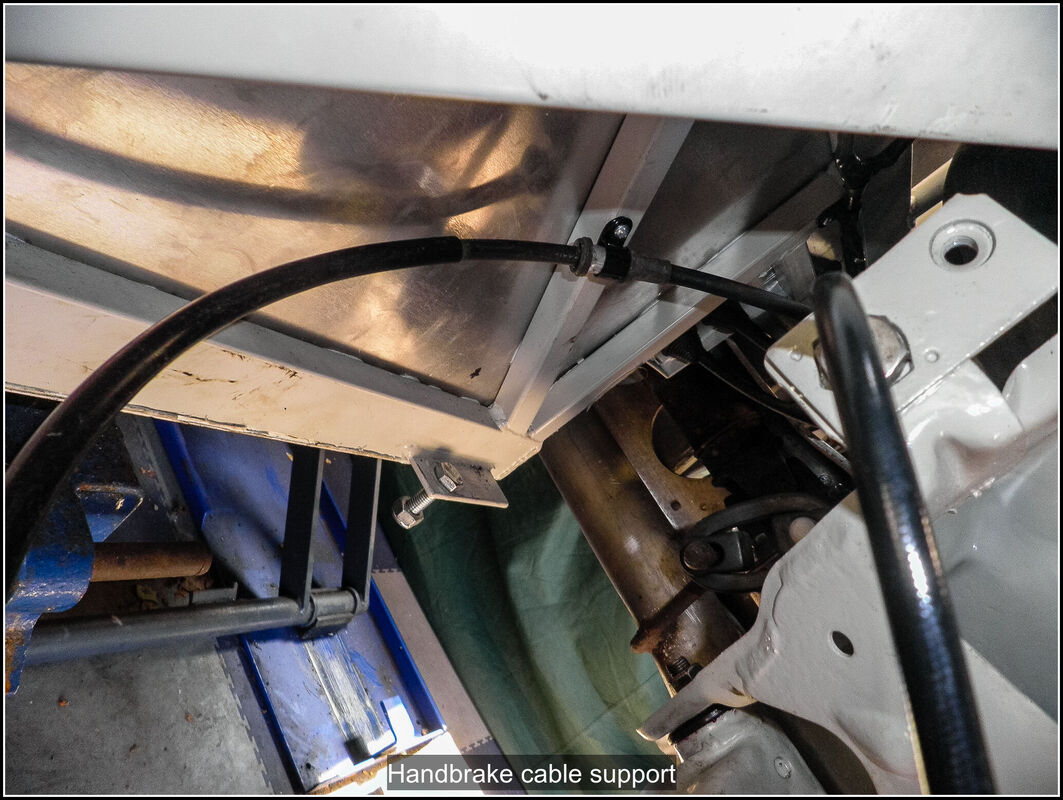
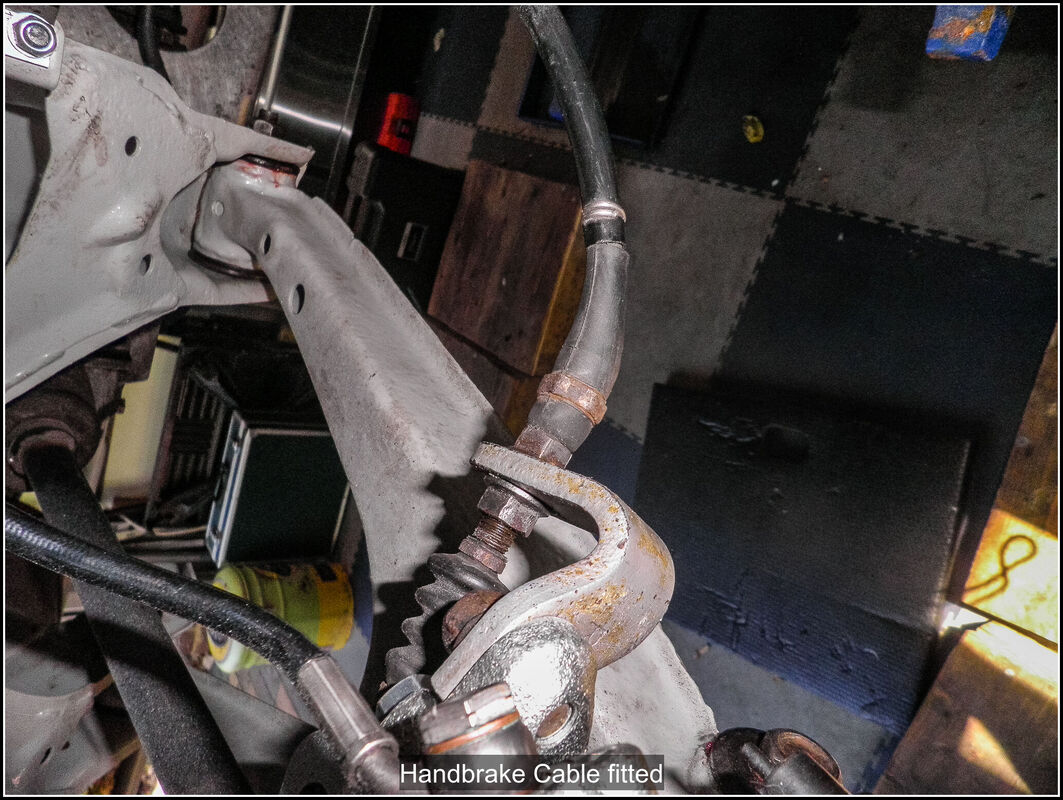
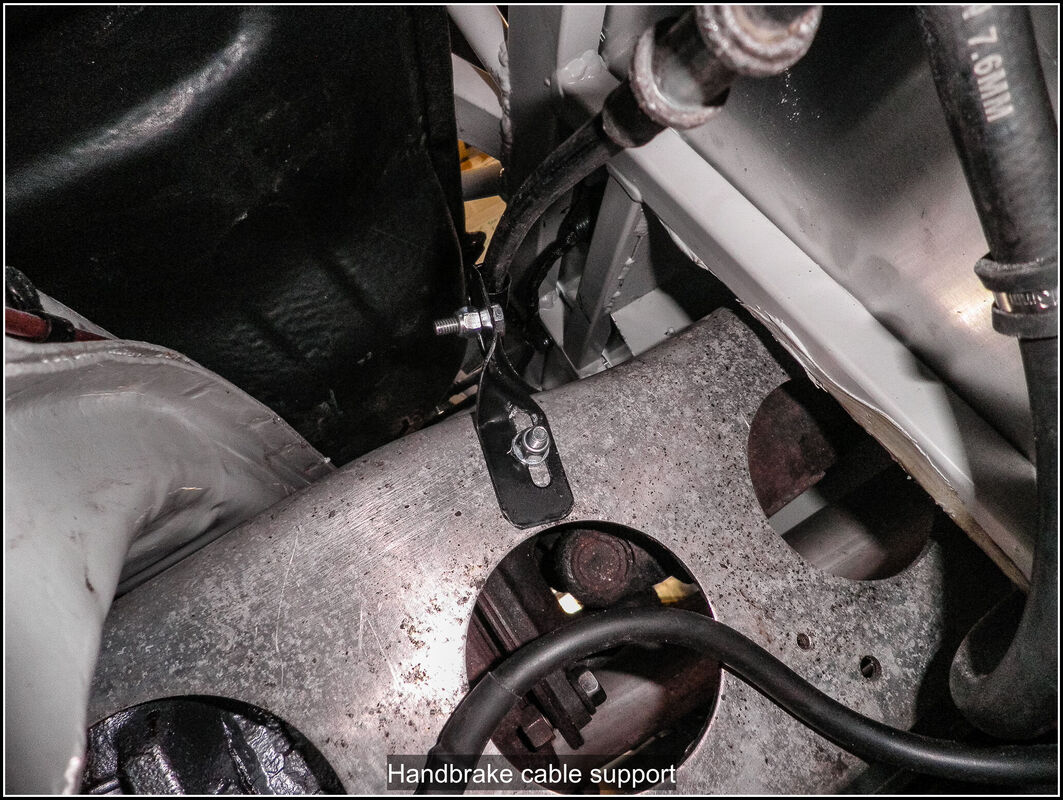
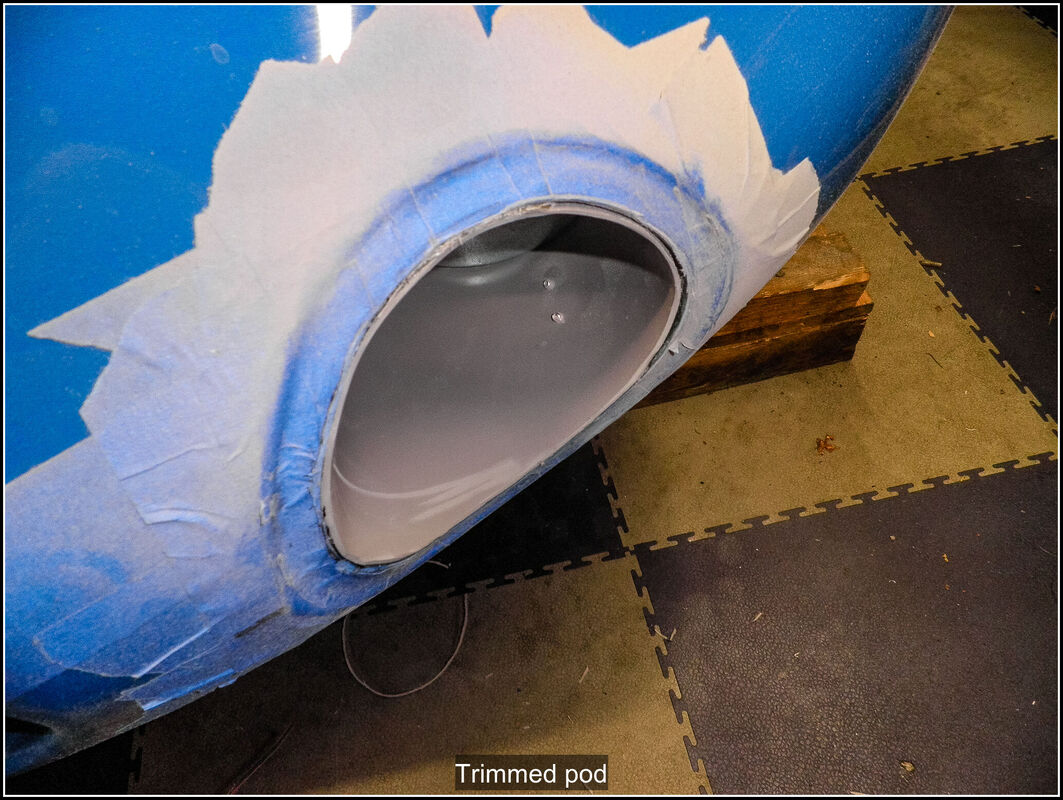
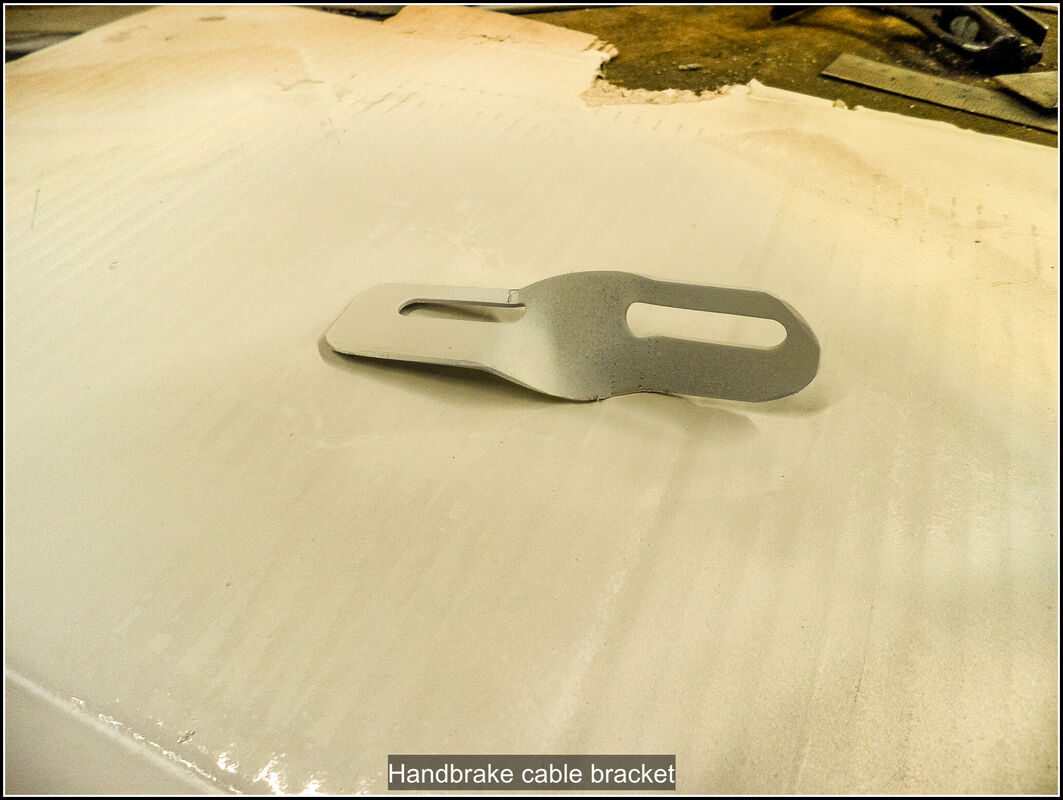
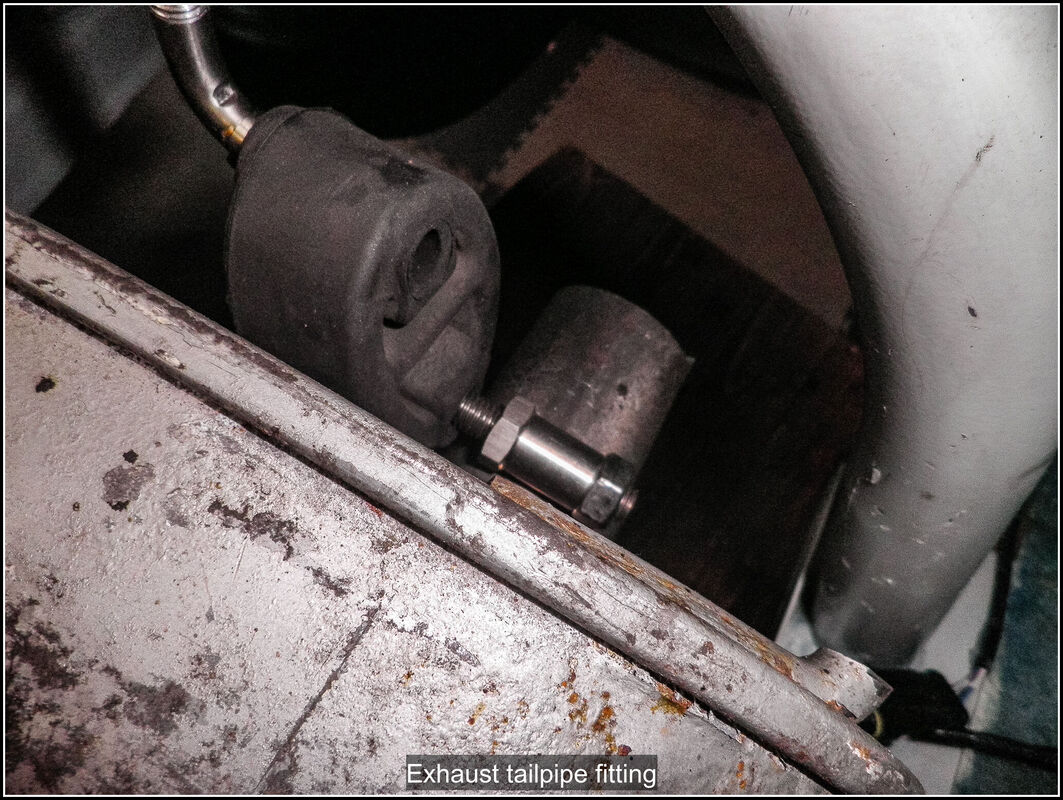
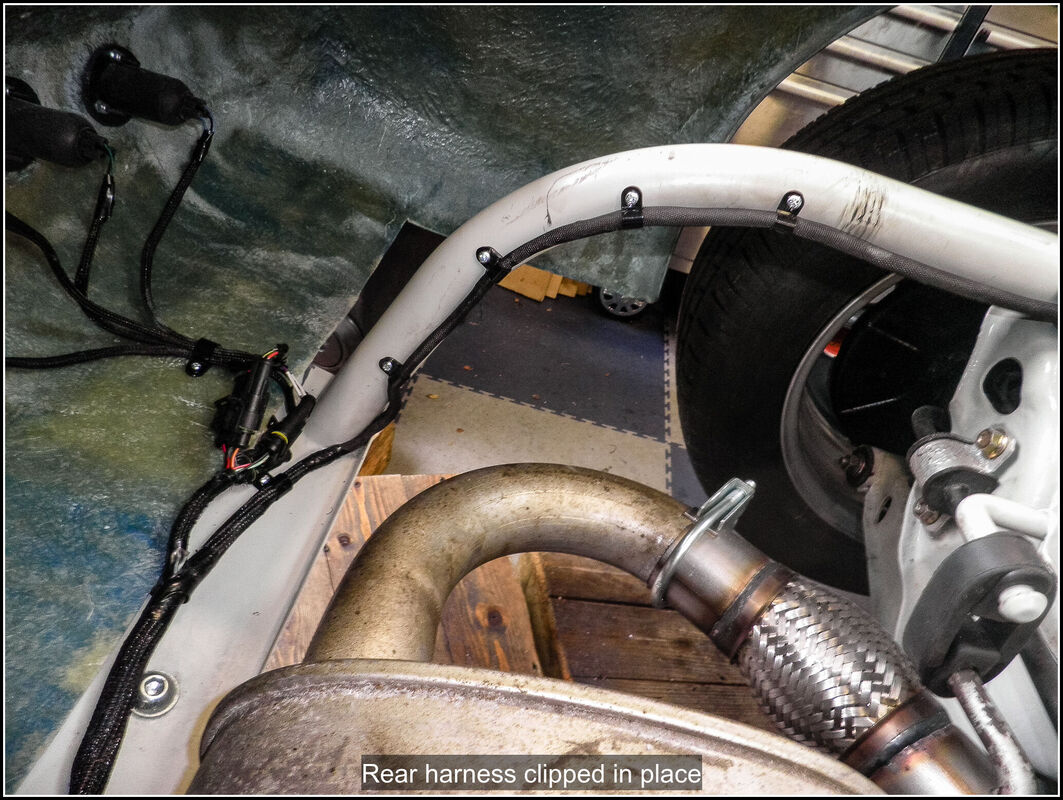
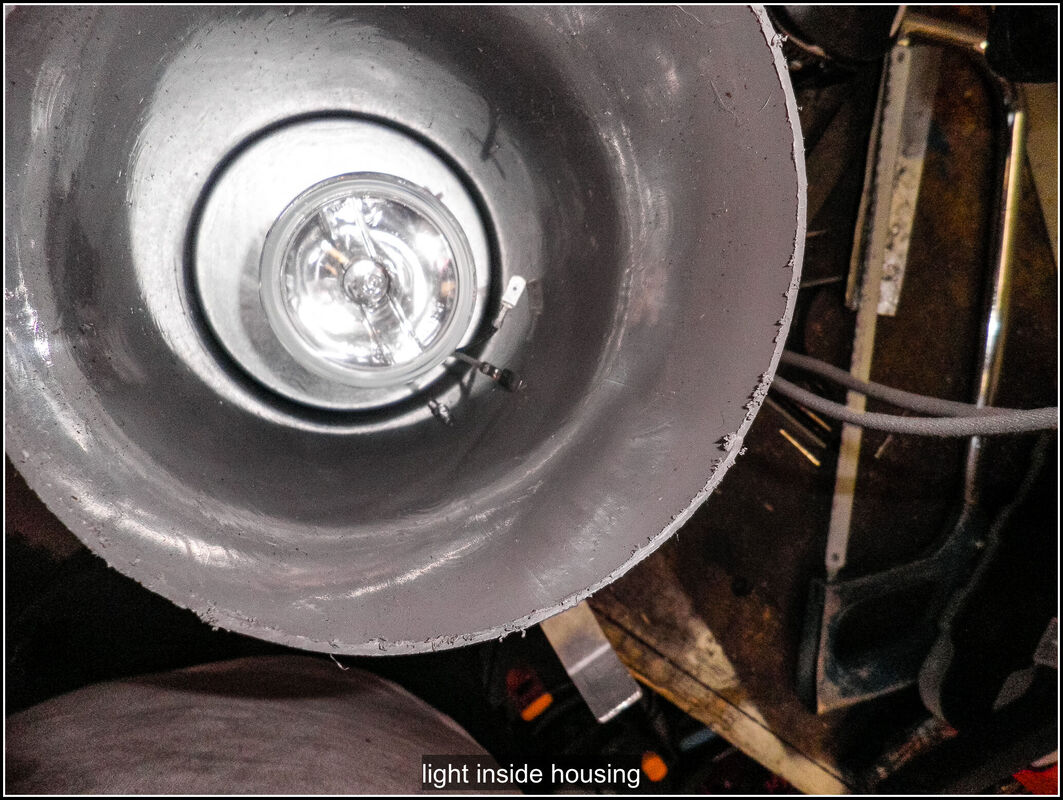
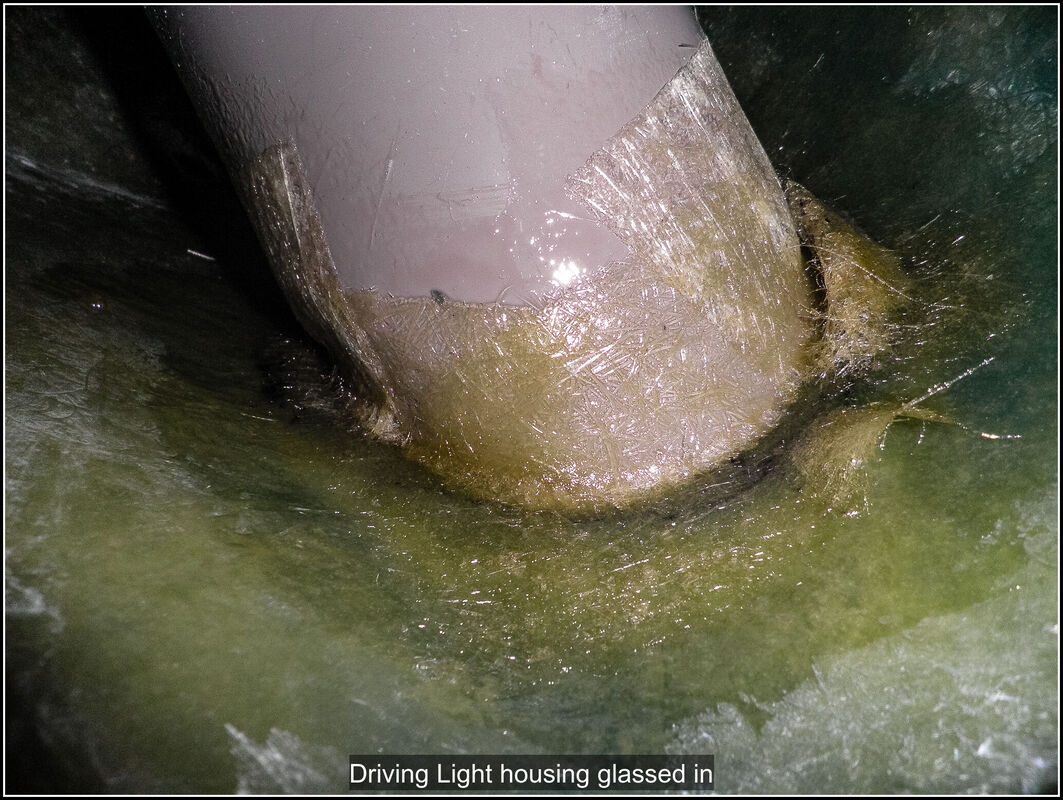
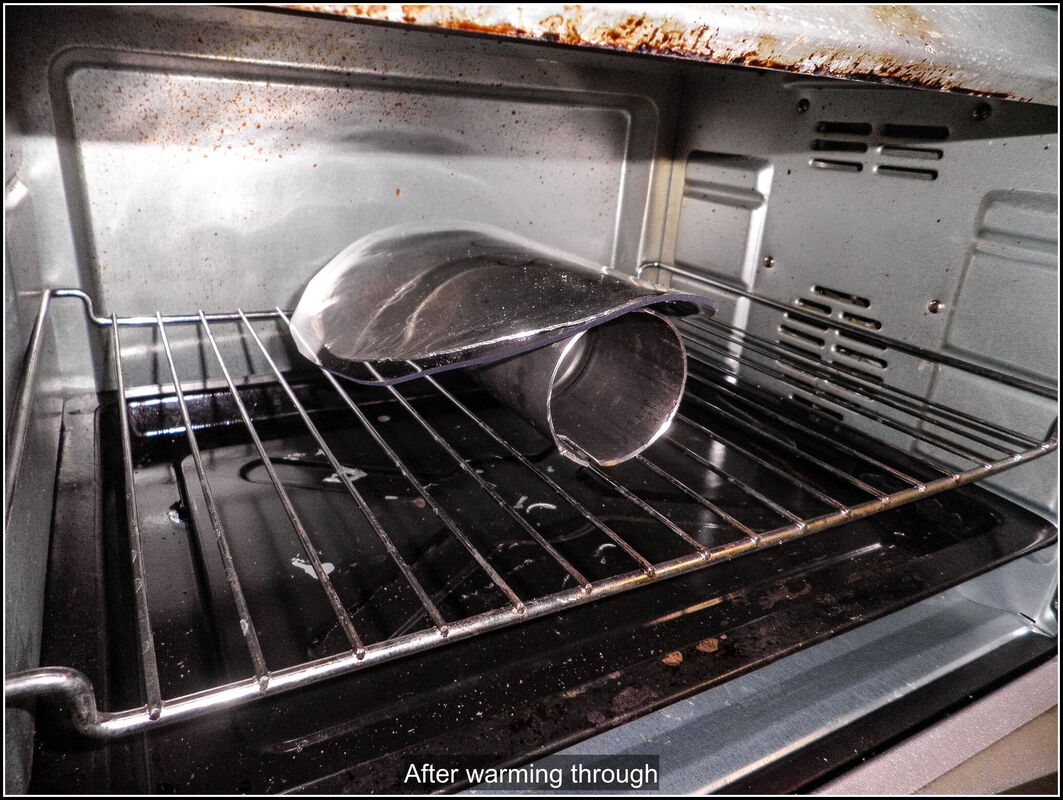
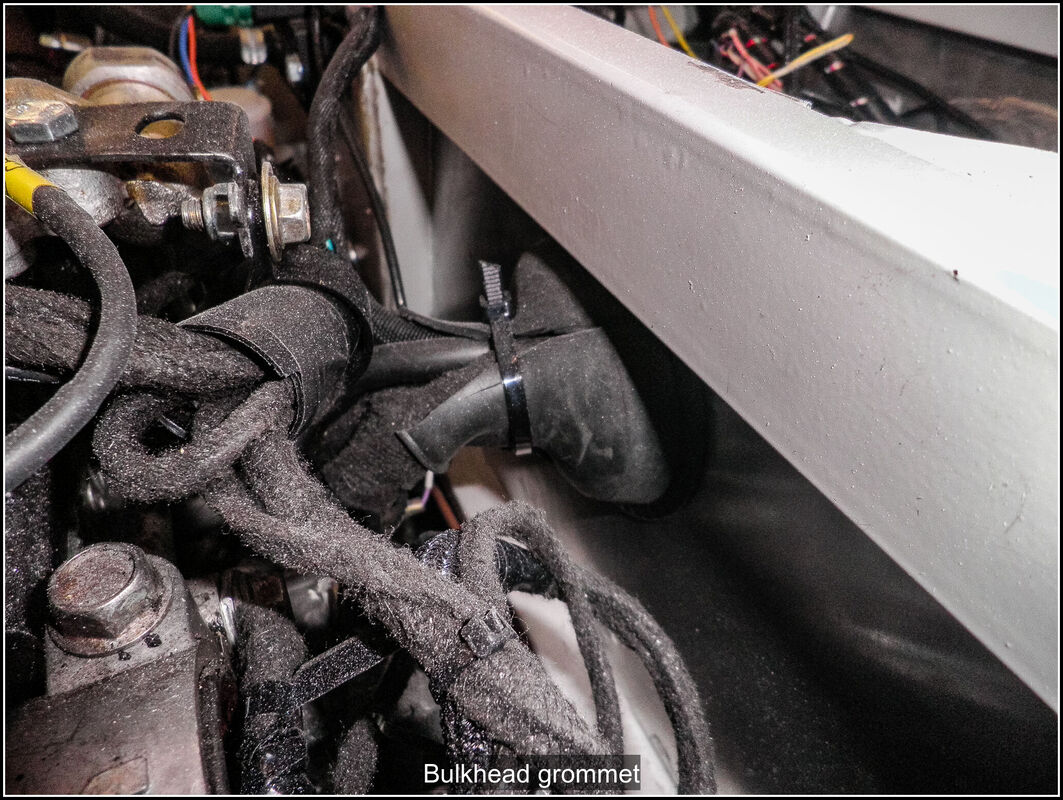
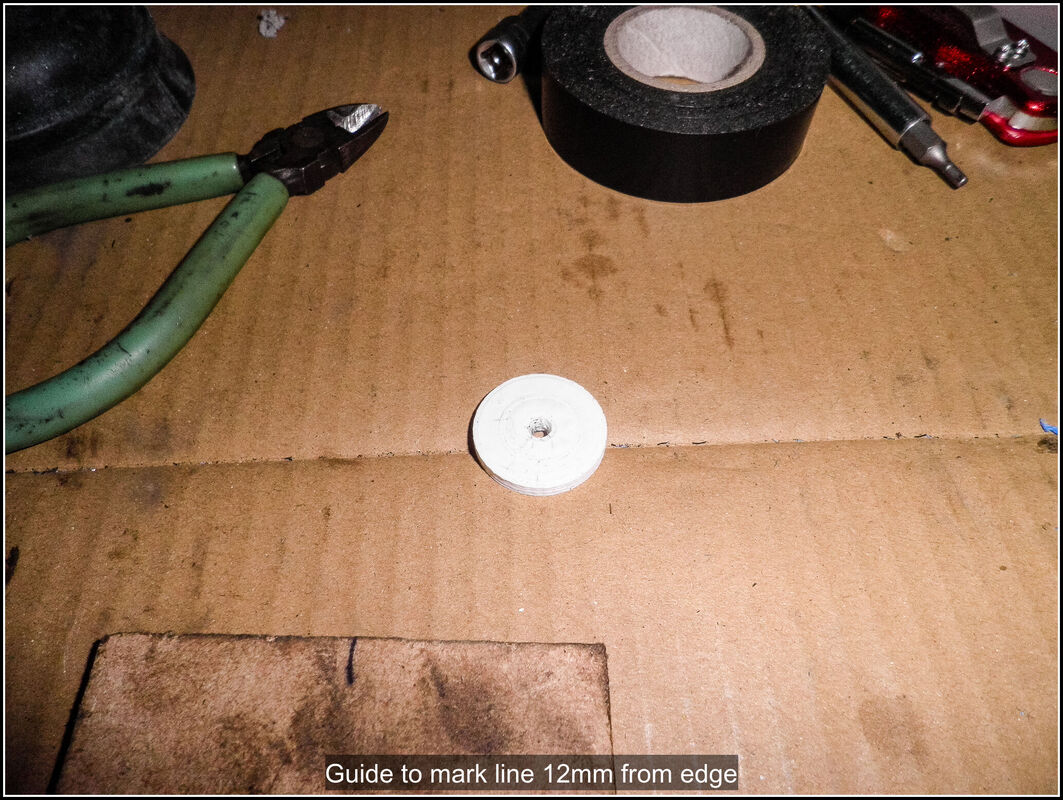
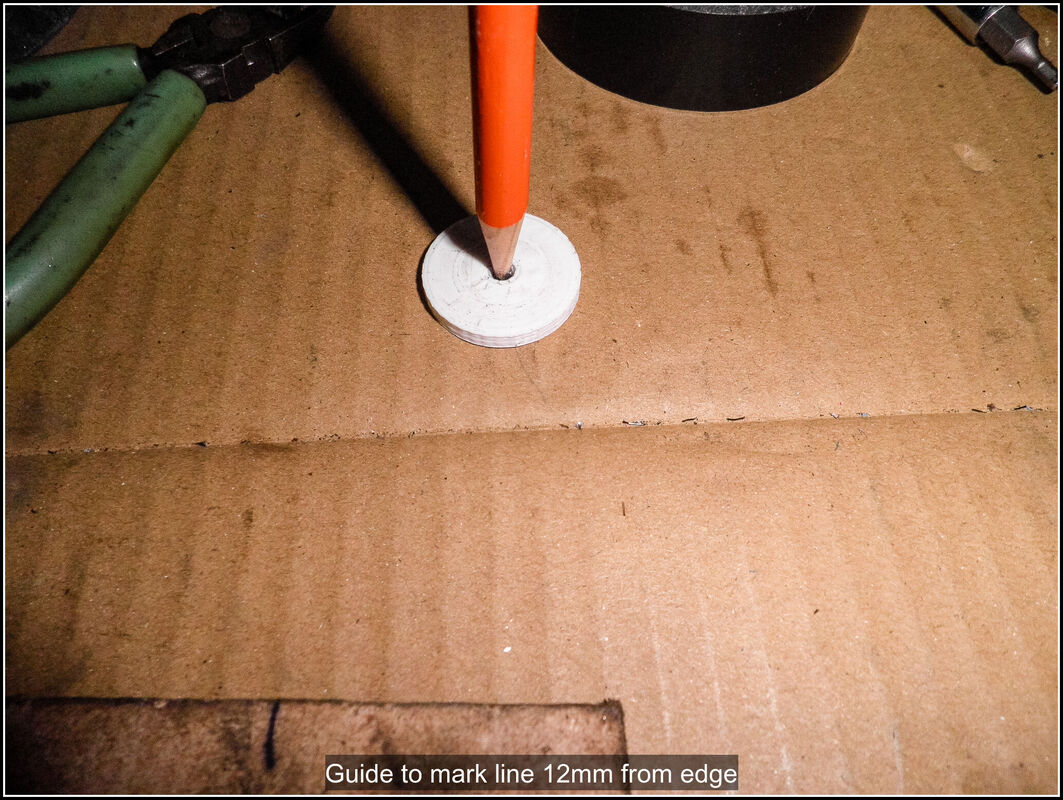
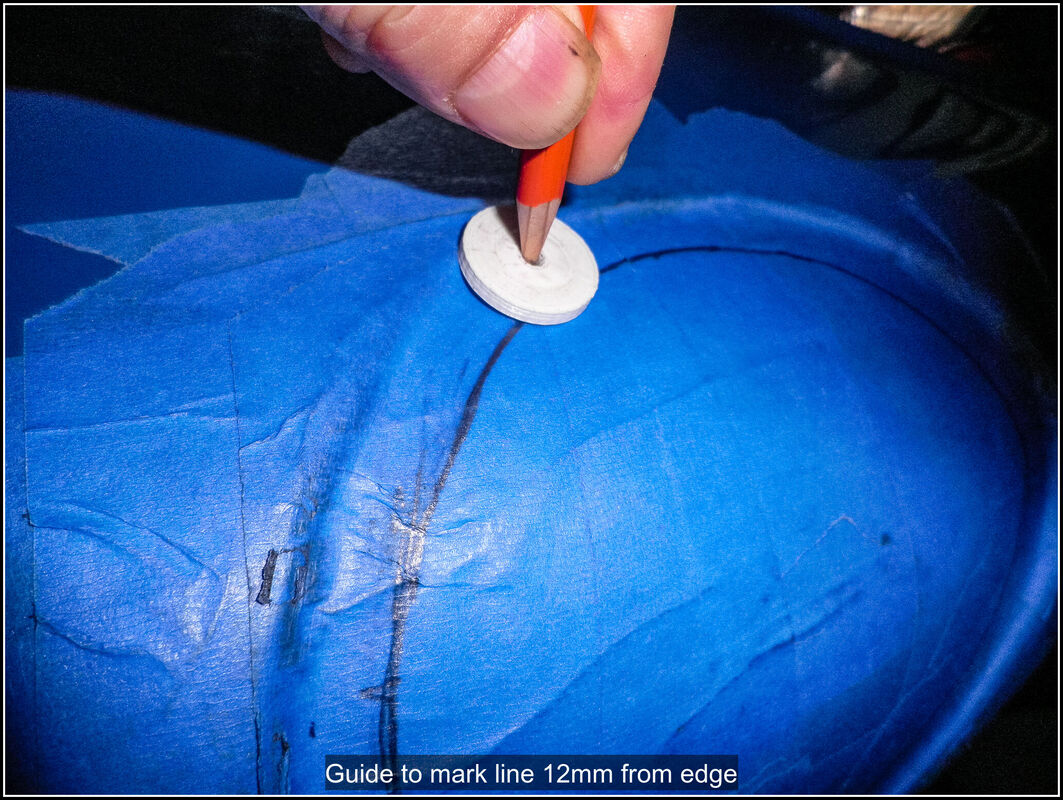
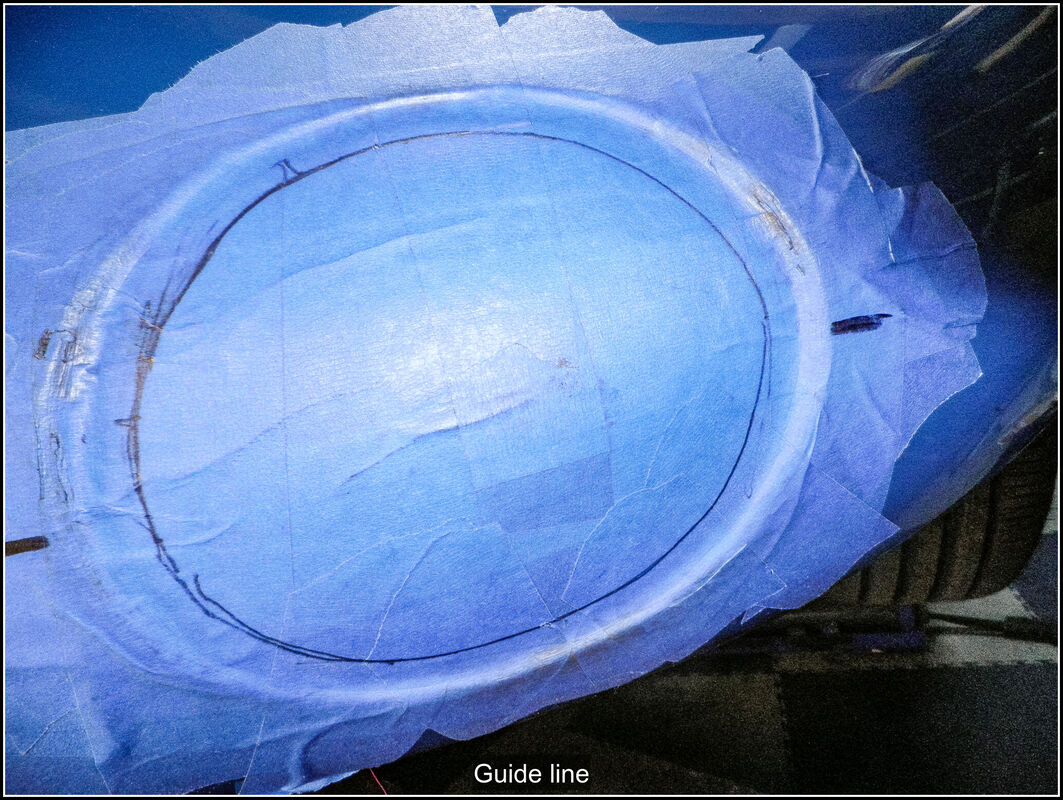
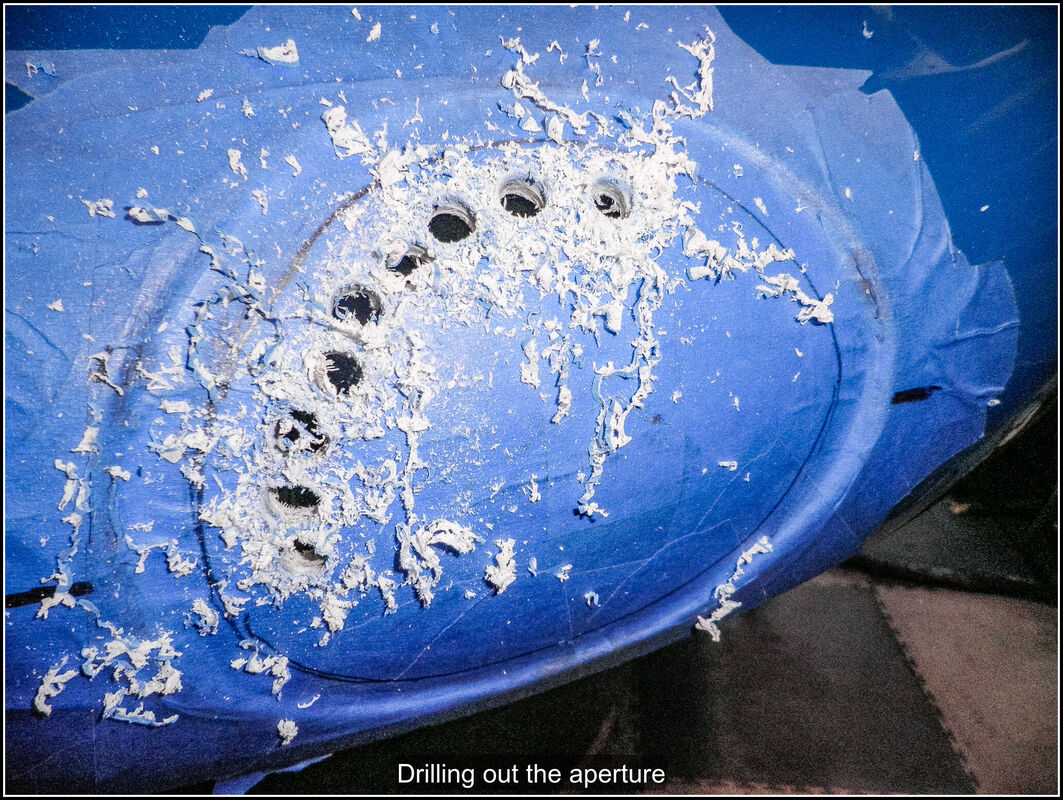
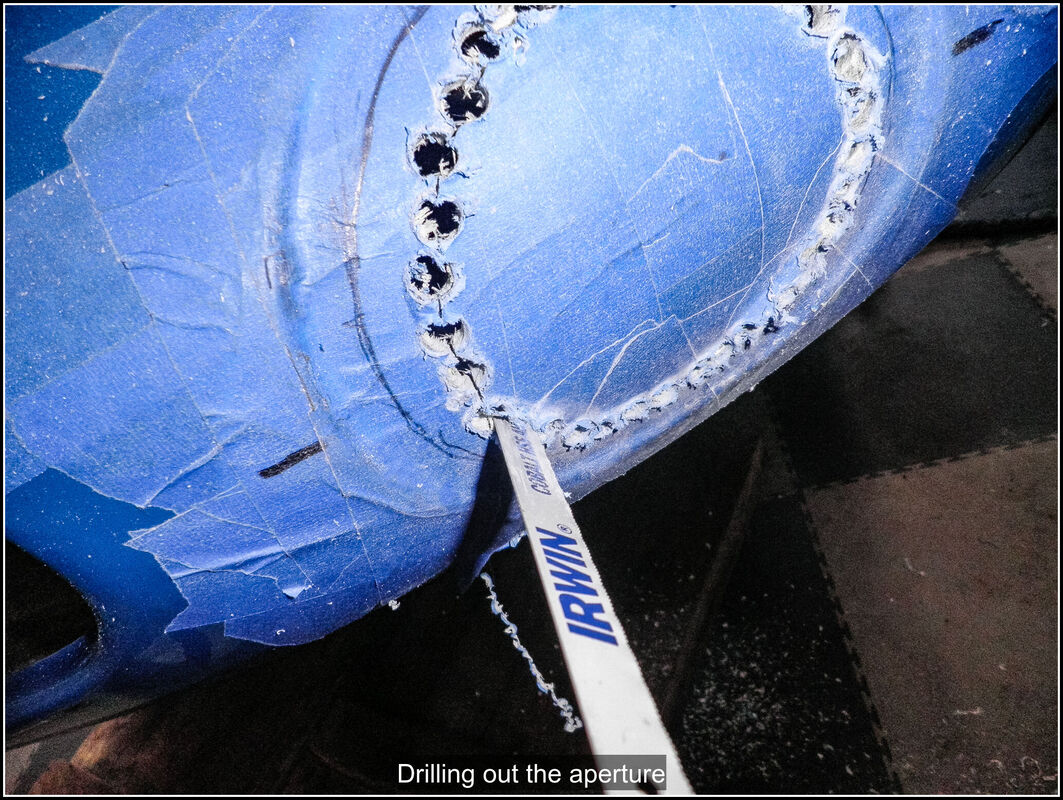
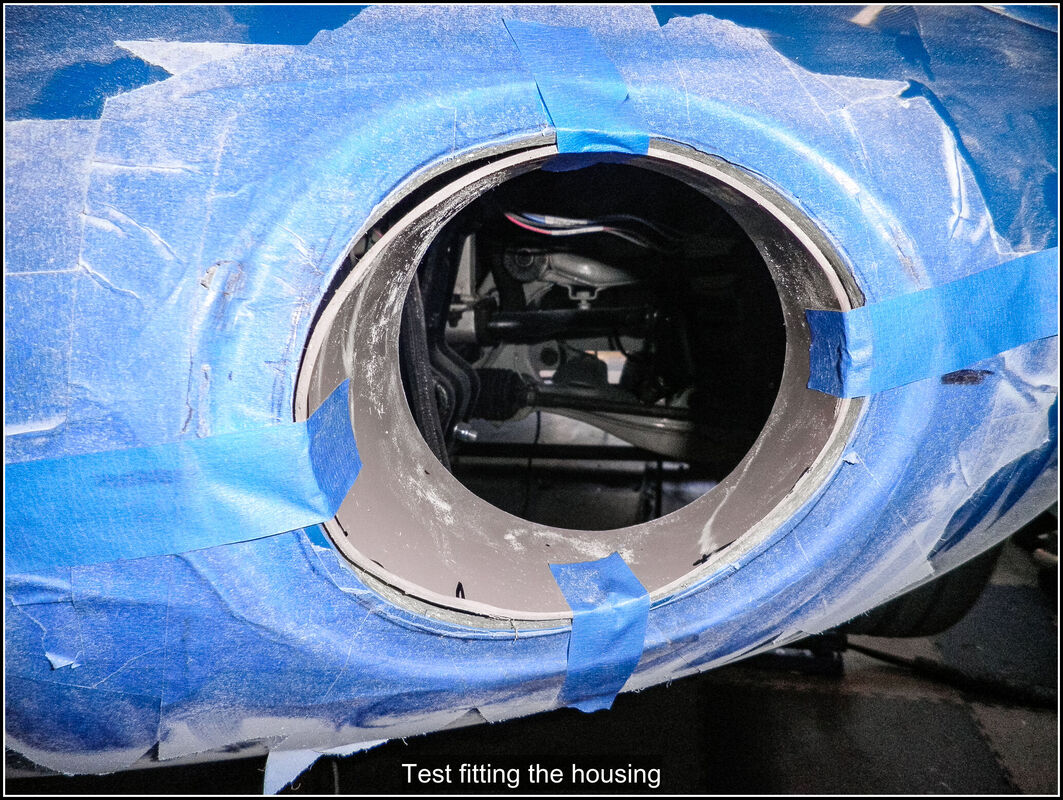
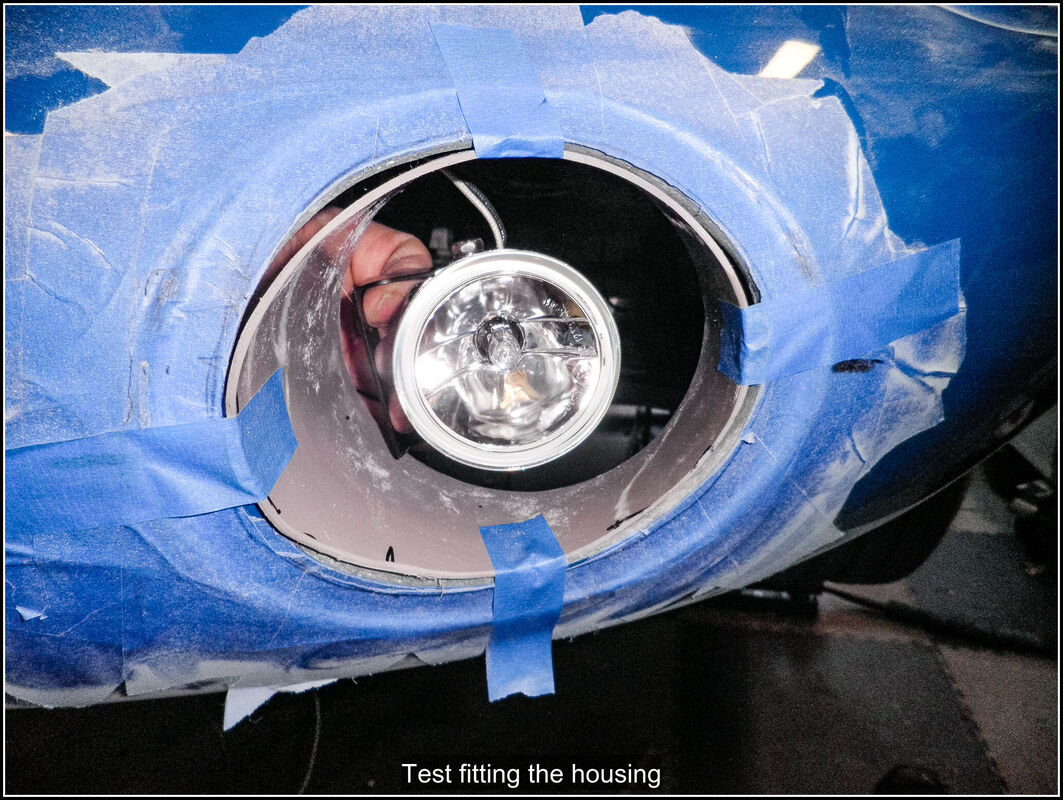
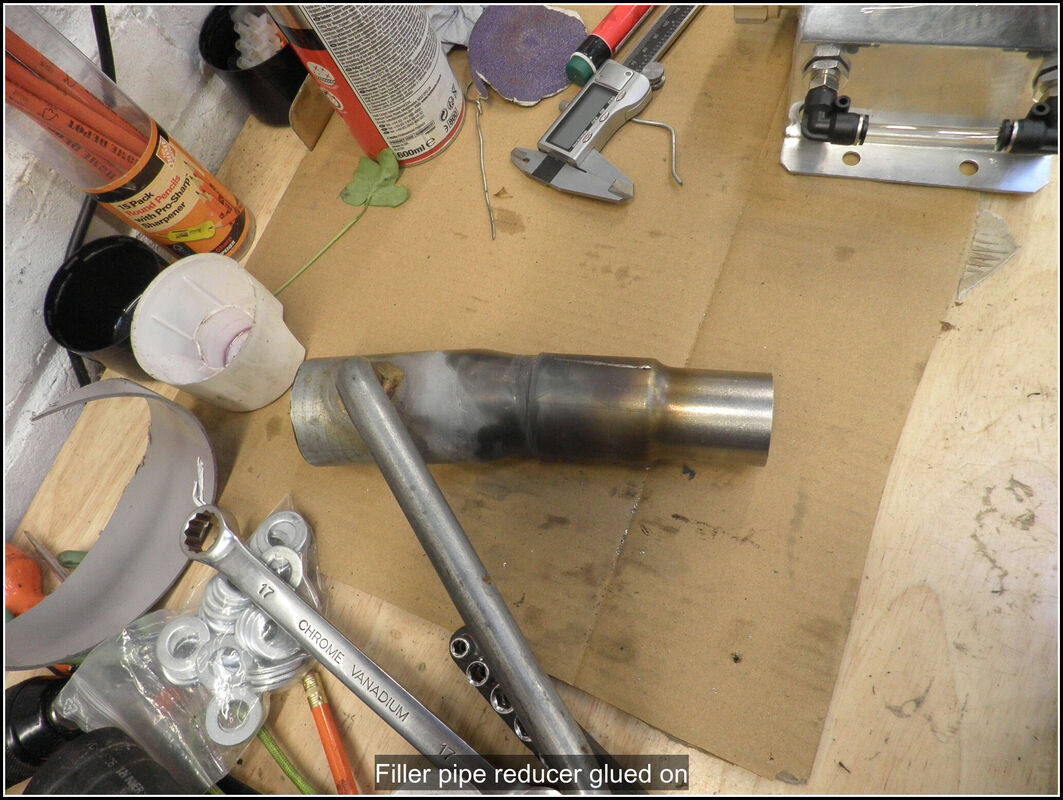
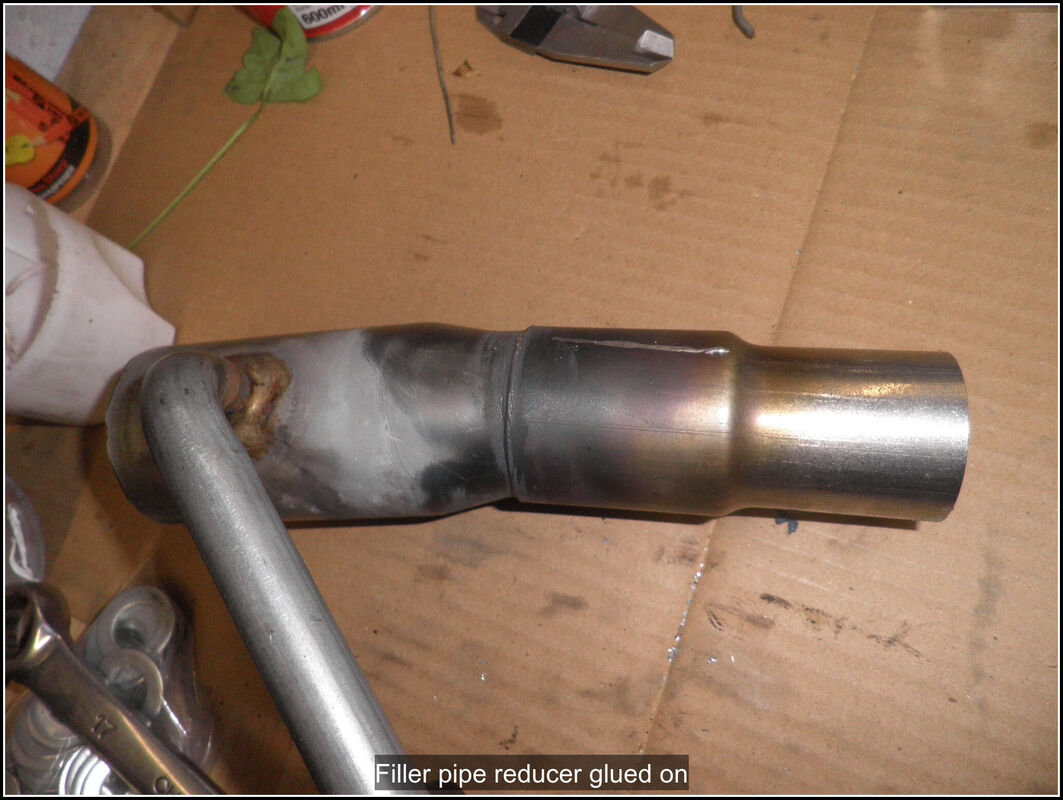
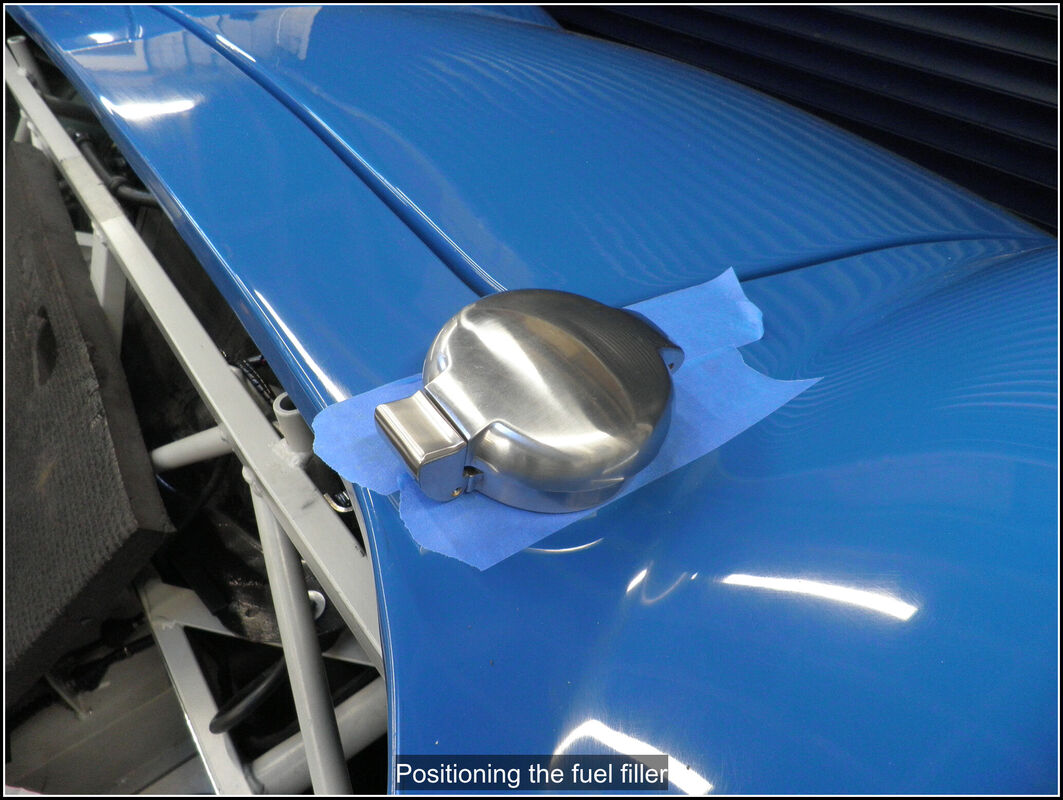
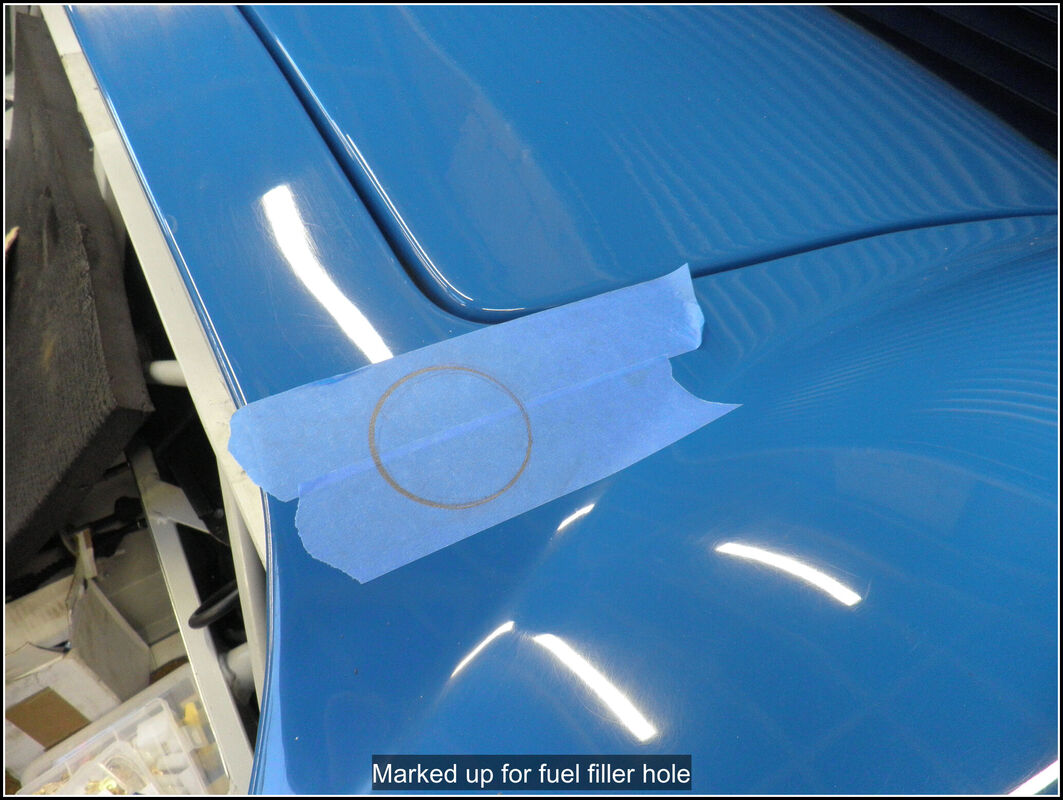
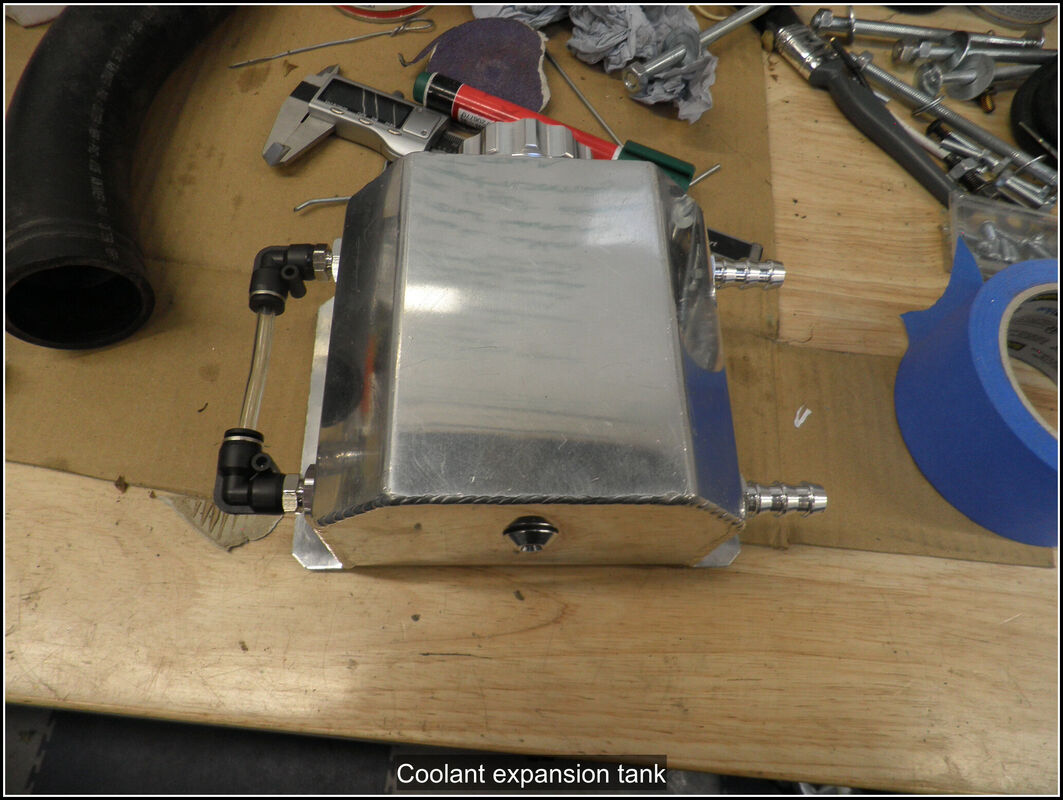
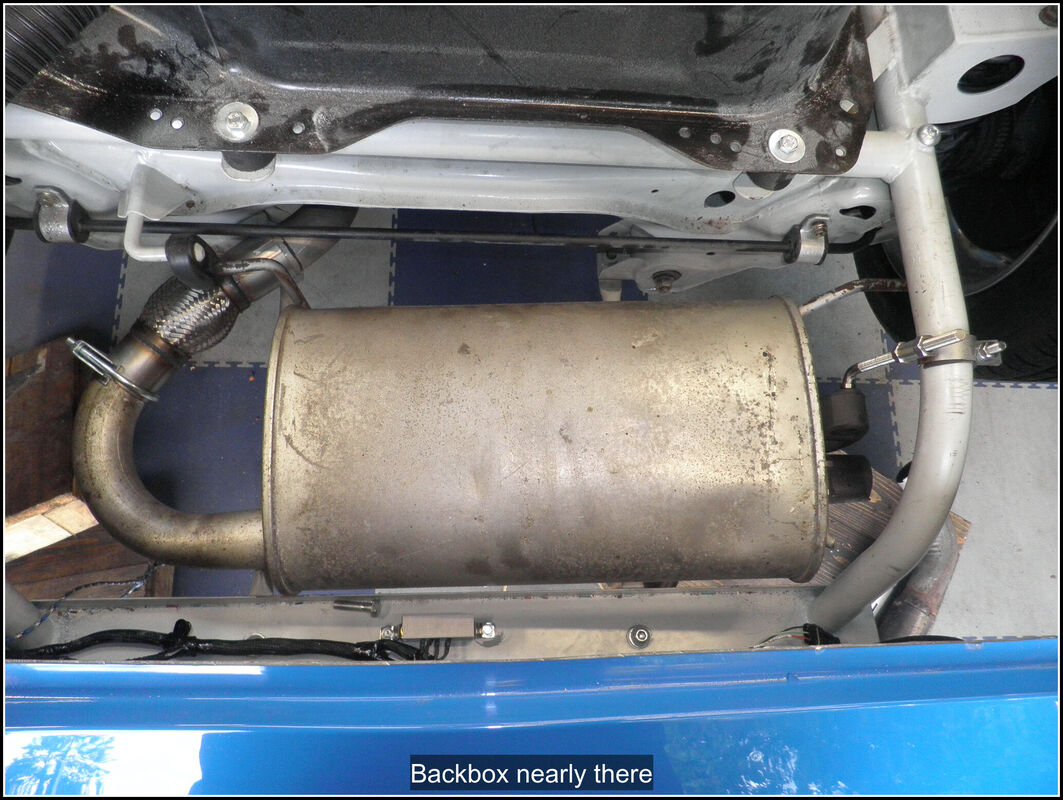
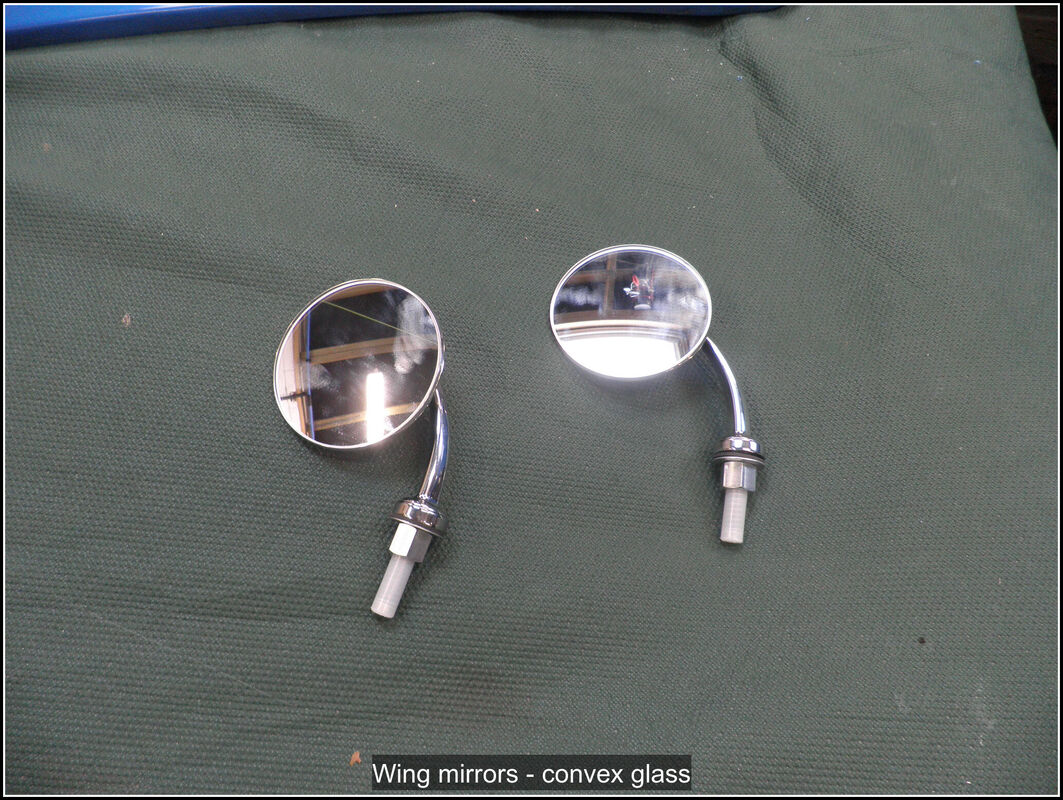
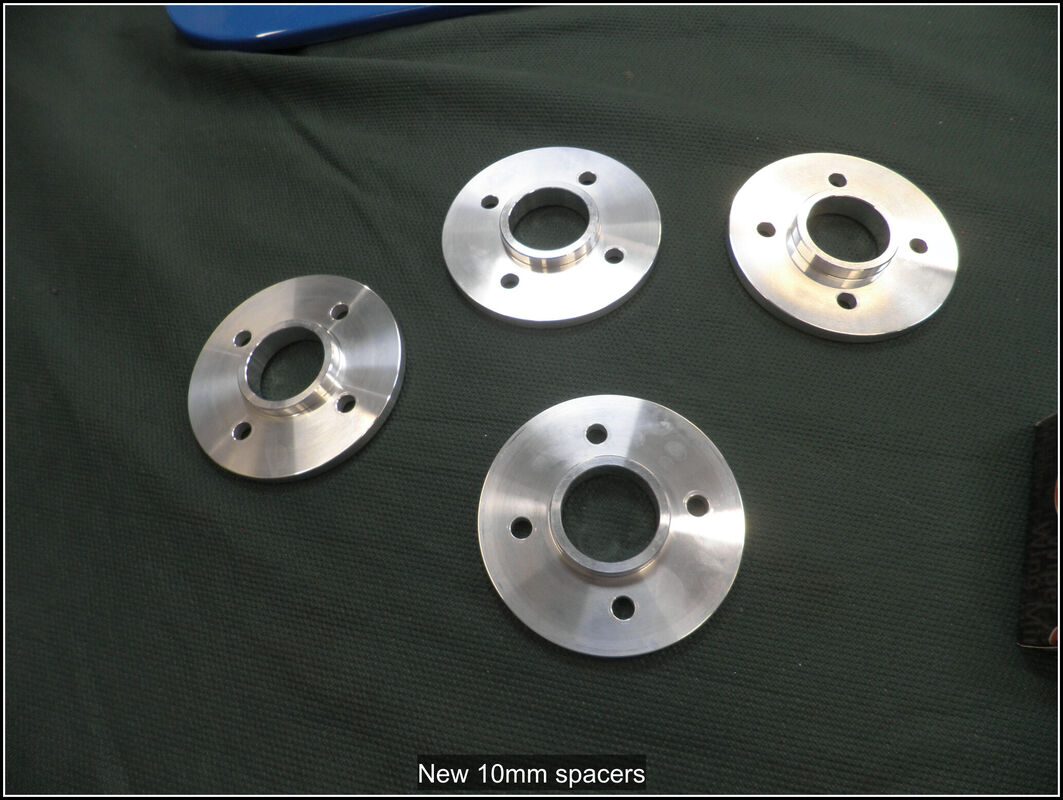
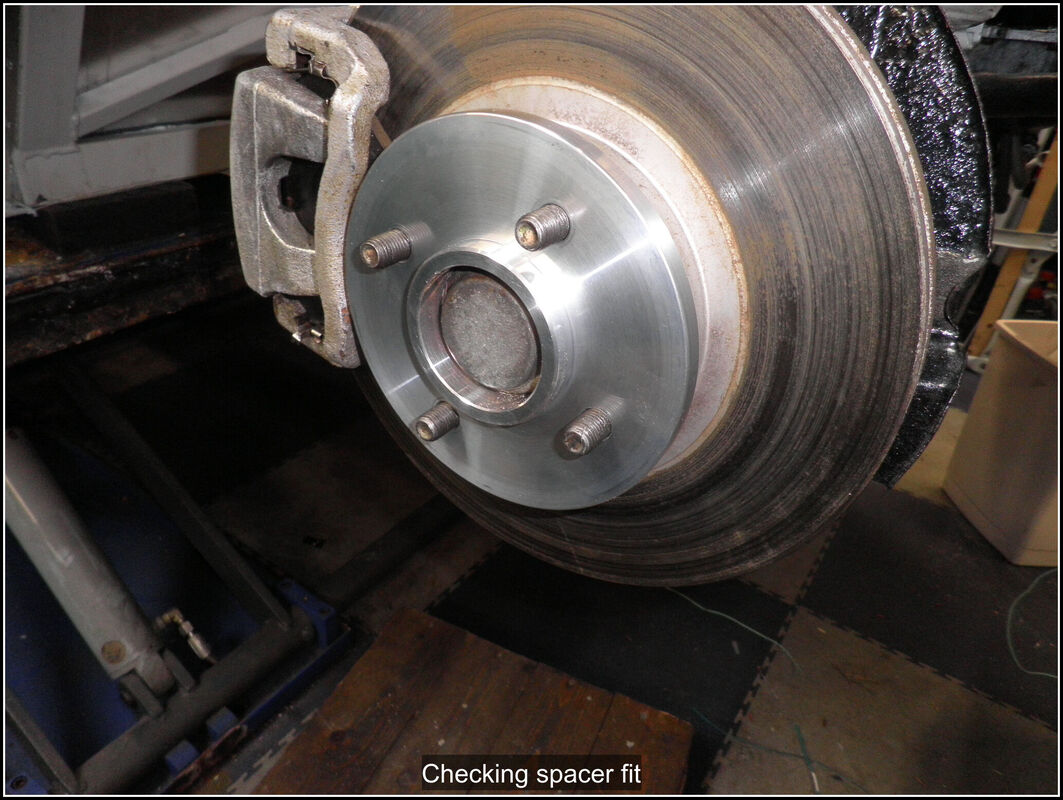
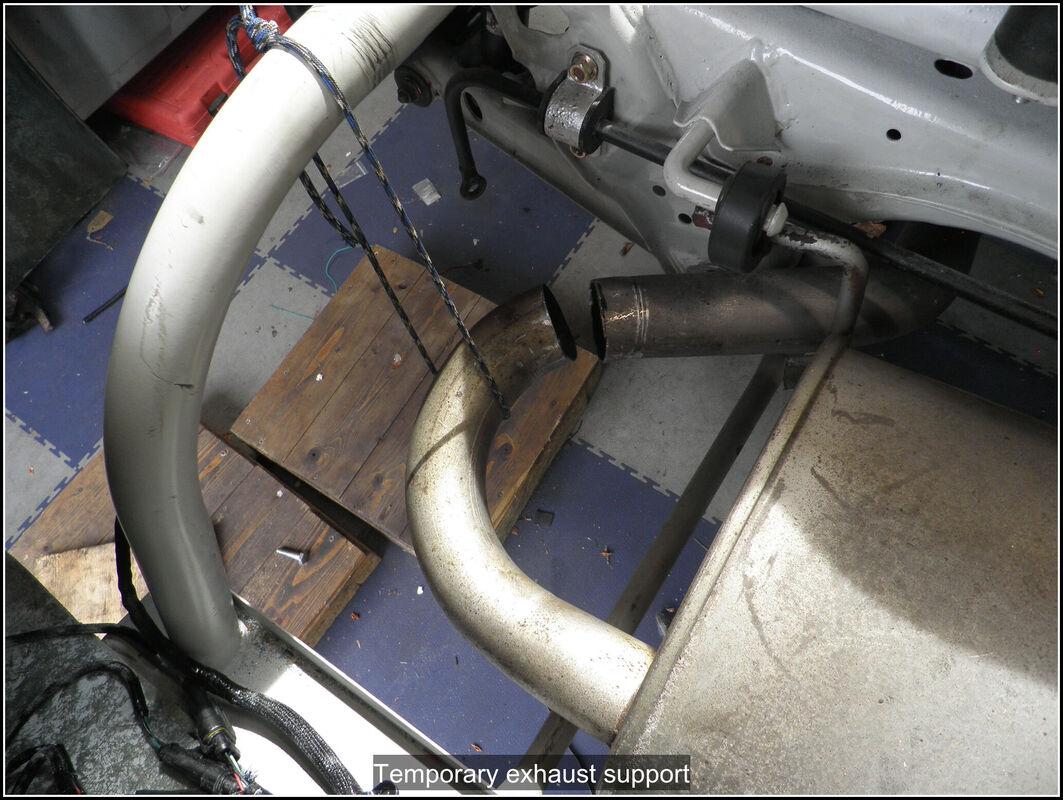
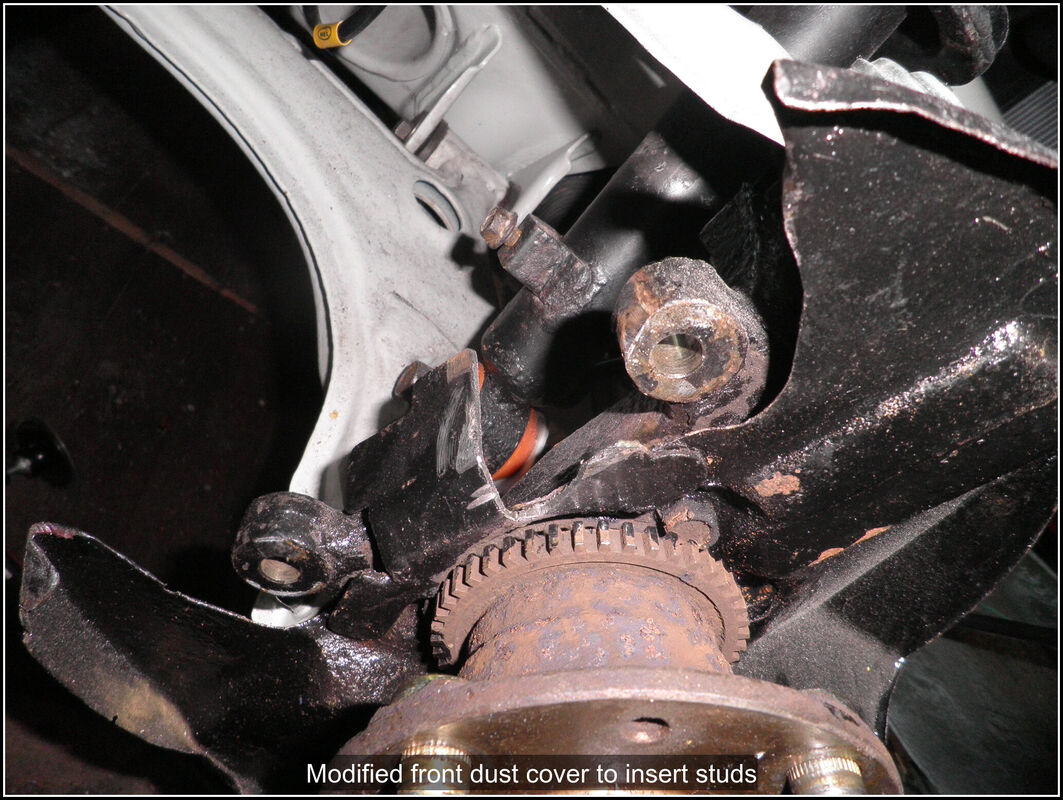
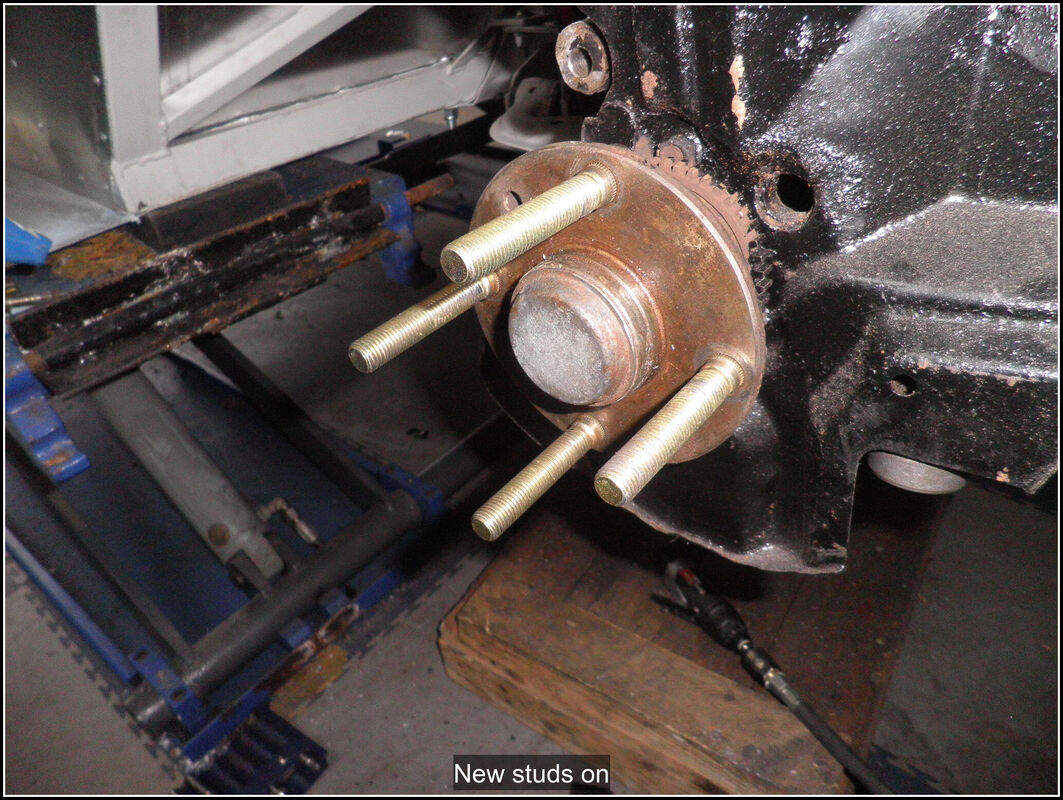
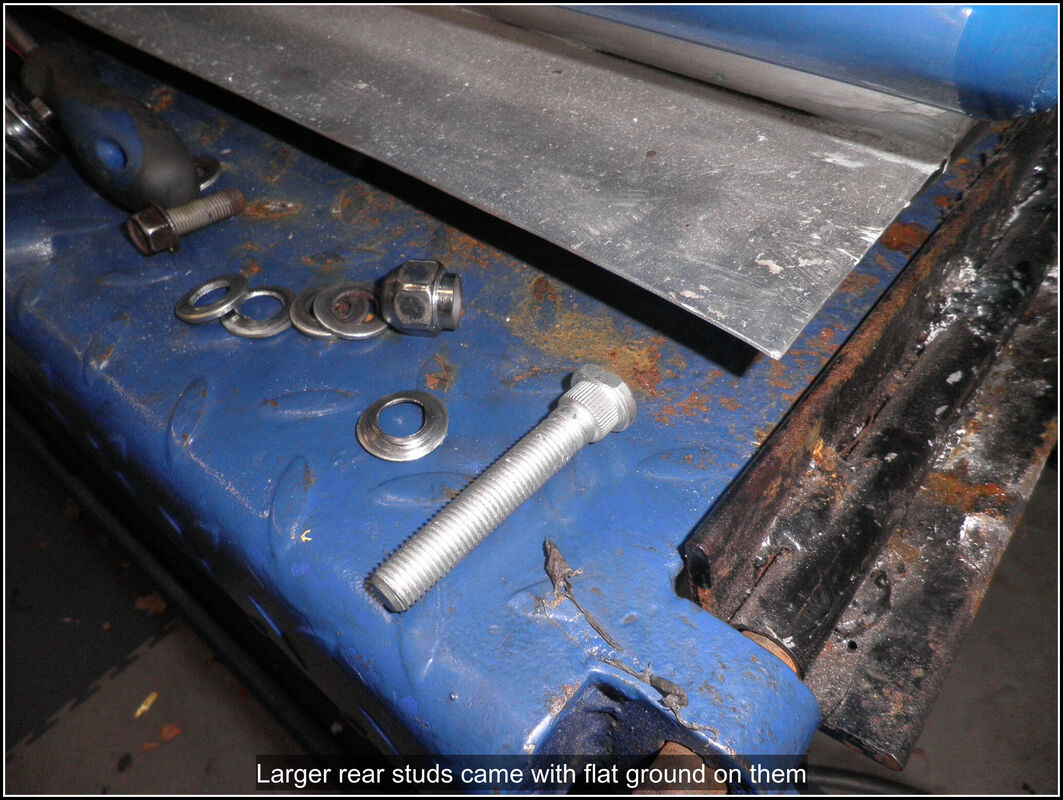
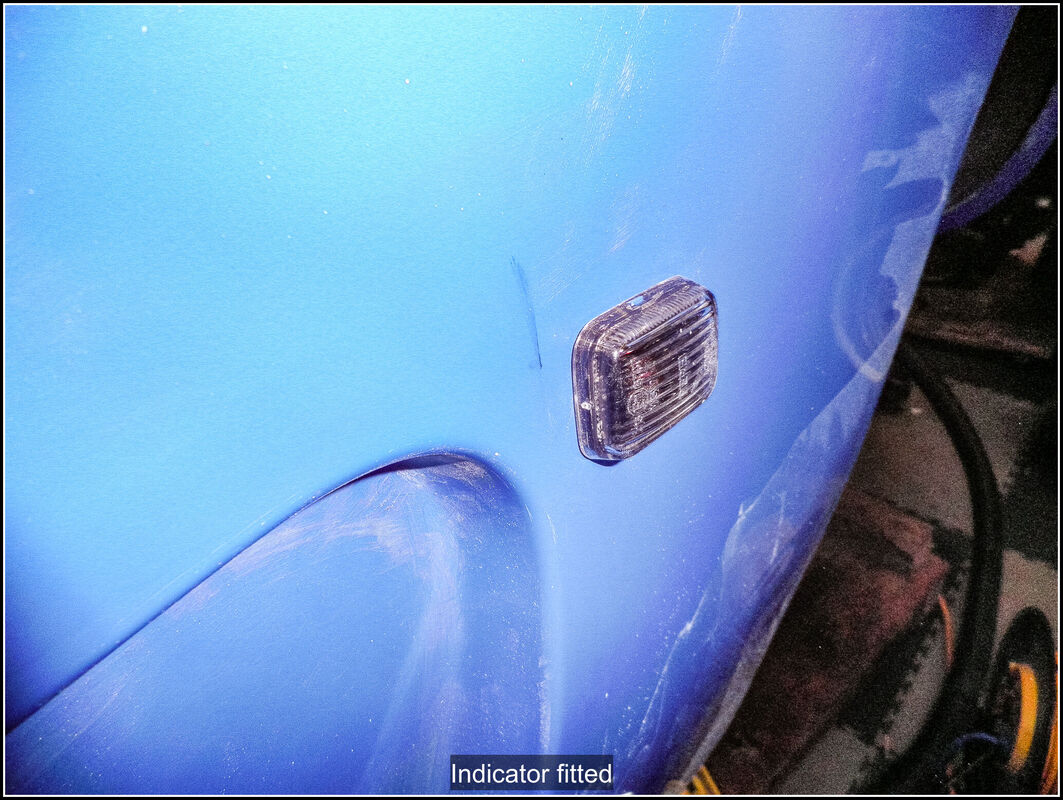
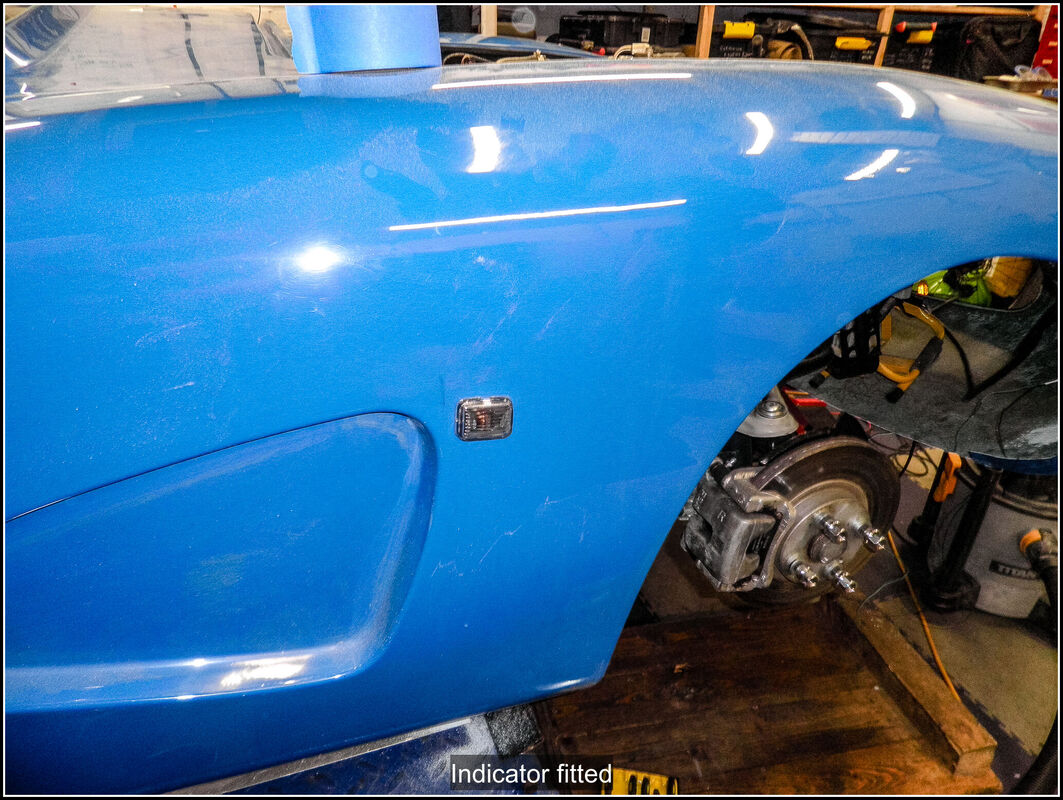
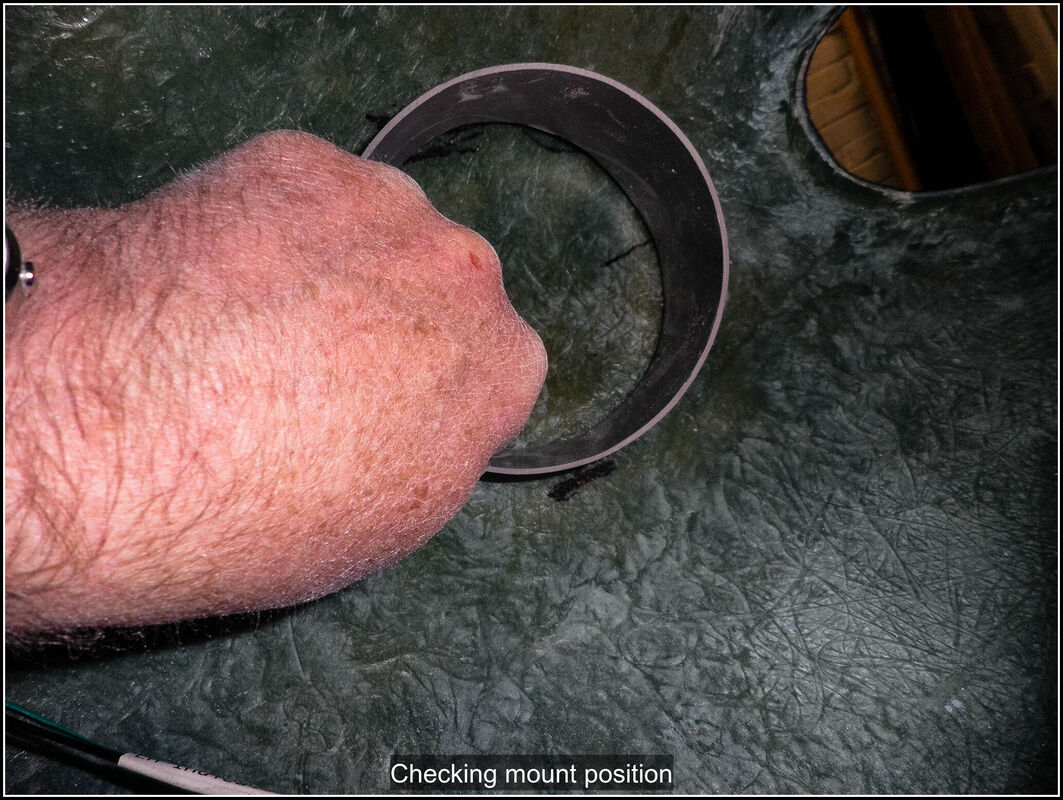
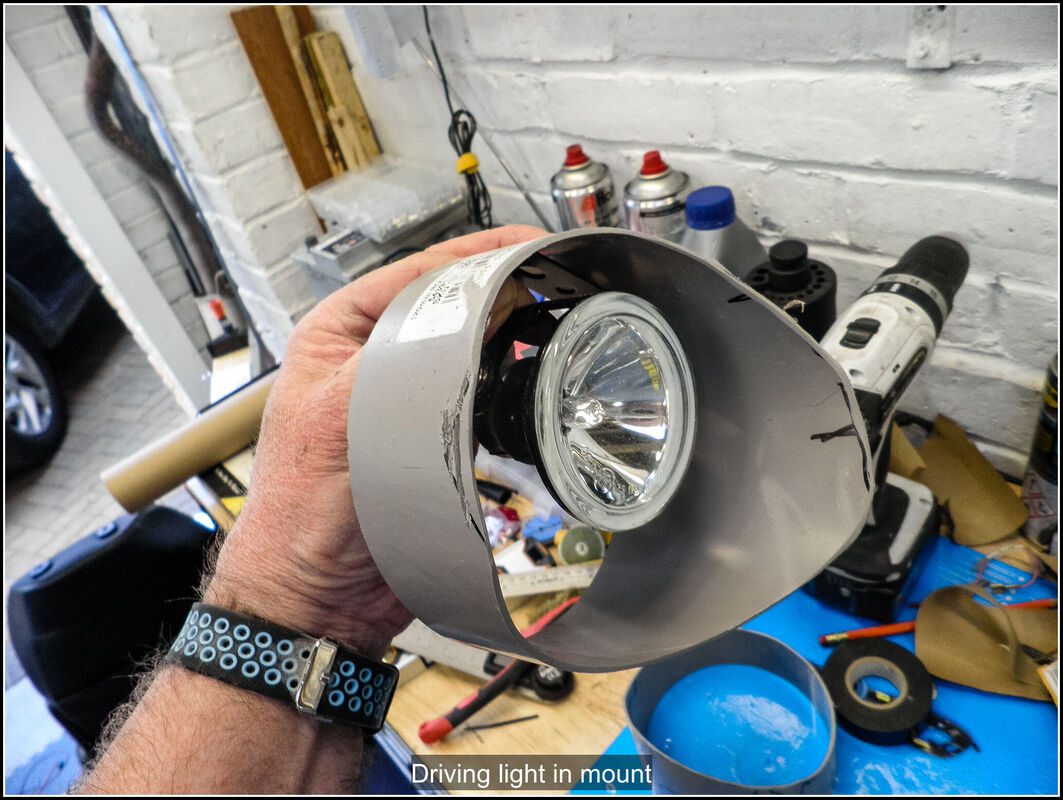
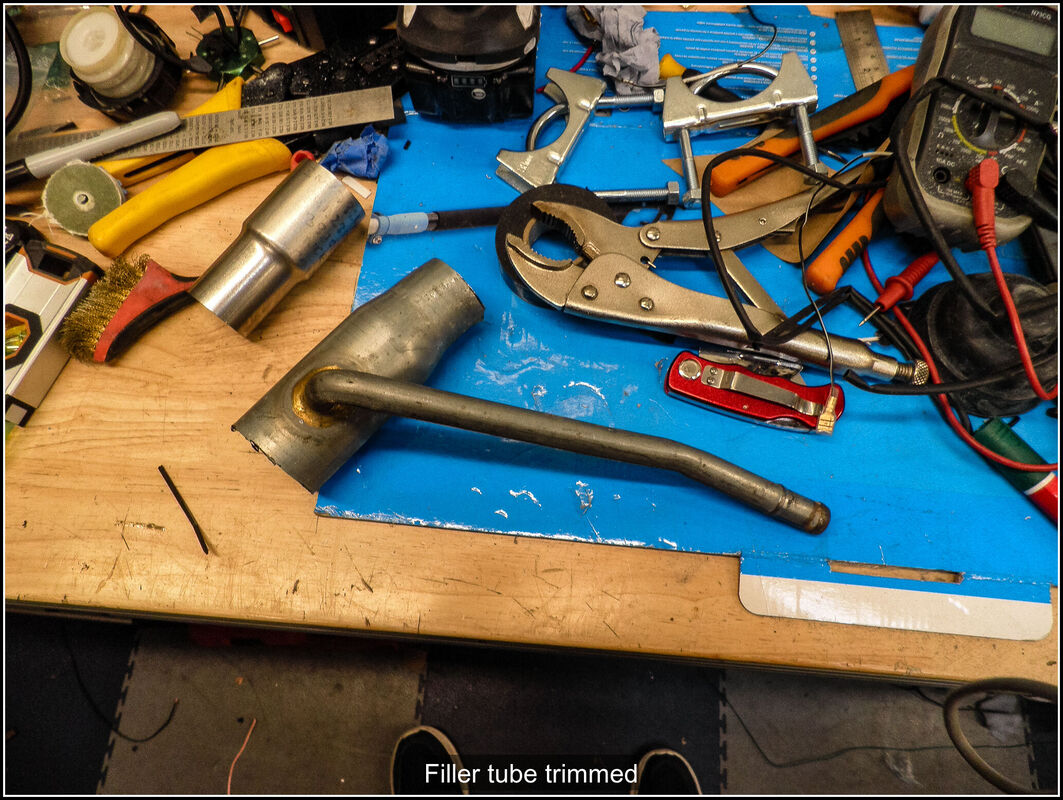
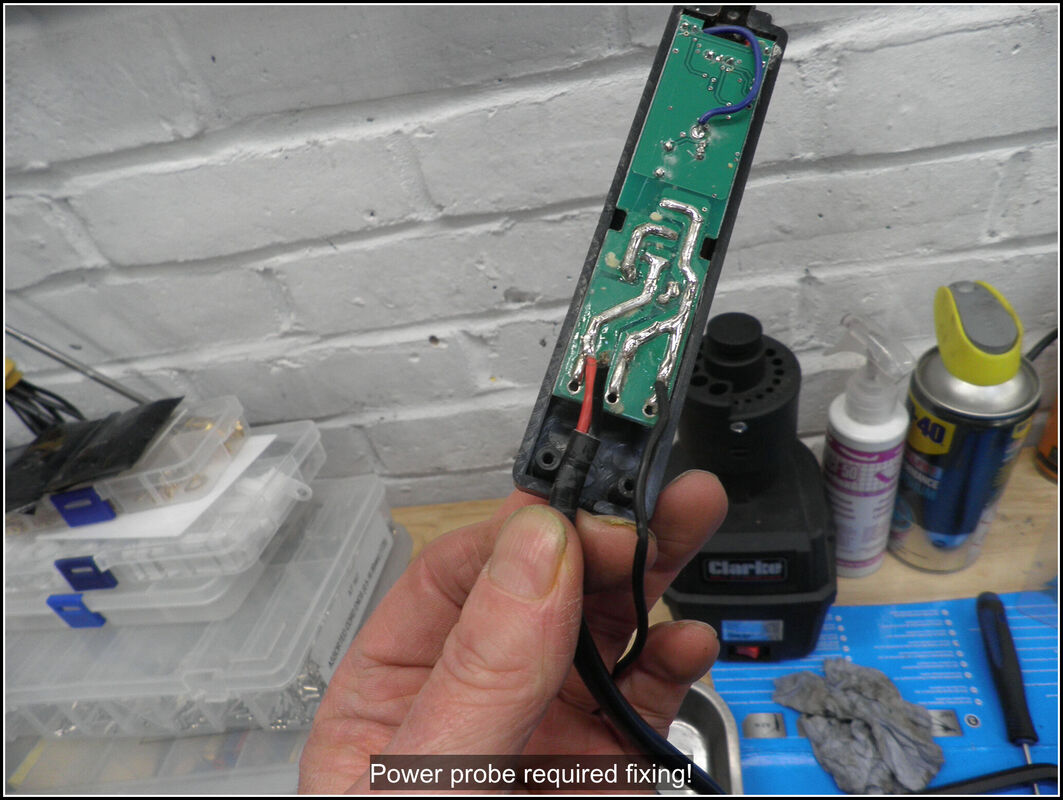
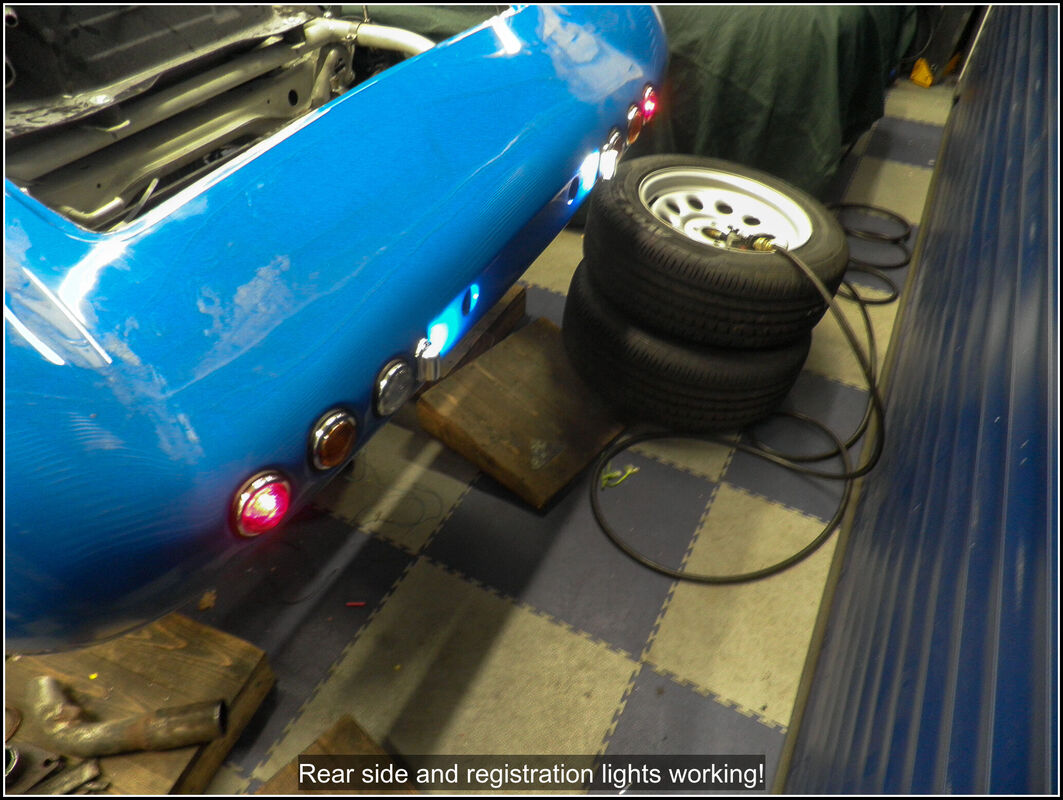
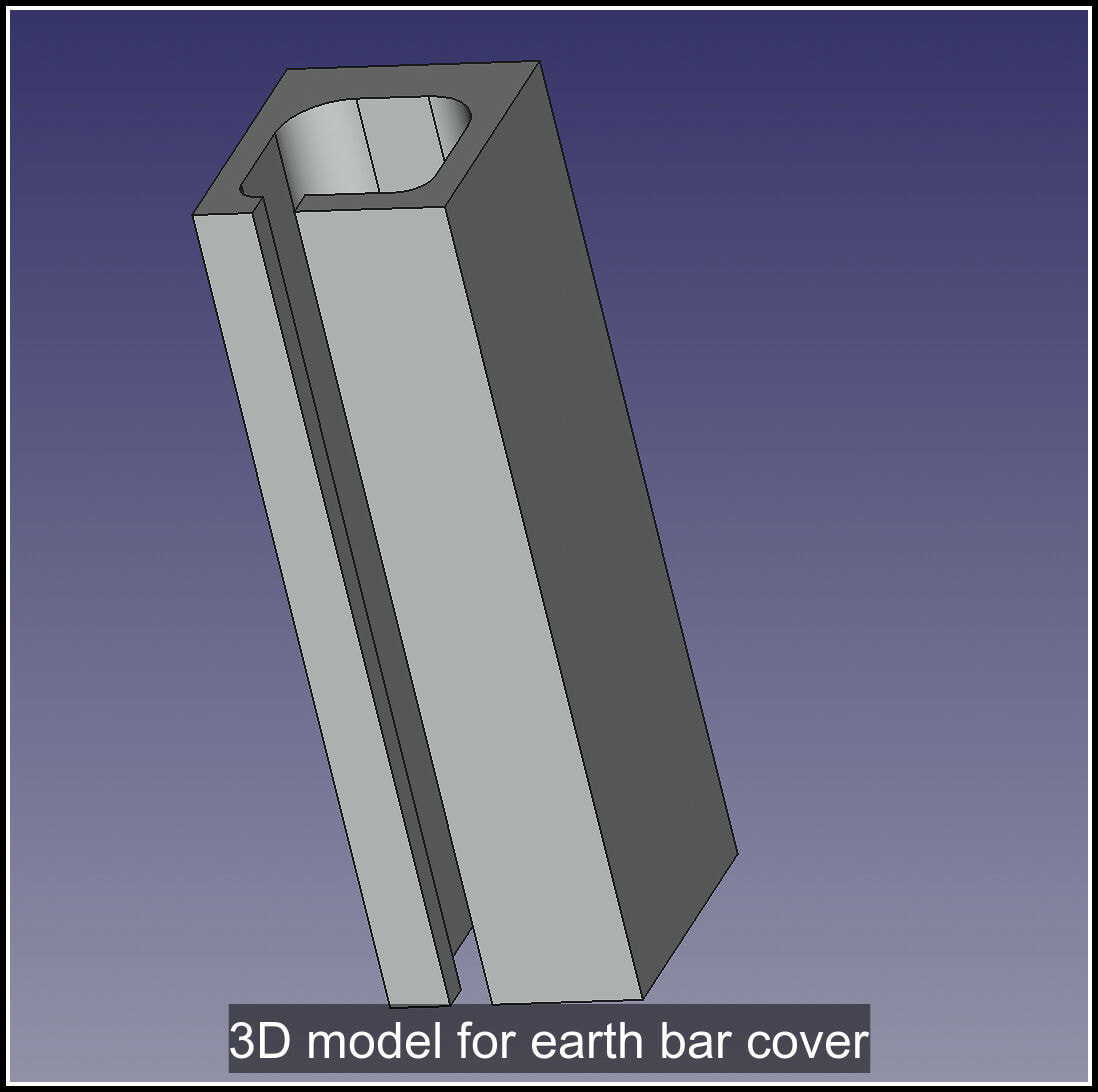
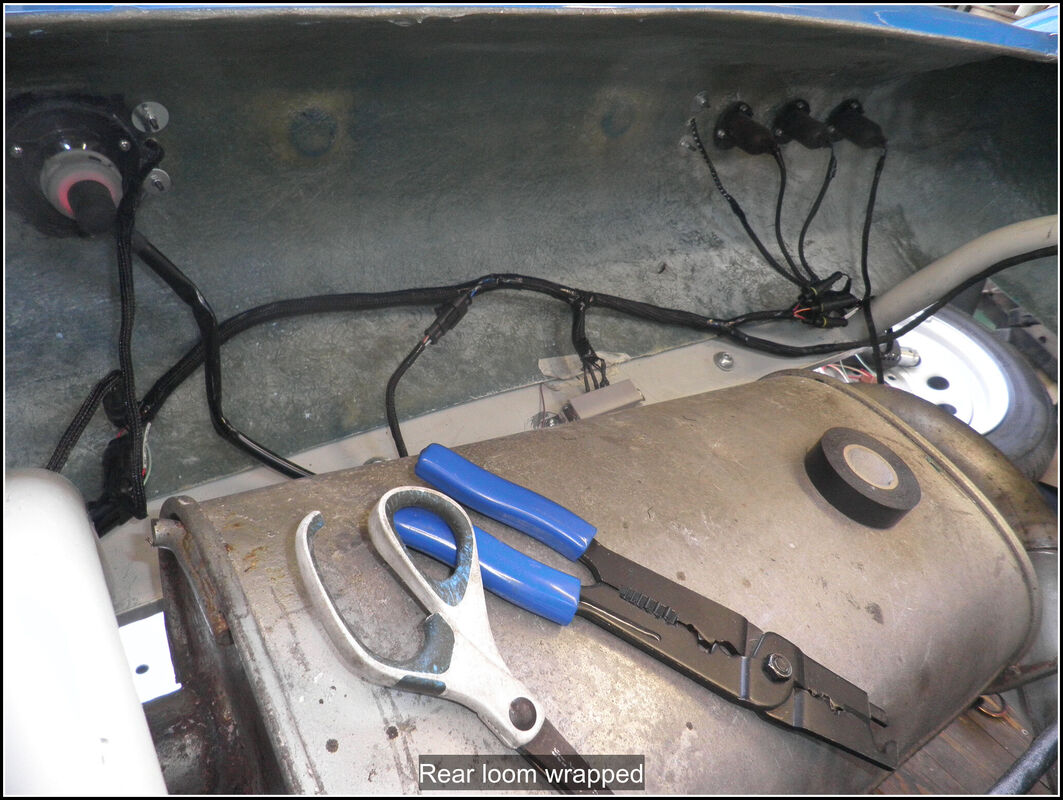
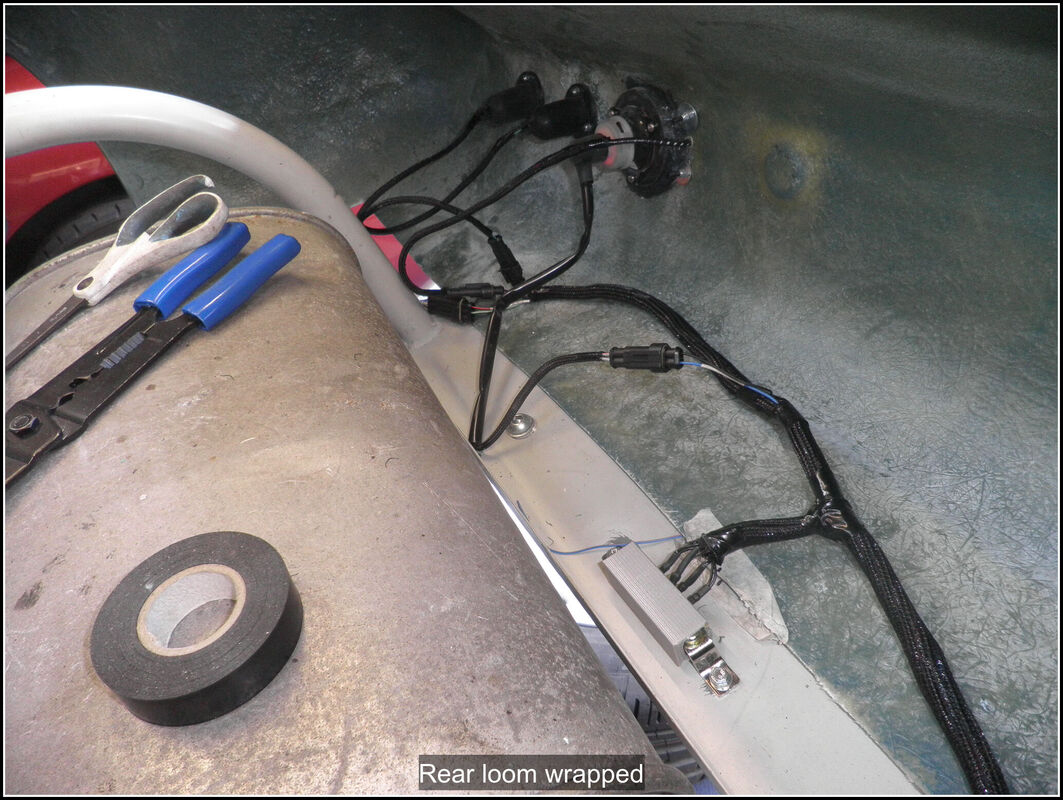
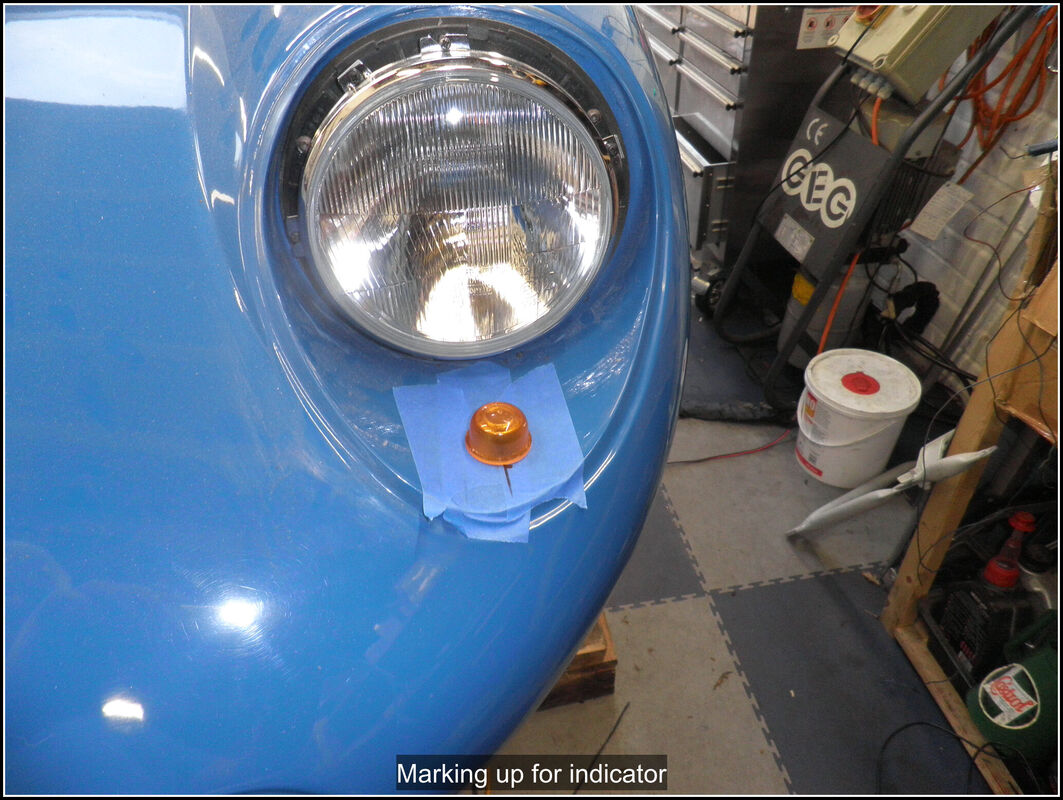
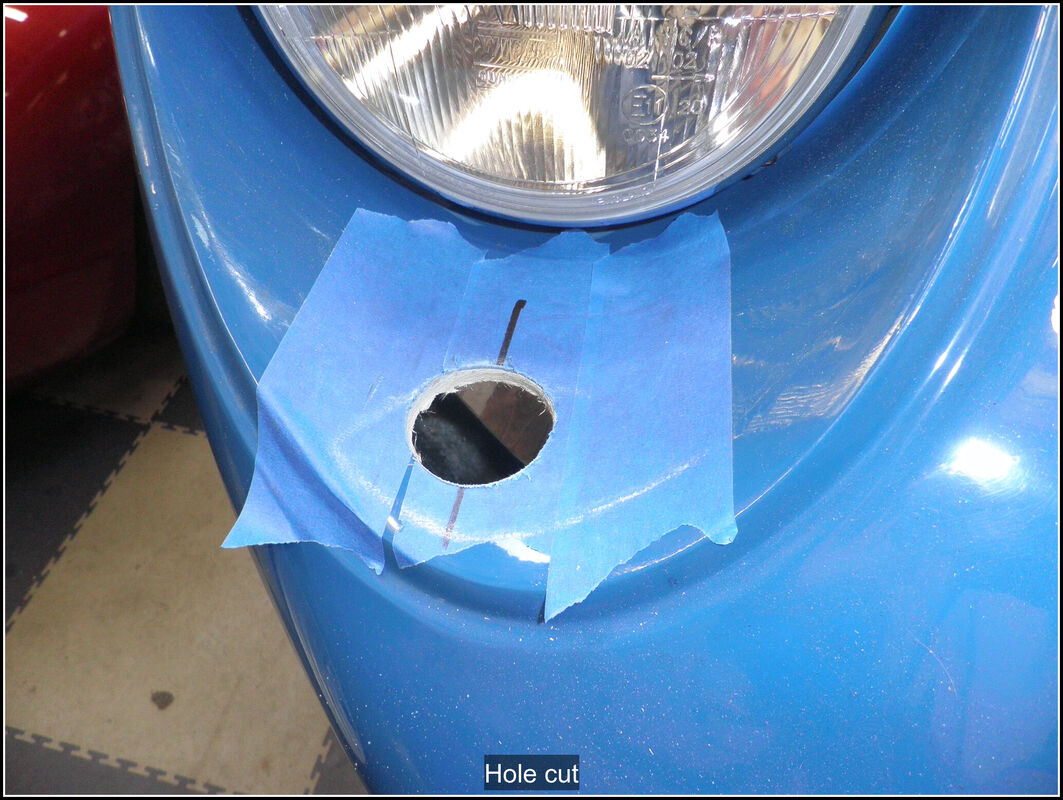
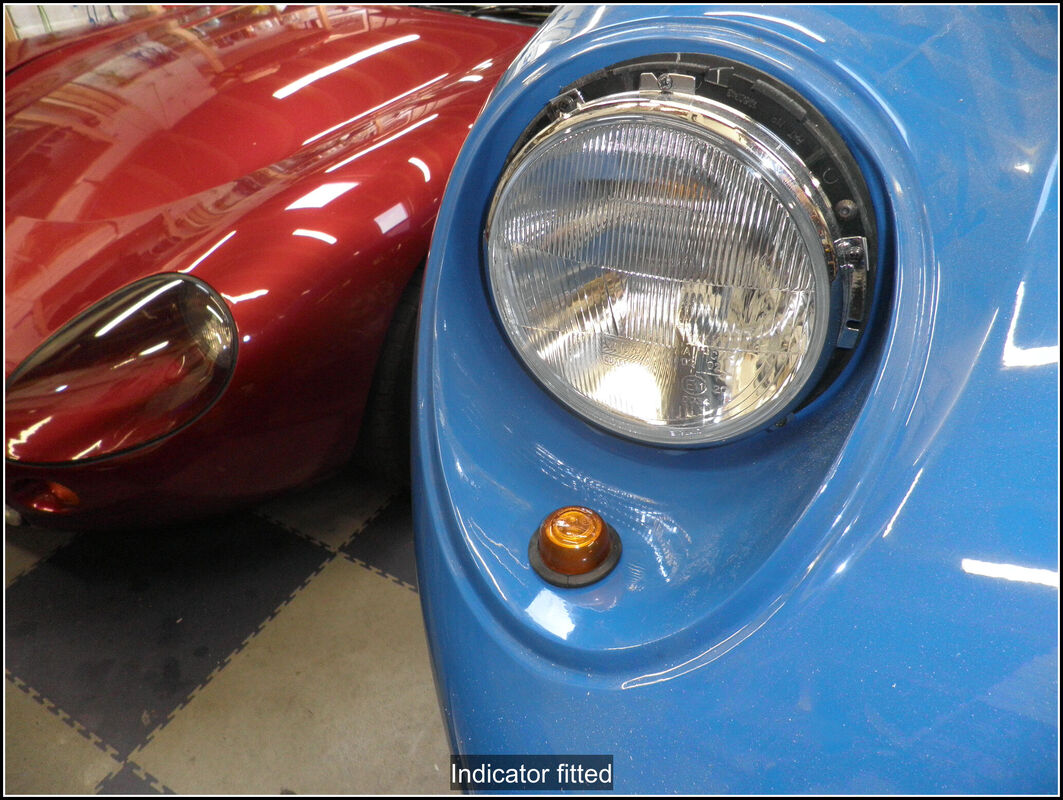
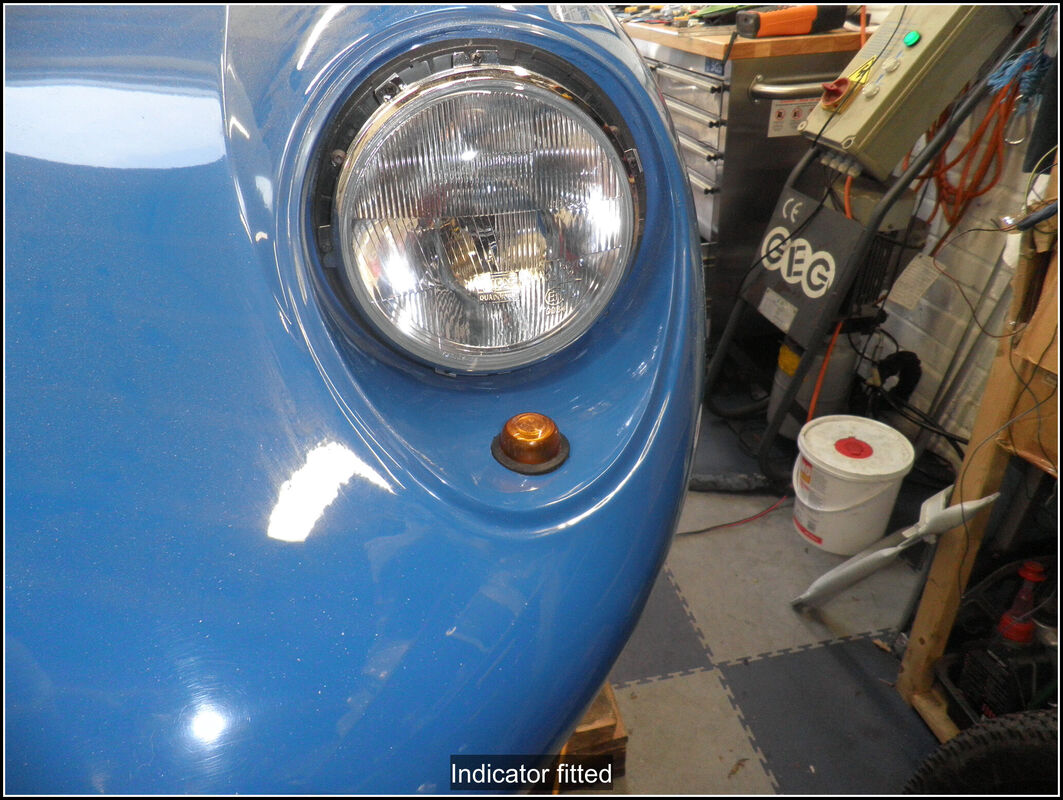
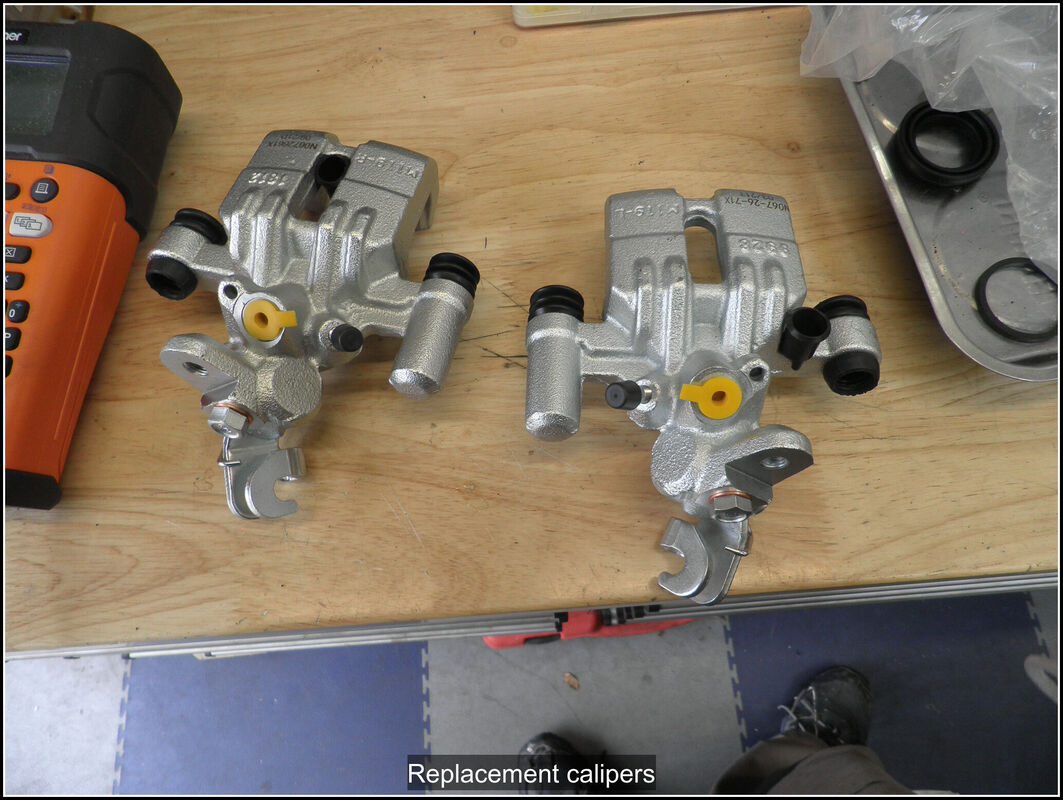
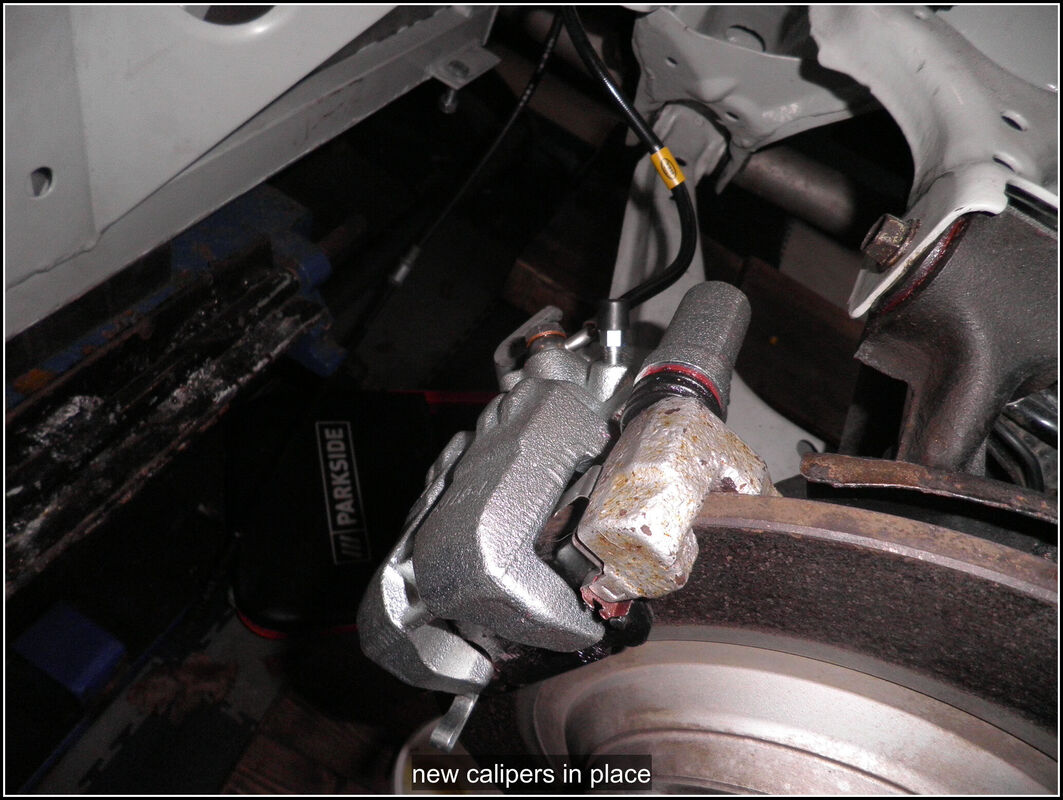
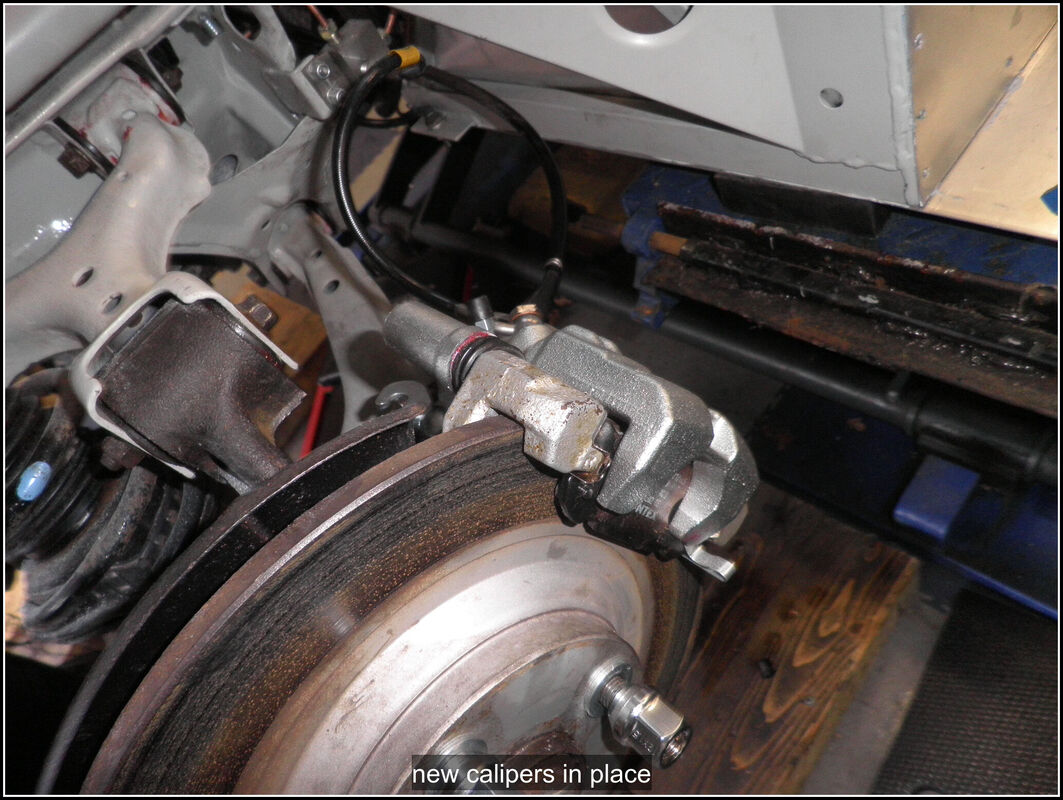
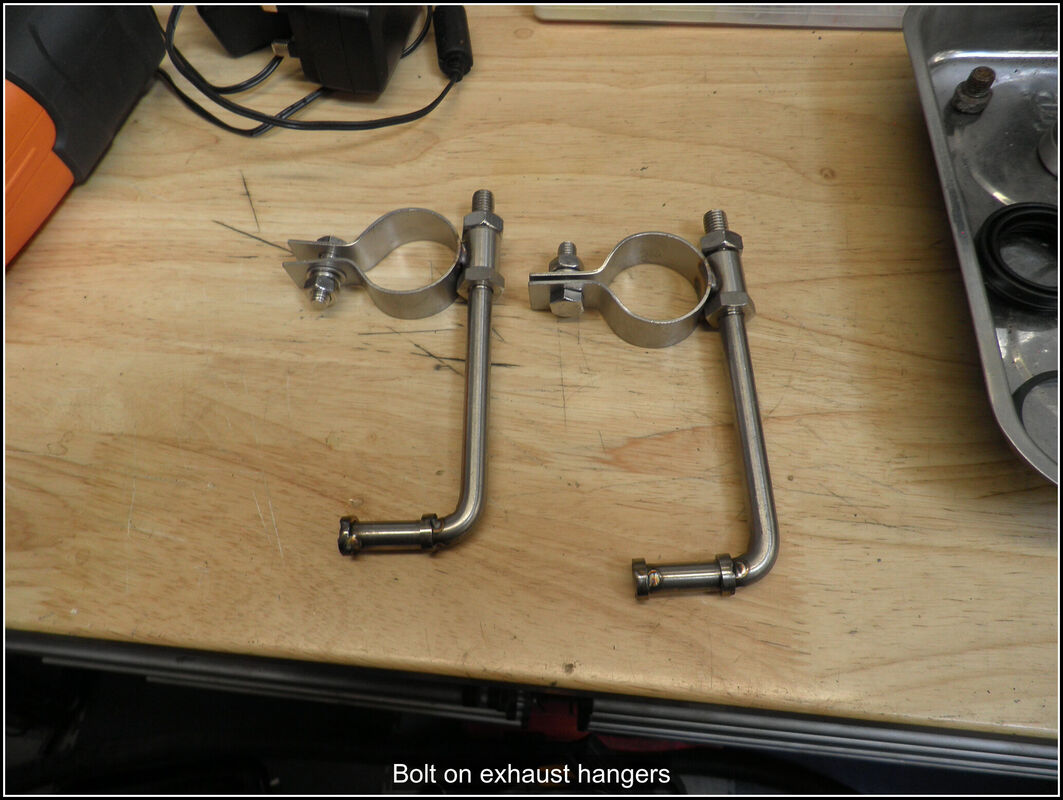
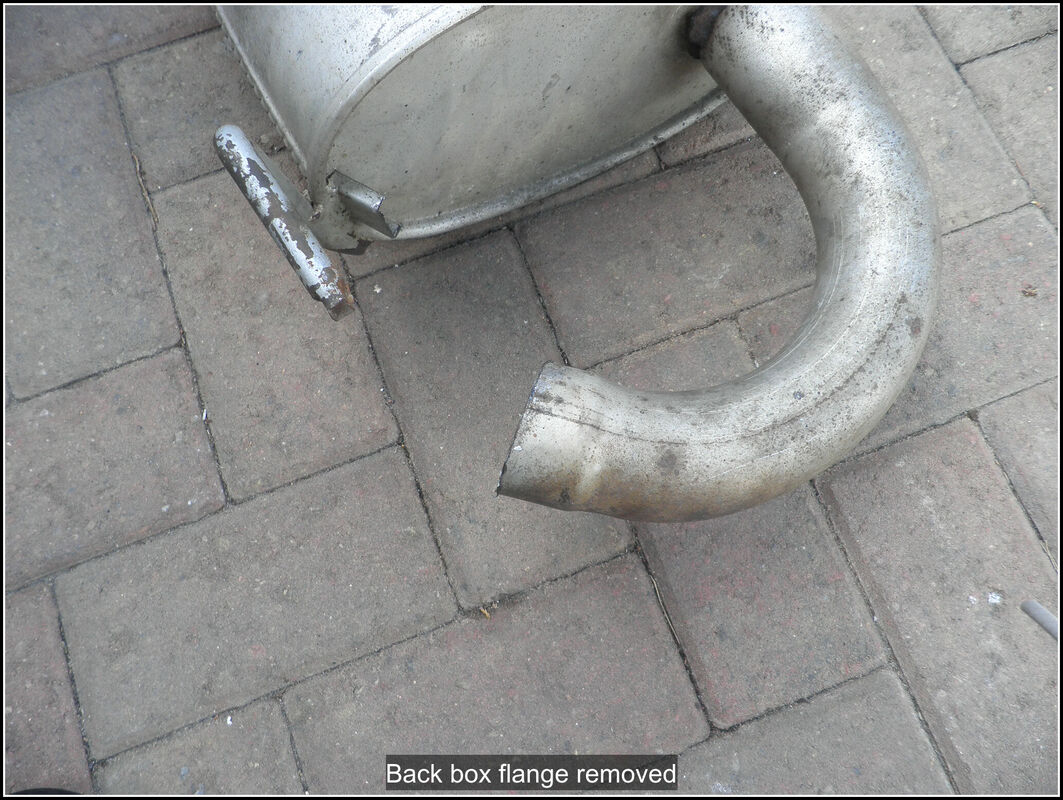
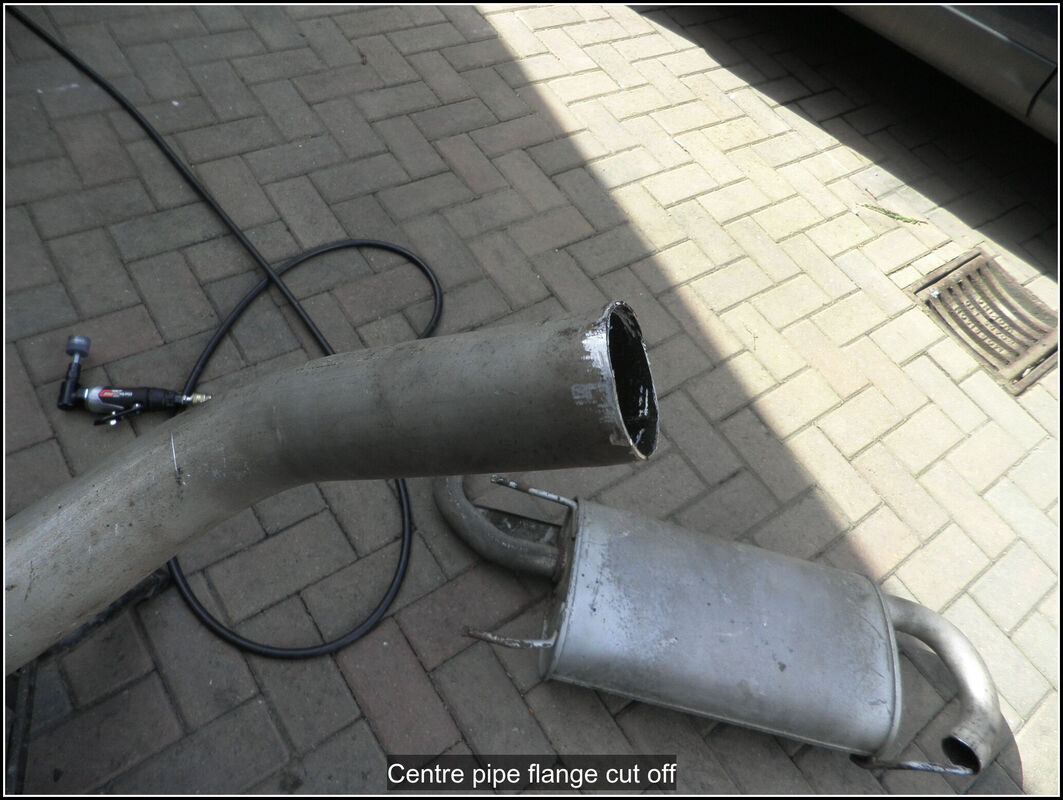
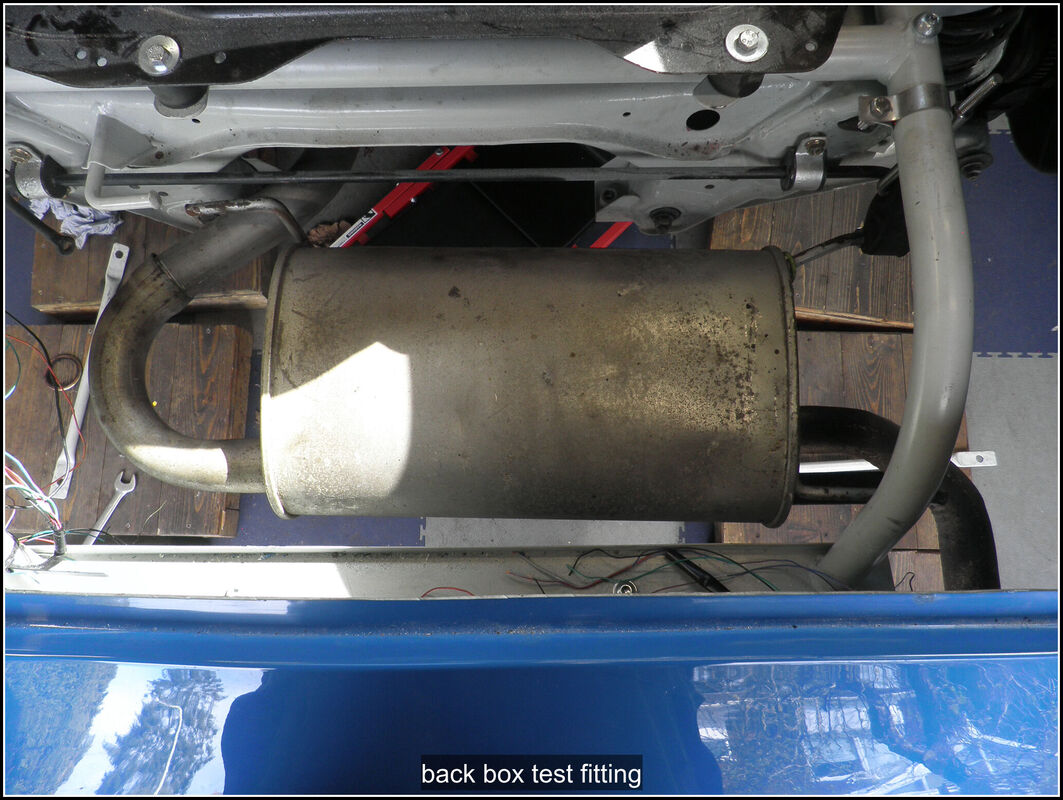
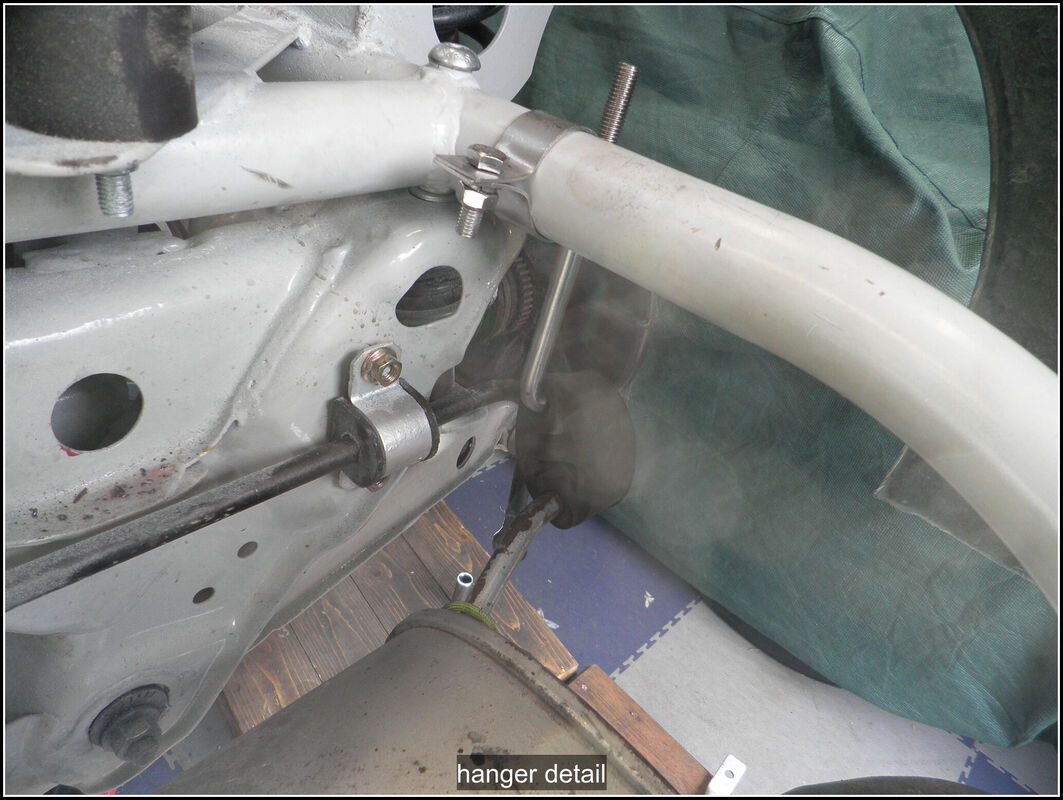
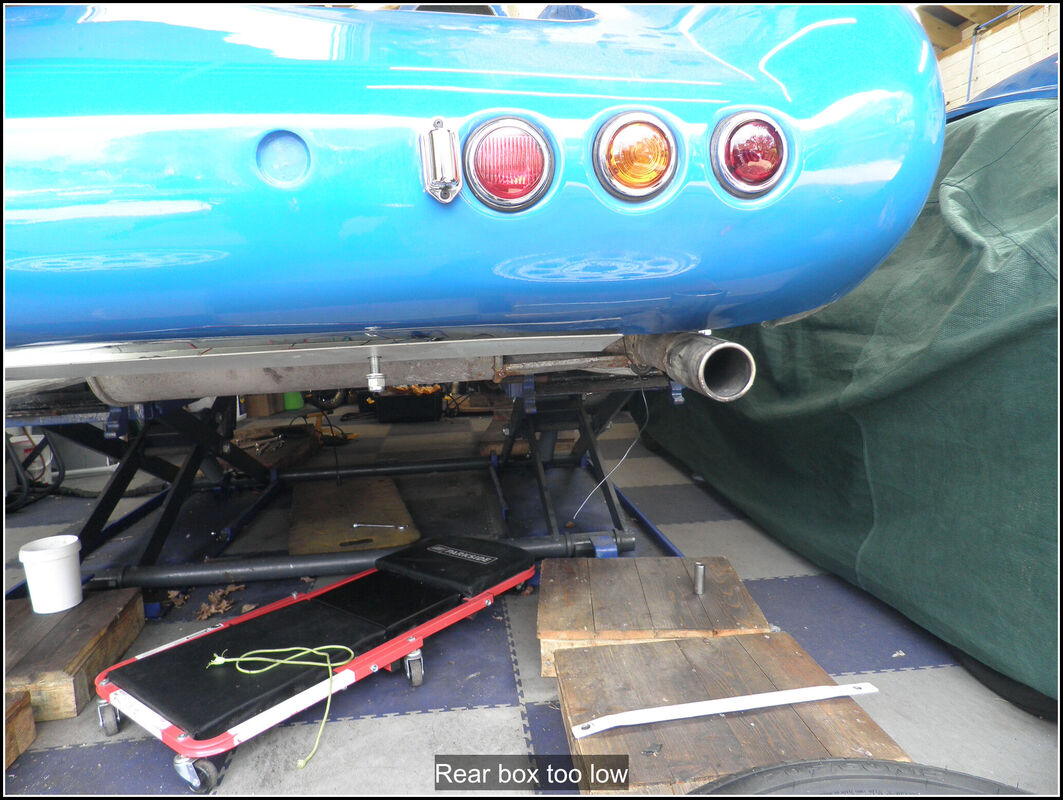
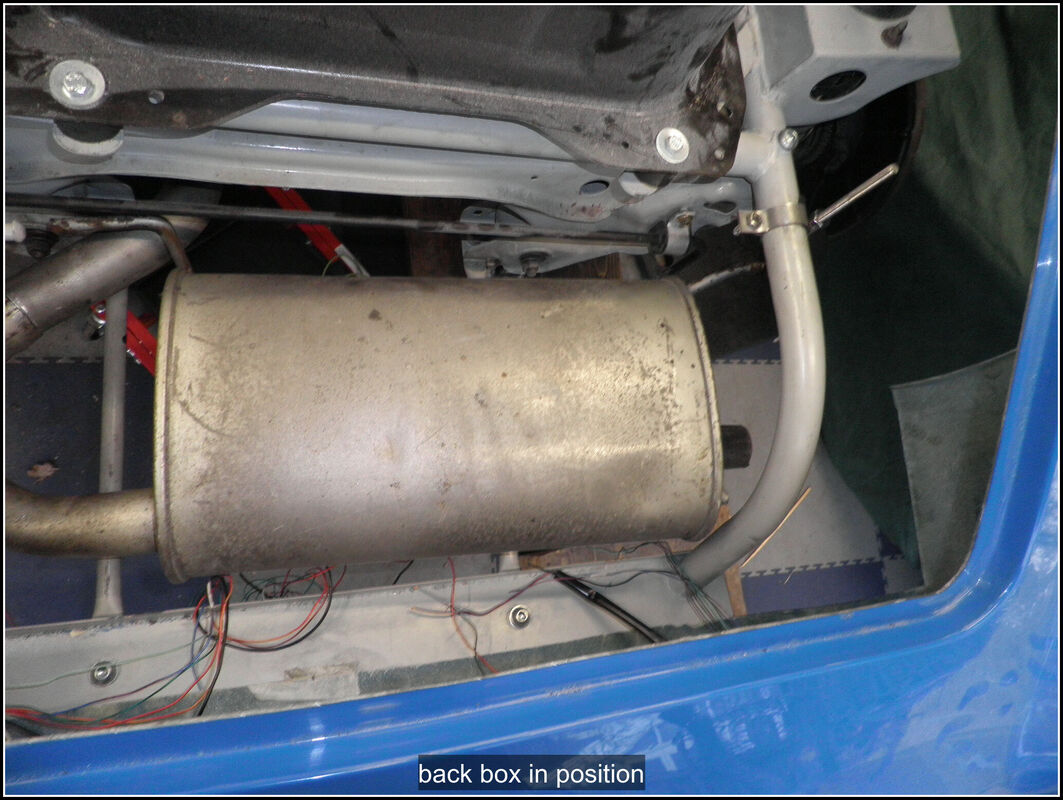
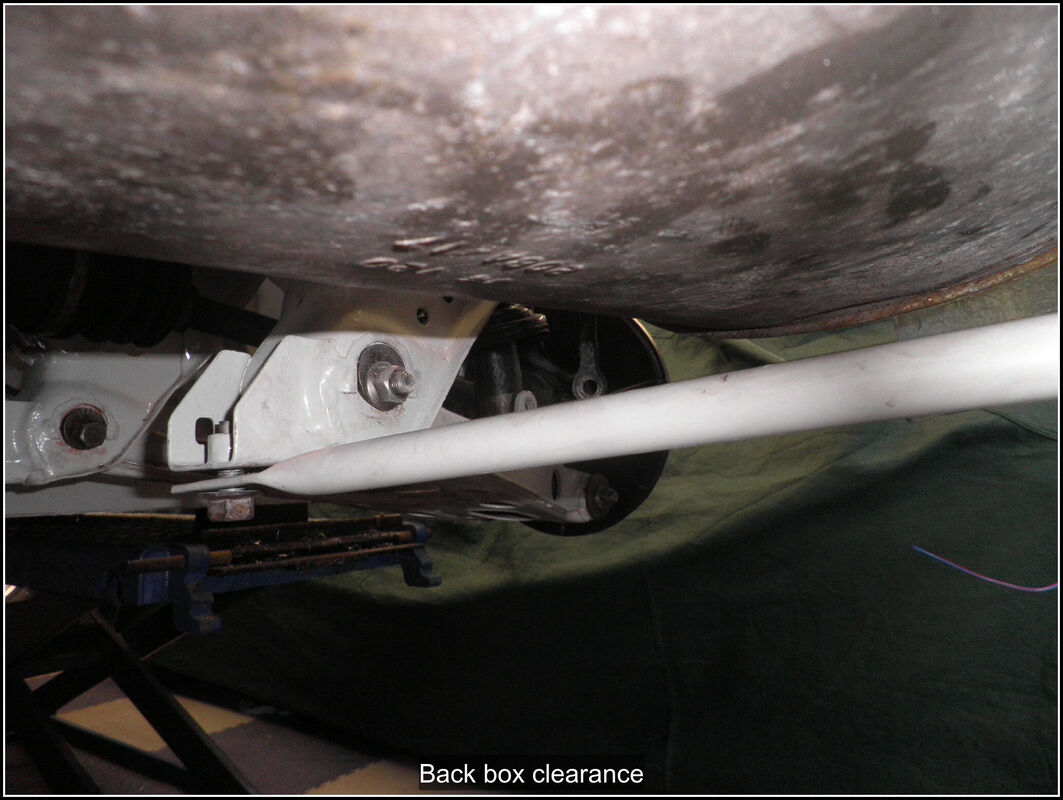
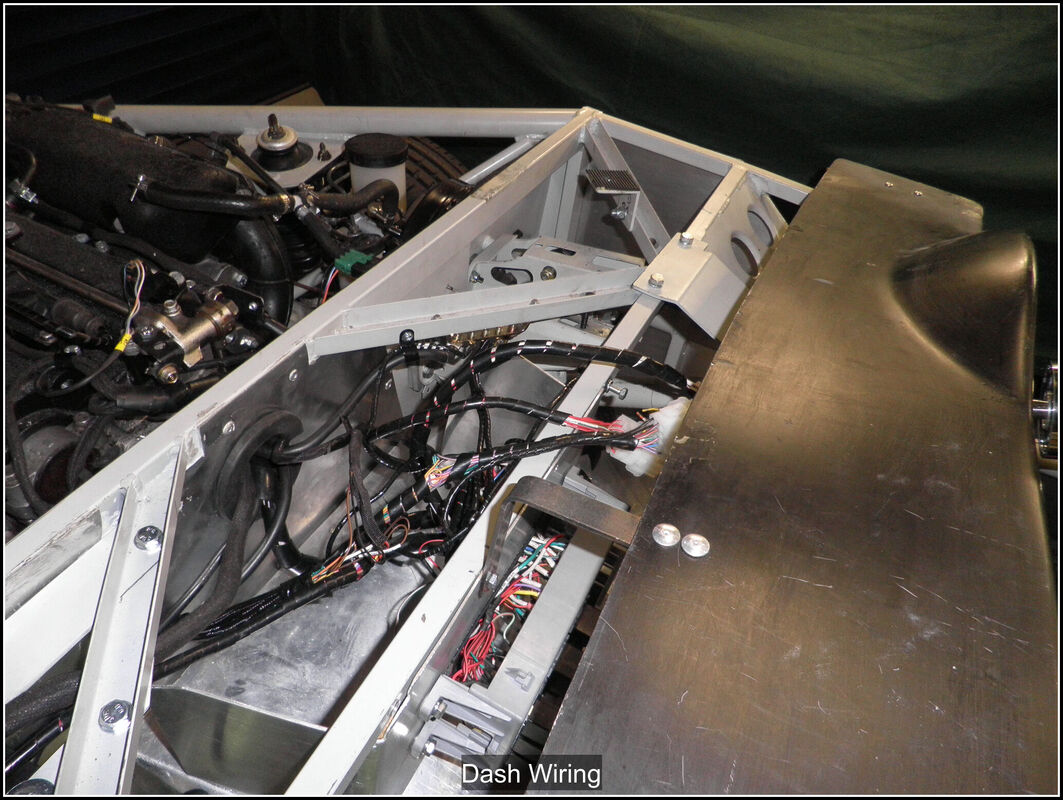
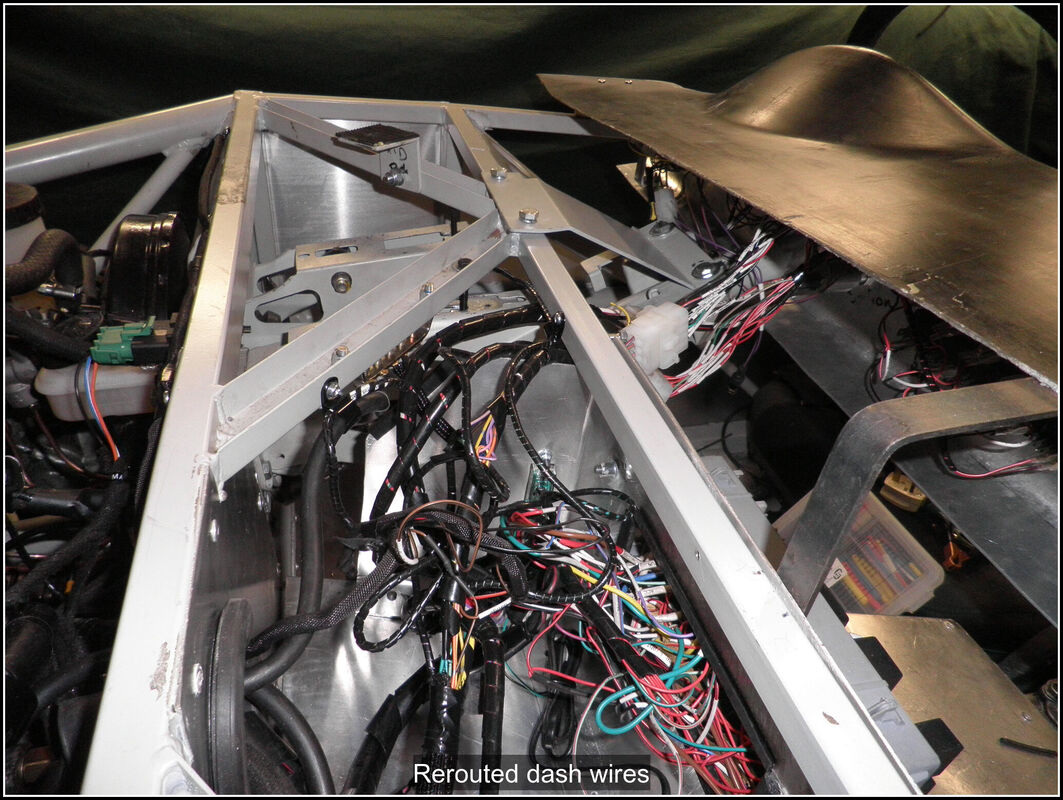
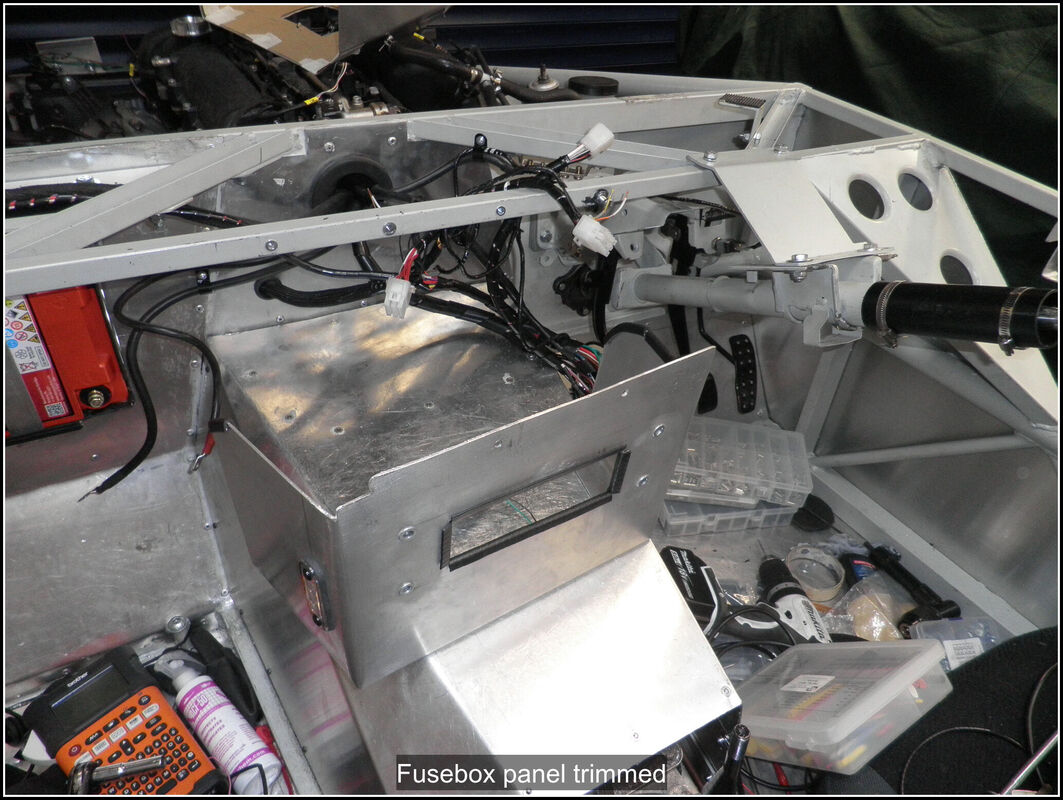
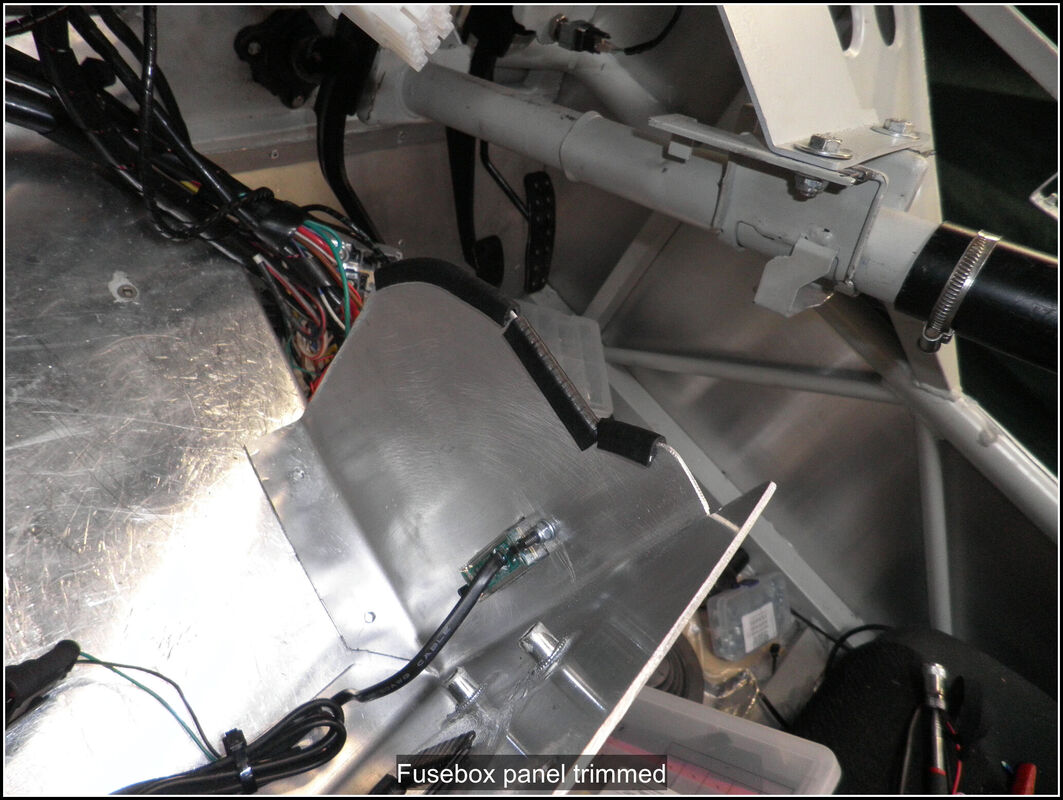
6 July 2022 Covid appeared and wiped out the weekend. I've been (over)?) thinking the drip drip whilst I've been laid up. The bottom of the fuel tank dips down quite a bit and so the drip tray has to dip down too. I've been trying to come up with ways to make the drip tray that don't involve a 500 piece jigsaw of aluminium that has to be joined together and fixed to the car somehow. My current favourite option is to make a template out of foam board then cover it in fibreglass, or take a mould from it and cast it in fibreglass. More thought to be had about that. Meanwhile in the garage I spent an hour reattaching one of the handbrake cables and searching for the bracket I had made before. I failed to find it so ended up making another one, got it cut, bent and painted. I trimmed the driving light pods flush with the bodywork. First I trimmed it closed with a cutoff wheel in my dremel, then finished it off with a flap wheel. 9 July 2022 I started by sanding back the edges of the pods with a block sander, there were some gaps so I made up some filler and filled them. Whilst I was waiting for filler to cure I fitted the handbrake cable bracket on to the PPF. That took way longer than it should have due to the awkward position of the hole in the PPF frame but eventually it was done. I then also finished fitting the handbrake cables to the calipers and making the manual adjustment at the caliper. I then turned my attention to the exhaust which has been sitting loosely assembled for a while. I undid the the centre joint applied a bit of paste and refitted it with a new gasket and torqued it up. Then I removed the backbox and sealed the flexi section with paste and clamps. I repositioned the rear support and clamped the tailpipe in position after a bit of trimming. Pretty happy how this looks and hopefully it is gas tight! Long term I'll probably get a custom system made for the car, once it is IVA'd. Back at the light pods I sanded down the cutred filler then masked up and applied som high build filler/primer. There is still one small hole I've missed so I'll need to mix up some filler for that. 10 July 2022 I mixed up some filler and filled in the holes around the driving lamps. I sanded down the filler and applied the colour coat in several layers. I also applied filler and paint to the end caps that the lamps will bolt to. I extended the wires, added a grommet, and terminated with a superseal connector. I drilled out a hole to accommodate the grommet/wiring. Whilst I was waiting for filler and paint to dry, I worked on getting the radiator expansion tank. I will need to mount the tank in a position that isn't obstructed by the body and doesn't foul the bonnet. I cut some lengths of aluminium to length, drilled holes and mounted M5 rivnuts to mount the expansion tank with. I'll finish fitting that when I take the body off again and I have better access to the firewall It seems like I blinked and June was over. Unfortunately life in general and the ramping up of car events has reduced progress on my kit build. So here is what has been going on over the last few week. 6 June 2022 Took the rear body mounts out and trimmed a bit more off the top. Loaded the new firmware on the ECU and the charge light now comes on with the ignition. Can't test if it goes off once the engine is running yet. Took the offside headlight off as I had noticed it wasn't sitting level. Extended the mounting holes with a file so I could turn it slightly. Taking the headlight out reminded me that I needed longer bolts for mounting them, the current ones only just screwed into the nut. Popped out to get some 20mm long ones and nyloc nuts to match. I took out the fuel tank which was straightforward and then clipped in the wiring loom to the chassis rail and the rear sill so that is all done. Took some measurements and ordered a 90 degree bend for the last bit of the exhaust. I also found some end caps to use with the driving light housings, these will seal the end and also be what I mount the lights to. While I had the fuel tank out I made a start on a drip tray to go under the fuel tank. I am using some offcuts so it will be made up of several bits joined together. The drip tray needs to have holes cut out to fit over the diff mount lumps which are an irregular shape. I made a cardboard template of the shape and then cut it out of a piece of aluminium sheet and then completed the fitting by filing the shape out. 8 June 2022 The end caps I ordered for the driving light housing arrived the other day so I popped out to the garage for a trial fitting. I drilled a hole in the centre and bolted the lamp units to it. Because the caps sit inside the pipe, the lights sit forward and my current housings are too short so I will need to remake them a bit longer. I will figure out some sort of fixing to hold them in to the housing, probably screws or bolts through the side. I also took the opportunity to replace the bolts for the headlamp bowls with the longer ones I bought on Monday. 26 June 2022 Wow over 2 weeks without any work on the build. Not through lack of entusiasm, just the usual life getting in the way. Back to it today and got on with the driving light housings. The previous ones were too short with the way the lights are mounted on the end caps so I started again with some new ducting. I cut some lengths longer than I needed then test fitted them in the holes with the lights mounted in the back. I spent a lot of time trying to get them pointing in exactly the right direction and trimmed the holes slightly. The ducting had quite thin walls and deformed to fit the ovality of the hole nicely but it kept springing back. I also decide I wanted some extra support near the rear to help hold it in place while I fibre glassed it in place but also afterwards just to stop the lights wobbling around. I cut some lengths of aluminium flat bar and bent them in my vice to the rough size and shape I needed. I pop riveted them to the lengths of ducting after some test fitting and measuring. They needed to be quite a long way from the end of the pipe due to the length of the end cap. I did some more test fitting but even with the bracket the ducting would spring back whenever I let go of it. I decided to use my heat gun to warm up the plastic while I held it in place so it would deform and then let if cool down while I held it. This worked quite well but it did deform a little when I got a bit too enthusiastic with the heat gun. Now I could get the housing pointing in pretty much the right direction, I will fine tune the aim with the light bracket. I drilled holes for the bottom of the brack and secured them to the body with nuts bolts and large washers. I marked the line where the body met the housing and then used my Dremel to cut, the lines with about 10mm extra. The plan is to sand these down to the body onece they are fixed in place and then fill and paint them. I made up some resing and cut some pieces of matting and fibre glassed the housings to the body, I had just enough to do one layer on both side so I'll get some more and do another layer. While the GRP was curing I cut out the hole for the other section of the fuel tank drip tray. Felt like I had made a bit of good progress today. 23 May 2022 Had a response from Dave at CANEMS and the ECU triggers the charge light once the voltage drops below 12.5v, checked my battery and it is at 12.82v. Turning on the headlights was enough to drop the voltage and trigger the charge light. Dave said the trigger voltage is programmable so I have asked him for details about how to change the setting. While the dash was out for the testing I drilled a hole to mount the push button for the speedo programming. Reinstalled the dash panel plugged it back in and tested the charge light again (with the headlights on) all working. I then made a start on the driving light covers. I made a paper template from the moulds I made the other week and cut out a piece of polycarbonate about 1cm larger all round with my jigsaw. Making it a bit bigger makes it easier when trying to align the flat polycarbonate on the vurved mould. I balanced the mould on top of a bit of exhaust pipe and then the polycarbonate on top of that, then I placed it carefully in my oven. I set it at about 150C it took about 10-15 minutes to droop on to my mould, then I turned it off and opened the door to allow it to cool down. I trimmed it using my jigsaw and then used a flap wheel to smooth it down to the right size. I used a hand held sanding block to finally smooth the edge. Things I learned doing this. The sole of the jigsaw will scratch the polycarbonate so mask it up with tape. Leaving the polycarbonate in the oven too long will cause distortion so turn it off and open the door to cool it down quicker. 25 May 2022 CANEMS got back to me with a new firmware load for the ECU. Need to load that up sometime. The Seal-It grommet arrived but it's simply too small and isn't going to work. So I took the MX5 grommet out and ran some edge trim around the hole to make it slightly smaller and refitted the grommet, now it is held much tighter in the firewall. Then I put tie wrap on the thin end of the grommet to help hold the bundle together. 27 May 2022 Tried to improve the fit of the aluminium mould for the nearside driving light. Didn't seem to make much of an improvement but on reflection I don't think it wil matter too much once the hole is cut out. Did some trial drilling on a polycarbonate offcut to see how easy or hard it was going to be and how close to the edge I need it to be. It drill verya easily with a sharp drill. I'm going to use M4 dome headed bolts to secure the covers to the body. I decided that spacing the holes about 6mm from the edge would work. That led me to set 12mm as the width at the edge of the hole I need to cut in the body. 28 May 2022 Came up with a plan to mark the 12mm cut line on the bodywork. I printed a simple 24mm diameter disc with a hole in the middle (12mm from the edge) on my 3d printer. I put a pencil in the centre hole and pressed the edge of the disc against the edge of the cutout on the body, and rolled it round the aperture. This worked well and gave me my cut line on the masking tape. 2 June 2022 Got my drill out and started drilling holes so I could open the apertures for my driving lights. First I chain drilled well inside the line I had marked, the fibreglass is surprisingly thick but the 10mm drill made short work of it. Then a hacksaw blade was inserted and I cut through to join the holes together. Then I used a flap wheel in my die grinder tto smooth out and remove the excess fibreglass. I test fitted the lamp housing I made. The housing turned out to be slightly smaller than the 12mm line but as I did test fitting I was able to stop before the aperture was too big. With the thickness of the fibreglass I have changed my thoughts about how to fix the housing. I was going to bond it to directly to the inside surface but now the pipe can fit inside the aperture and I can bond along the edge. It will need additional bonding inside which I will probably do with some fibreglass. In hindsight it would probably have been easier to cut the apertures first then push the pipe in and then trim it to the aperture edge. I might do that anyway as the housings are just a bit shorted than I want. I also need to find some end caps to seal the inside and hopefully I can mount the lights on to that, which would be easier than what I had planned before. I plan to spray the pipe and edge in the body colour and there will be a painted edge on the polycarbonate cover to hide the edge too. 11 May 2022 Popped out to the garage, cleaned up the fuel filler pipe and glued it to the reducer with JB Weld. Very happy with how that's worked. The pipe will get cleaned and painted once I'm happy witht the fit. A bracket will be required to bolt it to the chassis somewhere. Exhaust flexi pipe has arrived but doesn't feel very flexible... Will see if it works when I connect to the exhaust. Might see if I can bend the exhaust pipe enough to make it work. Otherwise will look at some different flexi pipe. 16 May 2022 Sorted out the connection for the side light warning lamp. Did some testing on the charge warning lamp. It's controlled by the ECU but isn't coming on when I turn on the ignition. Feed is working and the wire to the ECU doesn't have a break so a bit confused so emailed CANEMS to check how it should be working. Took the exhaust centre pipe out and trimmed it a bit. Did a test fit with the back box and flexi pipe, it's pretty close to being done now and I think the 2 hangers I have will work. 19 May 2022Had a look at the positioning for the coolant expansion tank on the firewall. Rearranged and sealed the sight gauge and inlet and outlets. Loosley attached the rear ARB droplinks. Popped the wheels back on now the brake fluid leaks seem to be resolved. 22 May 2022 Had a think about where I want to position the fuel filler, taped it and marked it and then left it for me to ponder over. Decided I really wasn't happy with the firewall grommet through to the engine bay, it doesn't fit well and doesn't hold the cables effectively either. I've been looking around for a while, there don't seem to be many good solutions for this which I find strange as every car needs to run a fairly chunky bit of wiring through the bulkhead. I stumbled across the Seal-It split firewall grommet so I've ordered one from Merlin motorsport (the one with the 1” hole). The good thing is that it is split in half and is bolted to the firewall so I can install it without having to pull all the wires back through. In future if something changes it will be a quick job to remove as well. 2 May 2022 Got started on the covers for the driving lamps. Before I cut anything I wanted to take a mold fromt the apertures so I can mold the polycarbonate to the right shape. With some brown paper as a pattern; some thin sheet aluminium and a couple of hammers I did my best to make a profile. I've never done anything like this before so there was a lot of trial and error before I was happy. I expect any panel beater will be horrified but they are only going to be used to form the covers so doesn't need to be perfect. Ordered some polycarbonate sheet for the driving light covers so I can make the covers and then start to vut out the apertures and get the lights fitted. 6 May 2022 My spacers and mirrors arrived today. Had a quick check of one of the spacers on the front with the wheels and they fit lovely. As I expected I will needed extended wheel studs to make sure the nuts have enough thread to tighten too so place an order for those today from Demon Tweeks the ARP ones seemed very expensive at £30 for 4 and as I need 16 that's more than the spacers but found some cheaper ones from Demon Tweeks at under £30 for 8. The front and rear hub studs are different it seems so I've hopefully ordered the right ones. 7 May 2022 Only a bit of time on the car today, most of the day spent getting my bicycle ready for riding. Had a go at soldering the reducer onto the fuel filler pipe but failed, cleaned everything up and applied flux but the solder didn't penetrate at all. Plan B is to use JB Weld on it. Just need to get some. Order some polycarbonate sheet online as no one seems to stock it locally. Added a couple of p-clips to hold the loom underneath the fuel tank. 9 May 2022 A free day in the garage today. Started with fine tuning the back box position, and ensure it is fully supported. The rearmost part of the boxwas unsupported so I modified one of the clamps to provide a hanger on the exit pipe and moved the offside hange to use with it, that seemed to work well. I was able to use the original subframe hanger with one of the nearside hangers. It just needs a bit of support on the inlet pipe. I've ordered up some more hangers and rubber mounts and also a short section of flexi-hose to join the exhaust and back pipe together, the the short rigid joiner I'd bought didn't work with the angle of the back box pipe. My extended wheels studs arrived so I decided to get those fitted, and then bleed the brakes, I'd not refilled the system since replacing the rear calipers as I knew I was going to have to remove the calipers and discs again if I needed extended studs. Once I had the caliper and disc off, a lump hammer took care of removing the old studs. I had to modify the brake shield to get clearance to fit the new longer ones but a bit of cutting with an angle grinder and files sorted that out. I used an old cut down wheel nut and some large washer to pull the new studs in. The rear ones on mine are different to the front and in the videos I'd watched they had to grind a flat on one side to get them in. Thankfully the ones I bought were already ground down to shape. So with the discs and calipers back on I filled the reservoir and went round bleeding each corner in turn. I used a suction bleeder with my compressor and a bit of gravity cleeding. Pedal seems nice and firm without servo assistance. 23 April 2022 Fitted the offside side indicator. I used the gasket for the lamp as a template to mark on some masking tape. Then I drilled out the centre with a 10mm drill and enlarged it with a small sanding drum in my dremel. I used some small files to slowly shape it to the correct size. It took me about an hour of filing and checking but it finally popped into place. Next up I have to do it all again on the other side! 24 April 2022 Fitted the nearside indicator to the car. Terminated the lamp and body wires with SuperSeal plugs. Terminated the front indicator lamp and body wires with SuperSeal plugs. Successfully tested the indicator and hazard functions. 25 April 2022 Made a start on fitting the additional set of high beams that will go in the apertures either side of the grill. Spent a while looking at it and taking some measurements. Took a rough reading of the angle off the face of the aperture using a long square clamped to the front of the chassis and a ruler across the aperture. I thought about designing and 3d printing something but the surface is quite complex and I would have probably have to file it down to make it fit. As an experiment I bought a short length of plastic pipe from Screwfix and then cut it into a couple of 100mm lengths then roughly marked the angle on the pipe and cut it off with a handsaw. Then I shaped it with a flap wheel and lots of trial fitting to get the length of pipe to match the inside contour of the aperture. I'm pretty happy with the results and I think they will work. My plan is to bond the pipe to the inside with fibreglass and the light will be mounted inside the pipe using its bracket and a 3d printed spacer. There should be enough movement with the bracket mounting to adjust for inconsistencies in the tube positions. 28 April 2022 Designed and 3d printed a space to fit between the lamp bracket and the tube housing. Just a prototype at the moment but it fits well. I will need to adjust the size to position the light vertically in the tube once it is fitted but that is simple to do. Looked at the fuel filler again, the old MX5 filler pipe matches my filler cap diameter (51mm) but Mazda made the pipe on the fuel tank smaller than the bottom of the filler neck. They solved that with a rubber pipe that is different at both ends but that doesn't fit with the position of my filler. I've got flexi fuel filler hose to connect to the tank (38mm) and for the filler cap. So I need an adaptor to reduce the end of the pipe from 42mm down to 38mm. I found a mild steel reducer pipe that will do nicely, just need to braze it on to the end. I also ordered the wheel spacers, I've gone for 10mm ones. 1 May 2022 Up to the National Kit Car Show at Stoneleigh today, had a good chat with Andy on his stand and a chance for another look round his demonstrator. Picked a few bits at tha show for the build, boot lock and handle, interior mirror and a few more tools. Had a chat with Intatrim and Classic Cobra Interiors about seats, but nothing ordered yet; also had a chat with Protech about shocks. Looked around the club stands but didn't see any other Replicars. Back at home I spent a few minutes in the garage to trim down the Mazda filler neck and check the fit of my reducer which fitted perfectly. When I got home I ordered some wing mirrors similar to the ones that Andy has on the demonstrator which I like and satisfied the IVA test. 4 April 2022 Started connecting up the rear lights. Spent a bit of time thinking about how to group the wires and connectors. I terminated the brake, tail, number plate, and earths with SuperSeal terminals. I tested each one with my power probe, but first I had to fix a broken wire in the power probe. It's a really useful tool for applying voltage to components and checking continuity. To simplify the earth wires I added an earth bar on the rear outrigger plate then I made up earths for the number plate and tail lamps. Connected up the battery and added the fuses and turned on the side lamp switch. Success, the tail and number plate lights came on as well as the gauge illumination and warning light. Currently the terminals haven't been put into the holders, just while I check everything. Tested the headlight units and labelled each of the wires and terminated them with SuperSeal connectors. I found the side lamp bulb hadn't been put in correctly on one side so wasn't working. 5 April 2022 Did some calculations on how many of each connector, I'm going to need. I had bought a multi-pack some time ago but as always happens there aren't enough of the ones I need the most (2-way) so ordered some additional ones. I also ordered some more earth rings as I'm getting short of them. I want to have some sort of cover to go over the earth bar at the back to protect it and the connections a bit. So I drew up a design in CAD and after a few trial prints printed it off in some flexible filament so it can be fitted over the earth bar. 14 April 2022 Made up some earth wires for the front headlamps, additional main beams and indicator, added them to the earth bar. Got the horn installed and tested all working! 15 April 2022 A full day in the garage today, the first in a long time. Made up the additional wiring to extend the wires across to the offside lights. Put the earth wires into the p-clips. Terminated the wires to connect to the headlamp units and assembled the 4-way multiplug. Tested the sidelights, all working front and rear so one circuit ticked off. Put all the fuses in for the ignition switched circuits. Ignition on gave me the expected warning lights so that was good. Dip beams initially worked but when turning them off and on at the switch they would go off but not come back on again. Then I tried the main beam and while the warning light came on the lights themselves did not. Spent a long time testing the high beam circuit, I removed the high beam relay from the fusebox so I could check the resistances of the wires and make sure there wasn't a break. All seemed OK. Connected up the power and load to the relay and applied power to the coil circuit using my power probe and the main beam came on. So the problem was somewhere in the switch circuit. I put the relay back in the holder with the power/load wirtes inserted and made up some test leads for the switch circuit relay. After much testing many different scenario's I eventually found that the circuit works if I remove the warning light from the ciruit. Testing the warning light it has a 38ohm resistance which to me seems quite high. Measuring the other warning lights they are 28 ohm which seems high when I compare it to a small cap bulb at 5 ohm. I think the high resistance is causing too much voltage drop to trigger the relay but I need to do some more voltage checks. 16 April 2022 Had a chat with the supplier of the warning lights to check if the resistance I measured was correct but they couldn't confirm me. However they suggested I change the wiring so the warning light is fed by the same feed as the lights rather than by the switch. Had a think and a look at my wiring and that made sense and wouldn't be too difficult to do. I decided that I wanted to do all the lamps that way for consistency. I took the dash out of the car again and moved the wires around and made up the additional feed wires and earths for the warning lamps on the dash. I also took the time to make up longer wires to feed the charge, brake and oil pressure lights as this would give me a bit more length on the multiplug which was a bit tight when connecting to the main loom. I made up new wires to feed the fog, side, dip and high beam warning lights and spliced them into the relevant circuits and hooked them up to the spare positions on the multi plug. I had to order some spare pins as I was one short so I'll add that when they arrive. I tested all the circuits and side, dip and main beam circuits are all working. I moved to the back of the car and termiinated all the remaining lamp wires and made up the SuperSeal connectors. I've been able to tick off the reverse and fog light circuits which I am happy with. Tested the rear indicator circuits and somehow I have managed to mix up the left and right wires, I checked and the issue is the same all down the car which is not surprising as the are all spliced together. I should be able to just swap the connections on the indicator switch but that means taking the dash out again so it will have to wait for another day. 17 April 2022 A few minutes to take the dash out and swap the indicator wires round on the switch. Popped the dash back and tested and now they work the right way round. 18 April 2022 Brake lights tested and working, that's all the external light circuits tested now. Bundled and wrapped the wires in the rear of the car, haven't p-clipped them in place yet. Moved on to fit the front indicators. I masked the bottom of the front light recess and marked out the position for the indicators, a bit of lining up by eye and a bit of measuring to keep them looking symmetrical. I pilot drilled and cut out a hole with a 44mm holesaw, that made a nice tight fit for the indicators to sit in, I followed Andy's advice and pushed them down so the rubber was just proud of the surface. I don't think they will push all the way through due to the indicator lens. Made a start on deciding how and where to position the side indicators. 7 March 2022 Spent the afternoon having a tidy up in the garage, things have been piling up around the garage and there were tools everywhere. Spent a good few hours sorting things out, moving a few things into the shed out of the way. Move the car out of the garage and then back in on my lift ready to start work on it. I feel like I have a lot more room around the car again. 13 March 2022 Got a few hours this afternoon so got the car up in the air and removed the catalyst and centre pipe. I cleaned up the flange faces and got the replacement centre pipe I bought a while back and cleaned that up too. I put a bung in the rear O2 sensor boss as I don't need that with my ECU. I remounted the cat section with a new gasket and the centre section with a new seal. I tried fitting the back box, it's a tight fit in the space and runs quite close to the rear outrigger. The tail pipe will need cutting so I can rotate it down a bit, and I suspect a bit of hammering will be needed to create a bit of clearance. 21 March 2022 Decorating in the house has been getting in the way of car stuff. I went up to the NEC Restoration show and bought some supplies but no bits for the kit. I got out to the garage for a few hours today. I have pulled the wheels off as I noticed a leak of fluid from the rear nearside brake caliper. After some investigation it appears to be coming from the piston so I stripped it down I can't see anything specifically wrong but there seems to be corrosion in the channels that hold the seal is place so I suspect they are not sealing properly. Tried to clean them up but I gave up and ordered a pair off ebay which I will fit. Don't want to take any chances with the brakes. Spent some time thinking about the fuel tank filler position and also tried out some boot/bonnet edge trim samples I picked up from the show. Had another think about the exhaust rear box and decided that the centre pipe needs to be shortened to move the box closer to the subframe and away from the rear outrigger. If I cut the flanged joing off then I think the end of the back box pipe will slide over the end of the centre pipe, so a couple of slits and a clamp should sort that out. Due to the angle of the pipework, the back box will move slightly to the offside but I don't think it will be a problem. I think I need to drop the centre pipe down a bit to see where I need to make the cut and see where the back box will end up is the next step. I've ordered some clamp on exhaust hangers that I can use to make the back box mounting for the offside. 2 April 2022 A week away on holiday so not much progress. However having had a break I was keen to get back in the garage and had a fews hours after getting home. The replacement calipers had arrived so I swapped those over. I need to buy some more brake fluid so I can bleed everything again. My exhaust hangers had also arrived so I set about fitting the back box. I cut the flange off the back box and then put it back in against the centre pipe and marked where to cut off the flange. Then I took the centre pipe out and cut the end off. Refitting everything and I was pleased with the initial fitting, the back box wasn't rubbing against the rear outrigger anymore and the clamp on hanger was supporting it nicely. The end of the back box fitted nicely over the centre pipe, but there wasn't much overlap. However the box was sitting too low to get the rear support bars on. I cut the tailpipe off, it was fouling the rear body and I don't want to cut the bodywork for it until I have completed getting the box in place. I also cut off one of the hangers that was fouling the rear outrigger. With these out of the way I could get the box in with the rear supports in place but the clamp on hanger was too low, not a huge problem I just had to extend the thread on the hanger so I could screw it further in. My tap and die set came to the rescue, although it was a pretty tough session of threading as the bar is made from stainless. However, finally I got it done and I'm now pretty happy with the position of the back box. I will need to add another support to the other side of the box which I plan to do by adding a support on the pipe. I might change the joint between the centre pipe and the back box to a short flex section. 26 February 2021 Started with making the loom up for the Gauge Wizard, I extended the wires provided with the kit (power, ground, sender, gauge) then decided where to mount the unit, I'm planning to mount it to the inside the the fusebox panel with double sided tape. However the loom needs to be long enough that I can reach it to program it. I spliced the power for the gauge wizard into the feed for the gauges. I then cut the fuel gauge/sender wire and joined that to the two connections on the Gauge Wizard. I then spent some time depinning and rewiring some of the connections to untangle some of the wires on the back of the fuesbox. It's not a work of art but it's about as tidy as I can make it. Once I've hada chance to test the circuits I'll add more loom tape and p-clips. Made some updates to the fuesbox layout to accommodate the rerouted wires and add the one I forgot for the ECU ignition switch feed. I made up the connections to the brake lamp switch on the brake pedal and ran the feed wire back to the fusebox. I then cut the remaining wires to length and terminated them on the fusebox. I added some clips for the wiring to the brake lamp switch and connected the earth wires to the earth bar behind the dash. I then reassembled the fusebox panel and screwed it in place then mounted the dash and instrument panel to check how it all fitted together. I had planned to route the dash wires over the bulkhead but then realised that I was also going to panel that over eventually so re-routed the dash connections round the side of the fusebox panel. I will need to cut out a bit more of fusebox panel to allow the cables route more easily. 29 February 2021 Not much 'action' but I've been thinking a lot about the dash and body position. Previously I've worked to align the body and allow the bonnet to clear the VVT. This has meant it currently sits higher at the rear than I want which will make joining the body sides and rear to the chassis more difficult. My chassis is sitting with a nice rake between the front and rear (relative to the ground), the wheels are central within the arches and even left to right. I'm going to trim the rear body supports to drop the body so it rest on the rear outrigger as it should. Then I'll check to see how parallel the body side is with the chassis floor and adjust the front mounts if I need to. Finally I will look at the bonnet clearance over the engine. If it's a problem, I will have a couple of choices; I can put a spacer between the chassis and the subframe to raise the chassis (and body) slightly or I can get one of Andy's new bonnets that has a bulge in it. 6 March 2021 Refitted the body and trimmed the rear mounts, the rear body work now sits about 5mm above the rear sill panel, I may trim it a bit more but it doesn't need much. Had a bit of a look around and I'm pretty happy with how the body sites, nothing looks obviously out of line. The TVR is going off to be serviced tomorrow so I will pull the Replicar out and have a look in the daylight at it. The garage needs a big clean up and sort out which I plan to do while the TVR is away this week. The Replicar is going to go on the lift so I can work on the connections for the lights, fit the horns, the second pair of headlights, the side and front indicators. Then it will be time to test the electrics. While it is on the lift I will also fit my new centre exhaust pipe and test the rear silencer fit. |
AuthorThis is my first kit car although I've messed about with cars all my life. Archives
November 2023
Categories |


 RSS Feed
