|
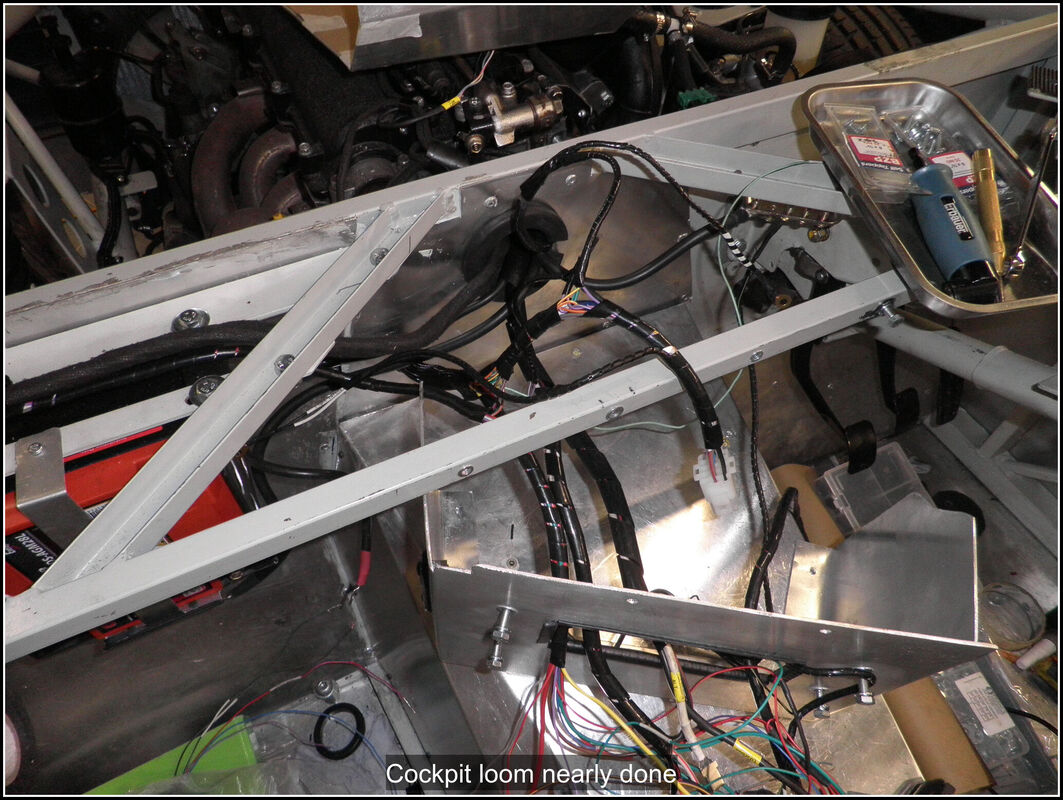
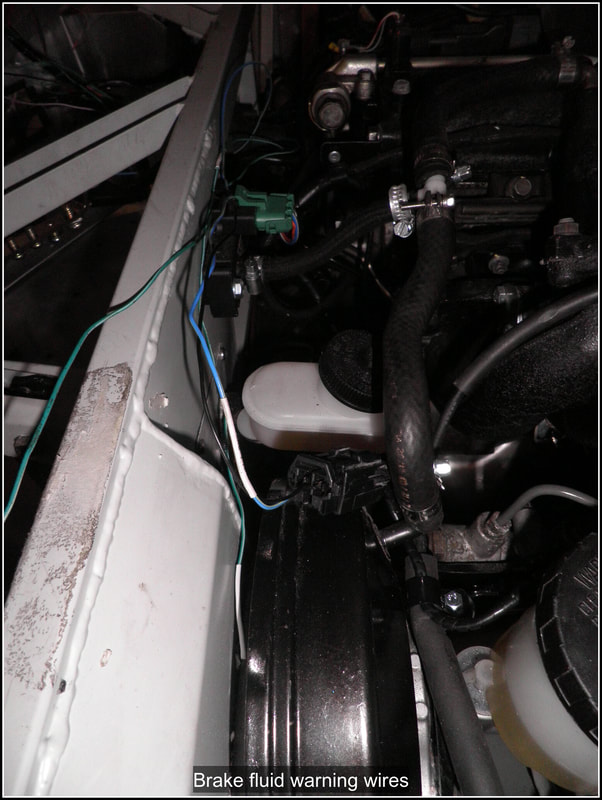
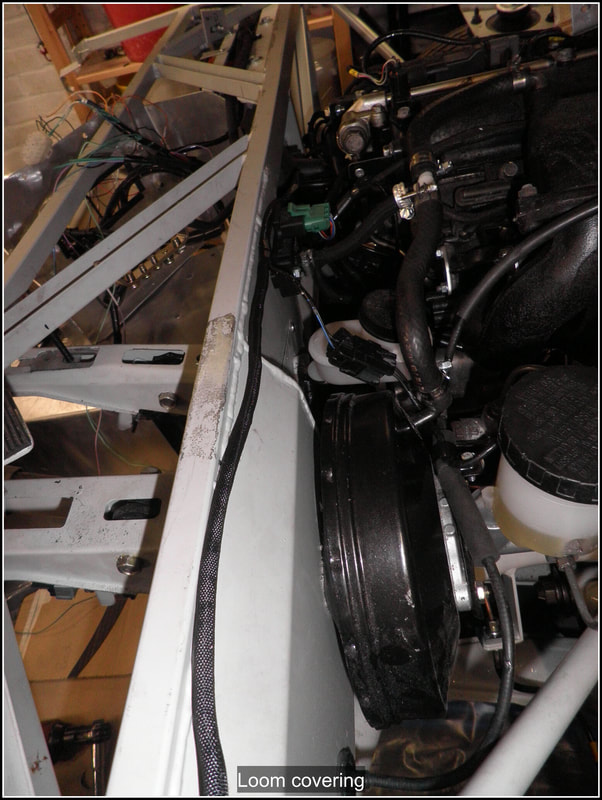
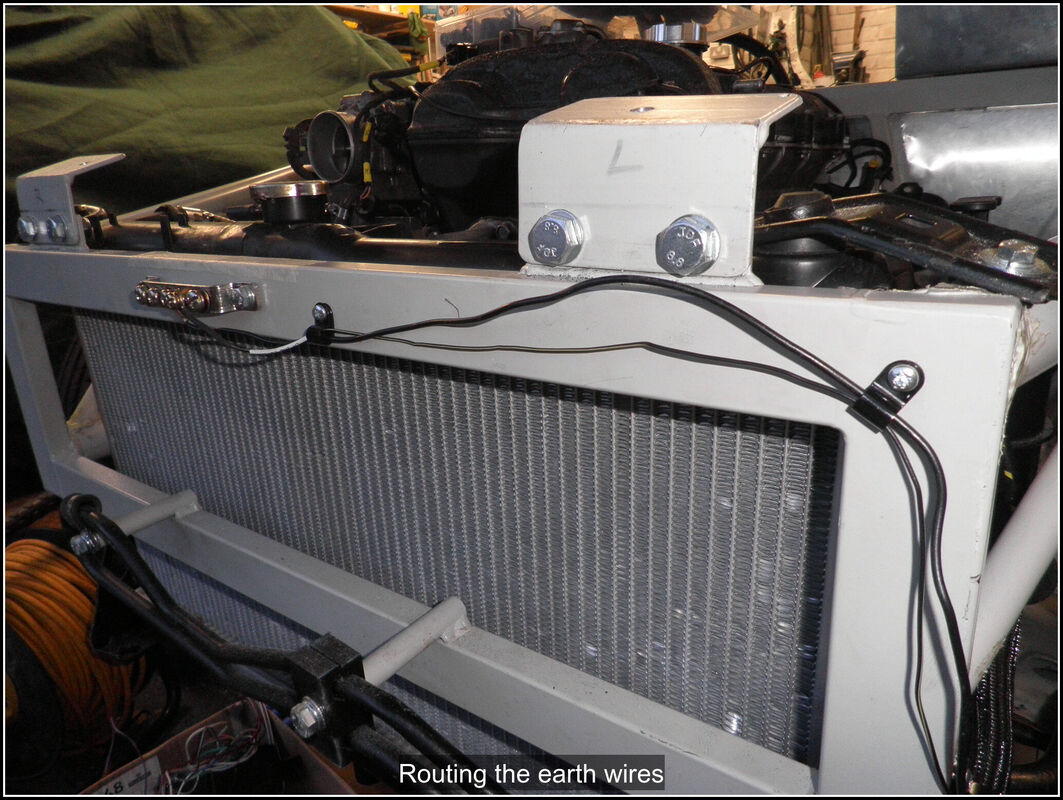
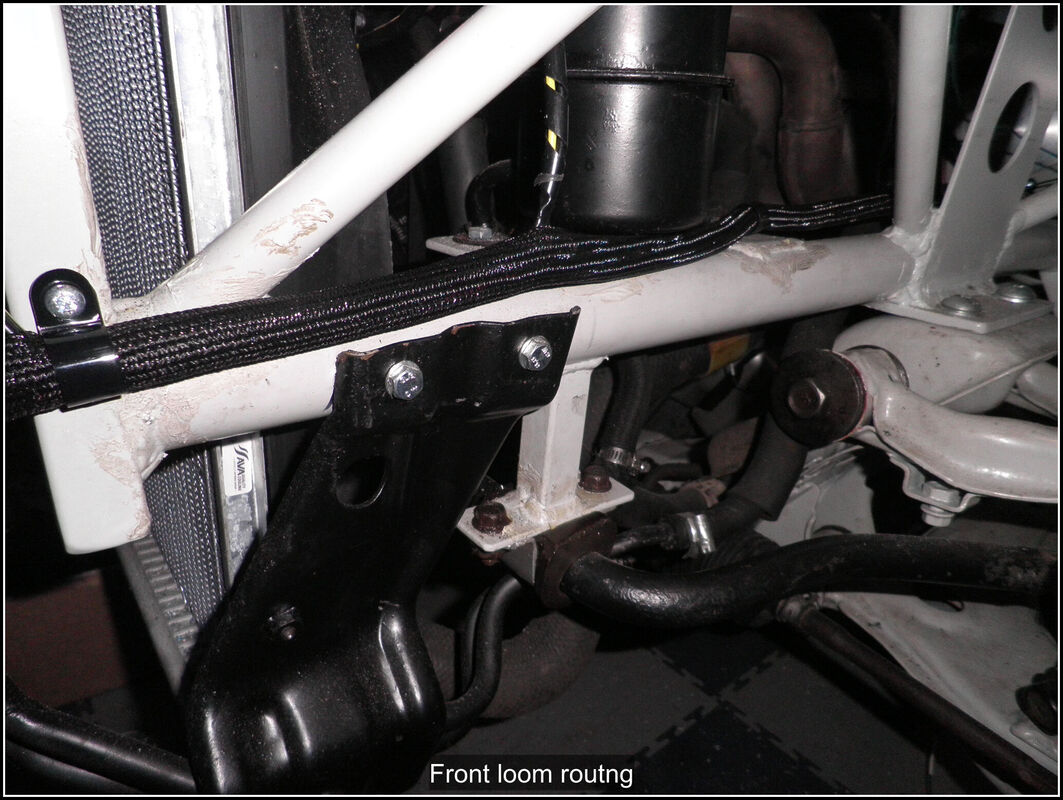
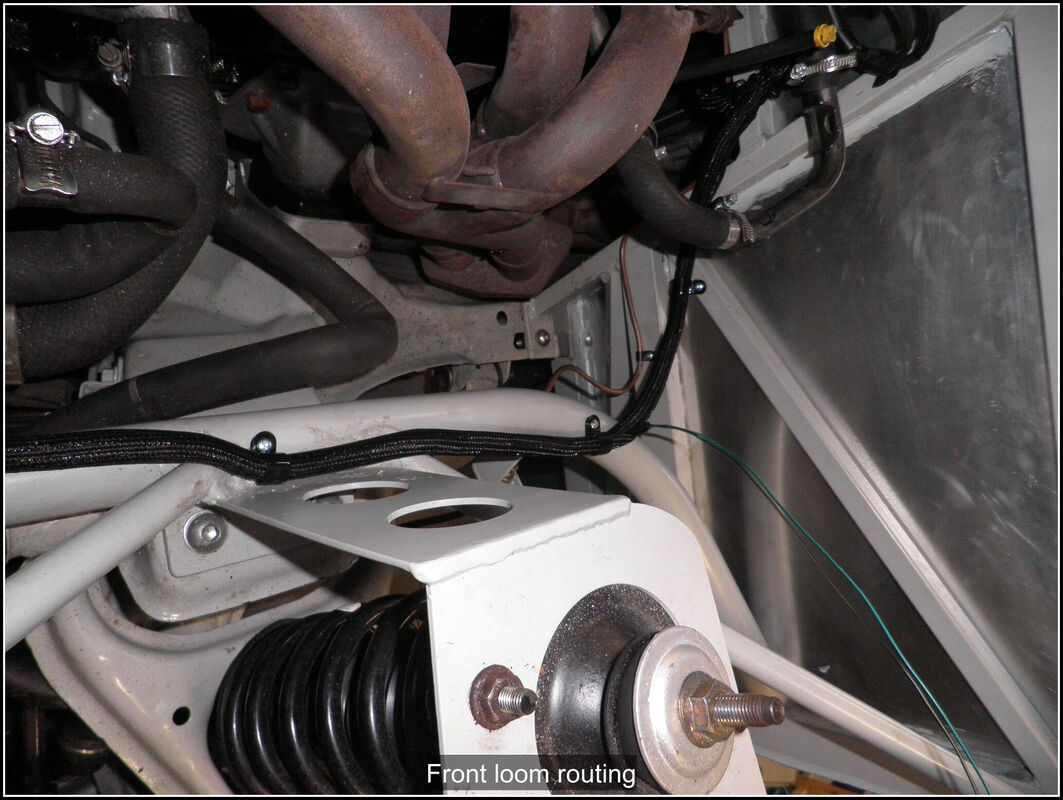
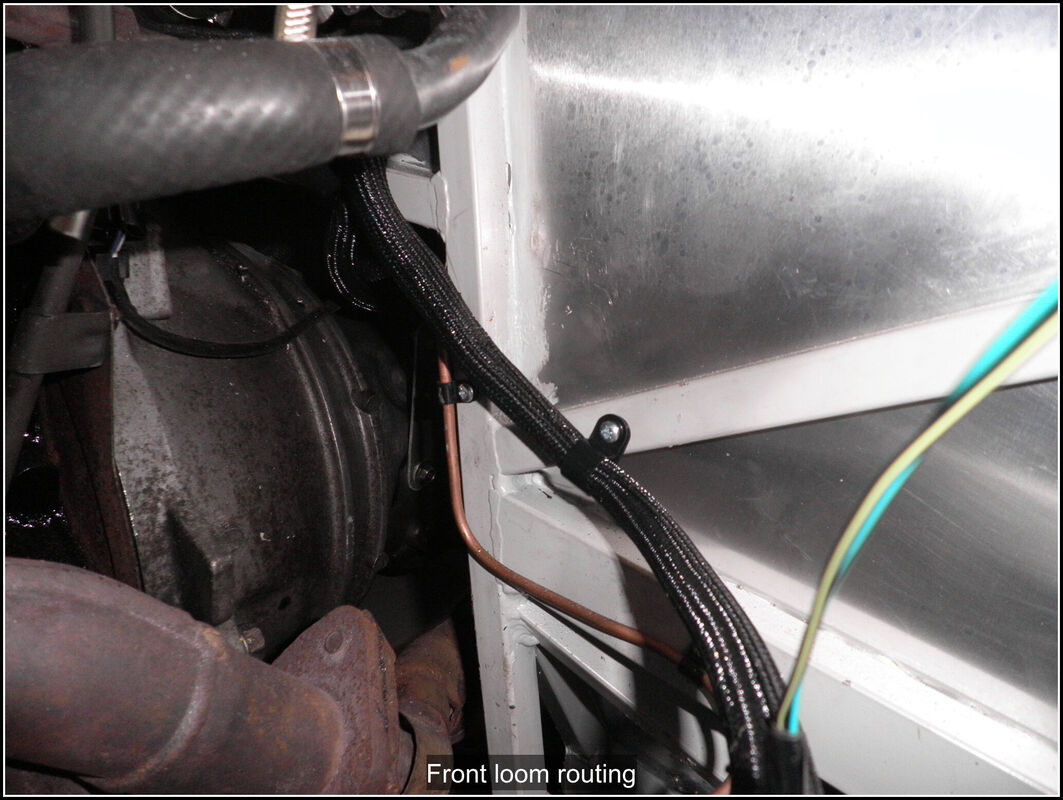
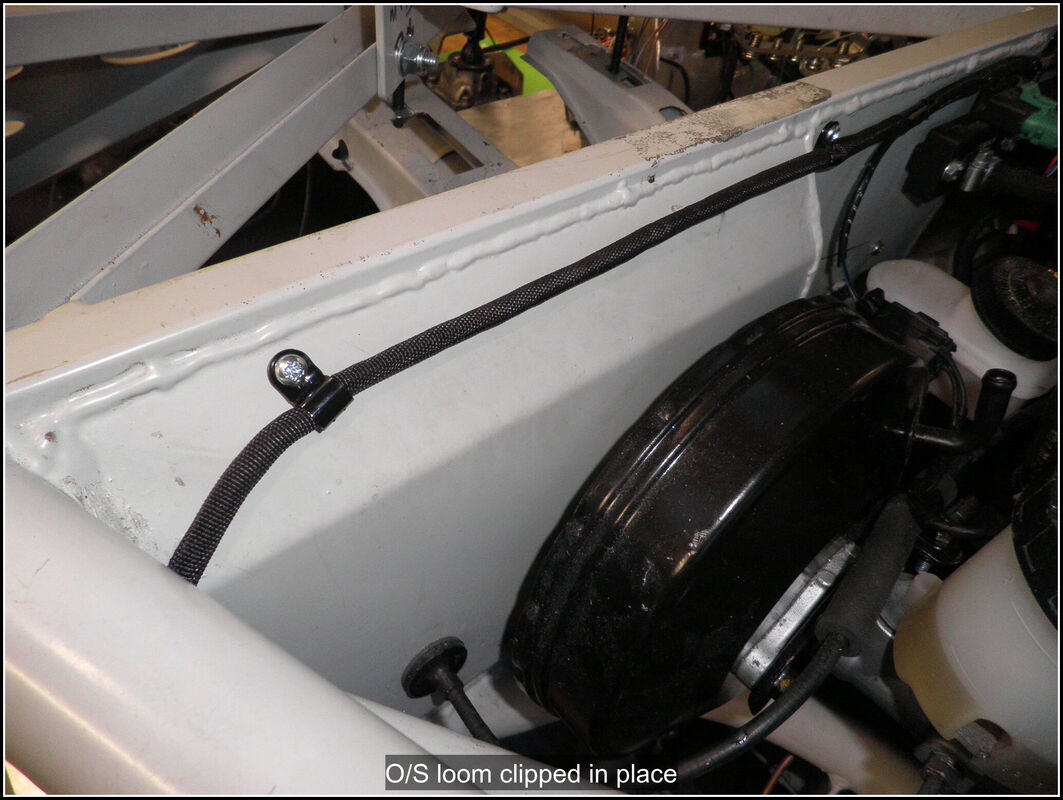
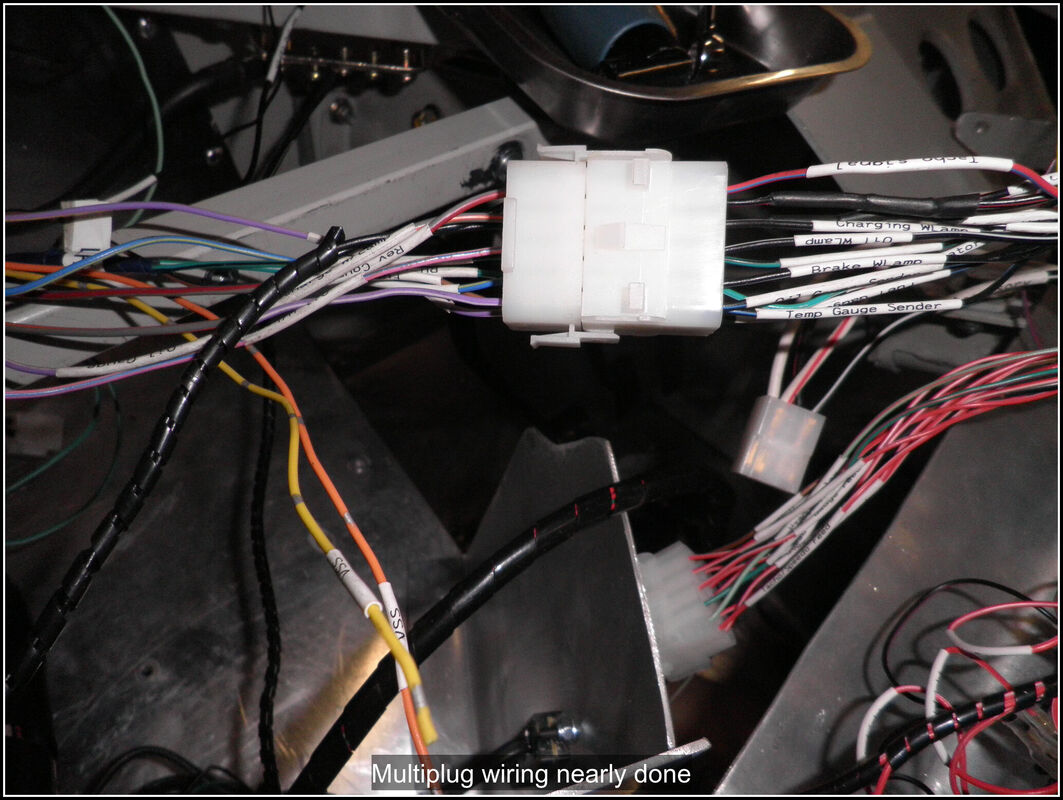
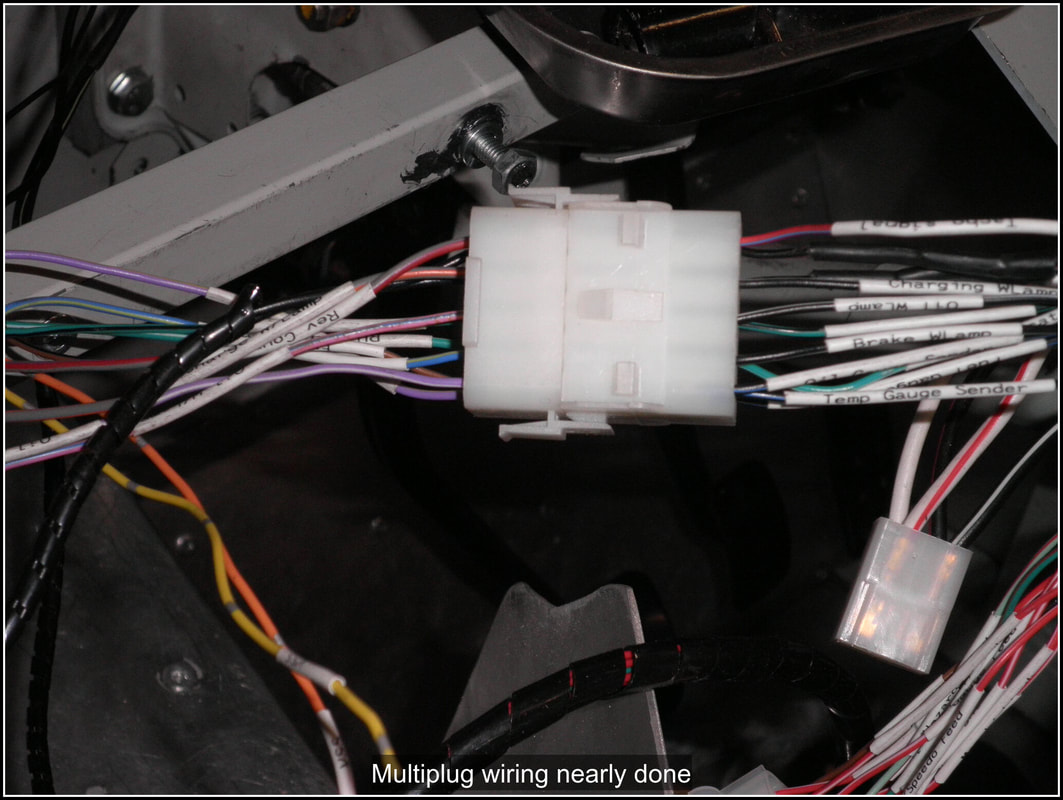
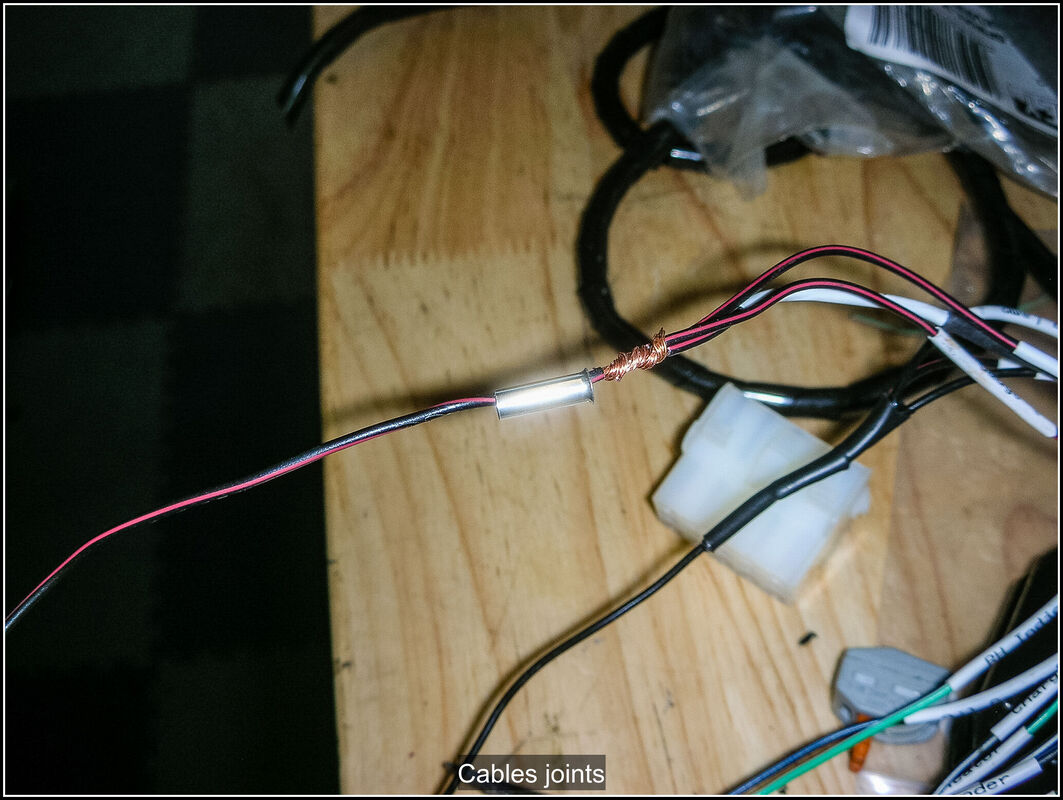
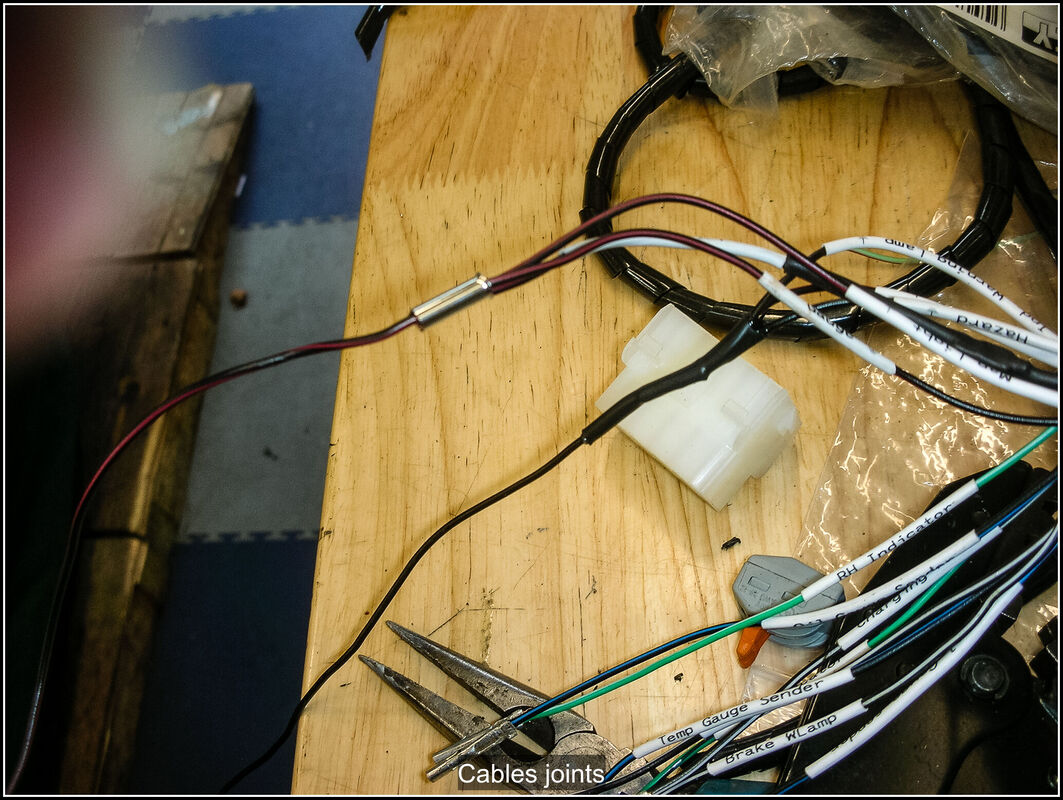
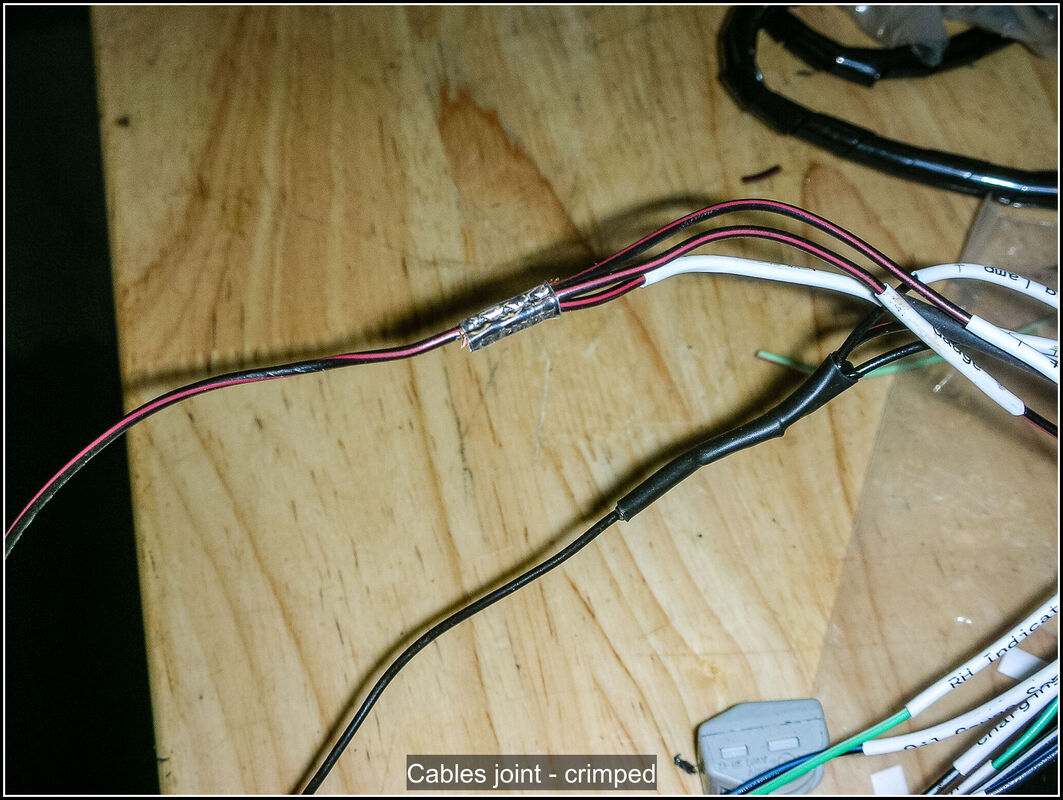
14 February 2021 Remembered I had not run an earth wire for the rear lights so made up a cable, unbundled the rear loom and added the new earth wire. Up front I was undecided about how to route the brake fluid level switch wires, the coolant temperature sensor (gauge) and the right hand indicator. I was contemplating drilling another hole through the front bulkhead but sense prevailed and ran it through the large hole/grommet that the majority of the wiring runs through. Had to fiddle around with the throttle cable so I could add a p-clip to hold the wire as well. The standard Mazda throttle cable clip was not in the best position and caused the cable to rub on one of the front chassis rails, it can't be moved along the cable either. By using a p-clip I could sort that out and secure the cable from the brake master cylinder. I wrapped all these wires together and joined the brake fluid sensor wire to the wire that goes to the handbrake (required to provide a method of testing the lamp). Ready for terminating onto the multi-plug, I think that next time I will be able to get everything apart from the VSS wires terminated. 19 February 2021 Ran an earth for the RH side indicator into the loom back to the cockpit earth then secured it to the chassis with p-clips. Then I turned my attention to the main front loom, ran an earth wire for the LH side indicator into the bundle and then added p-clips to hold it in place. Terminated the 2 earth wires with a ring terminal ready for screwing to the earth bar. Back in the cockpit had to undo a few of the wires I had pre-terminated in the multi-plug as the wires would have been too long and I could eliminate some cable joints. Terminated all the wires for the multi-plug and inserted them into the holder. Put on more binding for the loom inside the cockpit which has tidied things up quite nicely. Finished for the evening and then realised I had forgotten to cater for the Gauge Wizard I am going to use to match the fuel sender to the gauge. The fuel gauge wire I have just terminated in the multi-plug will have to be cut and run to the Gauge Wizard and back again. I also need to provide power to the Gauge Wizard. Seems I have finished this post the way I started it by forgetting something. Not quite finished with the wiring in the cockpit but the end is coming into view finally.
0 Comments
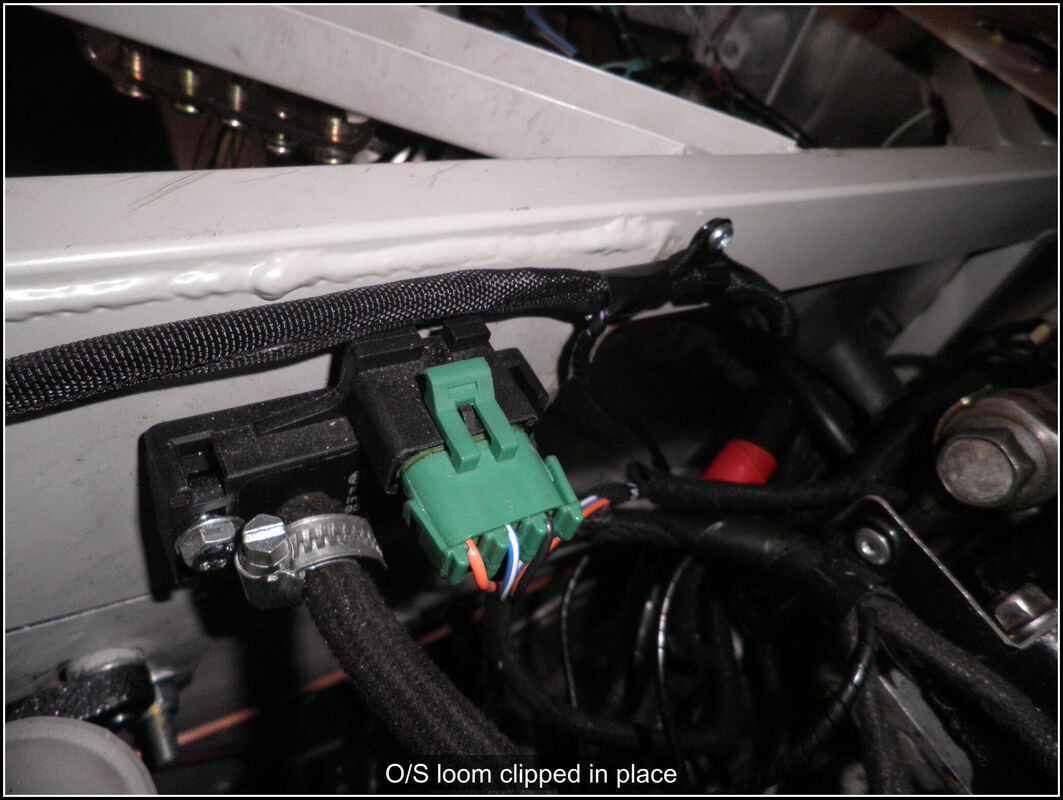
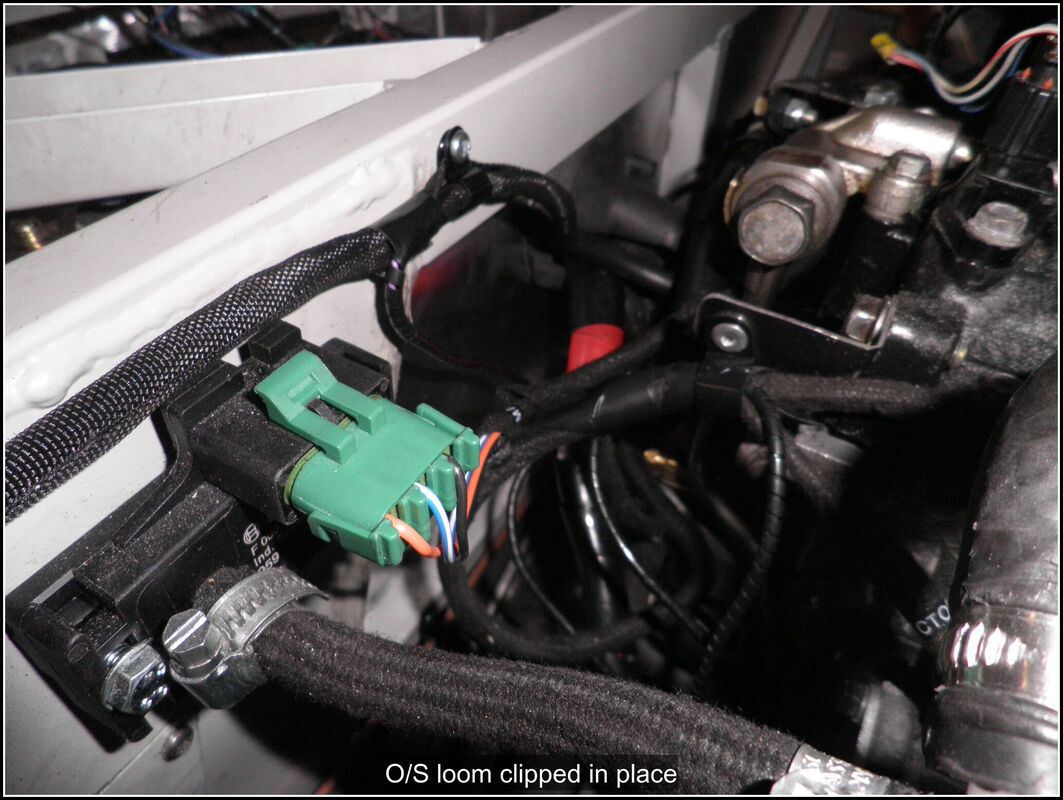
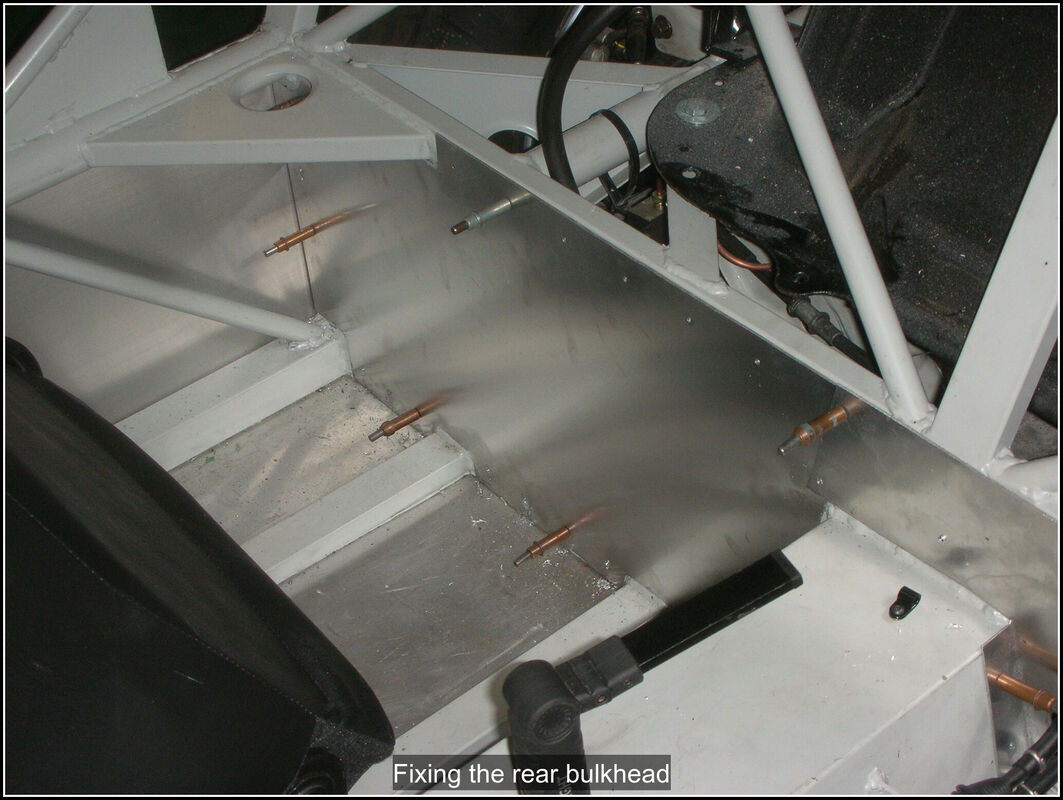
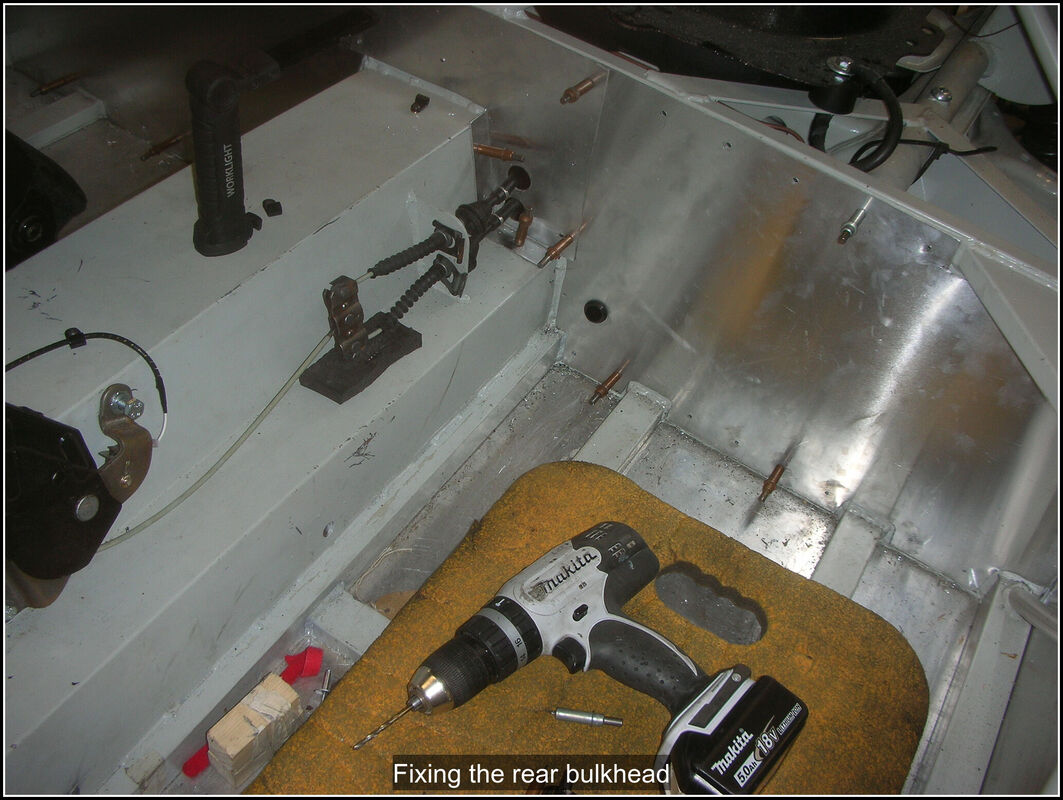
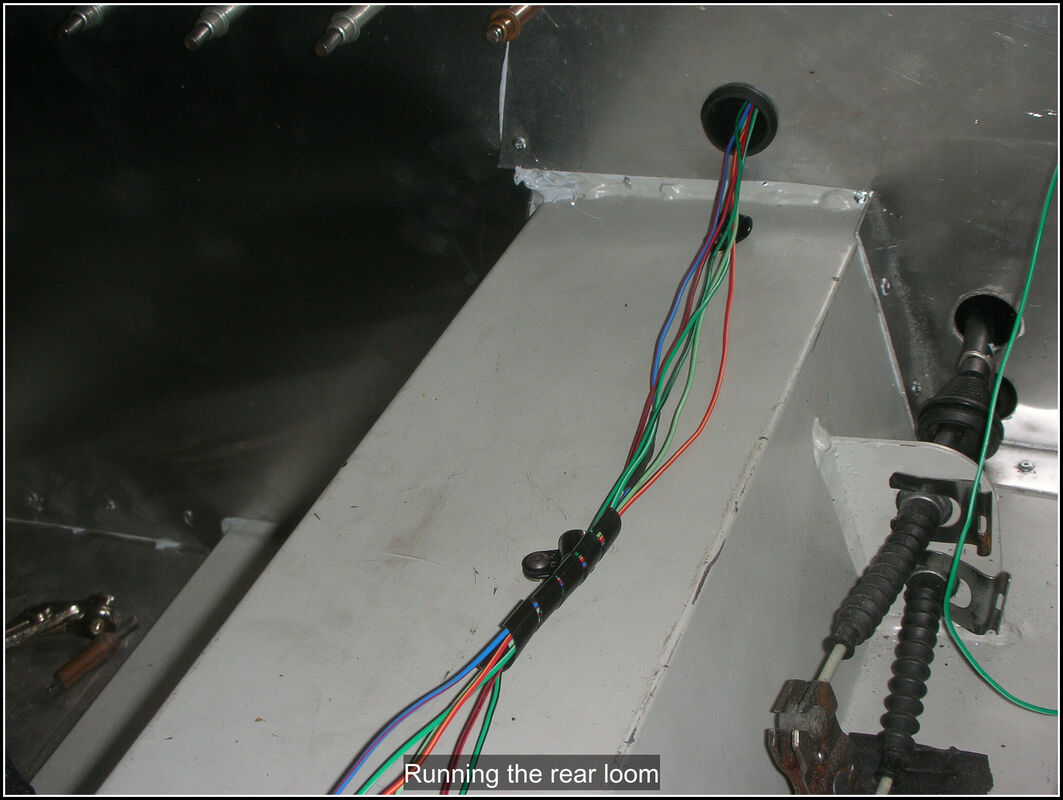
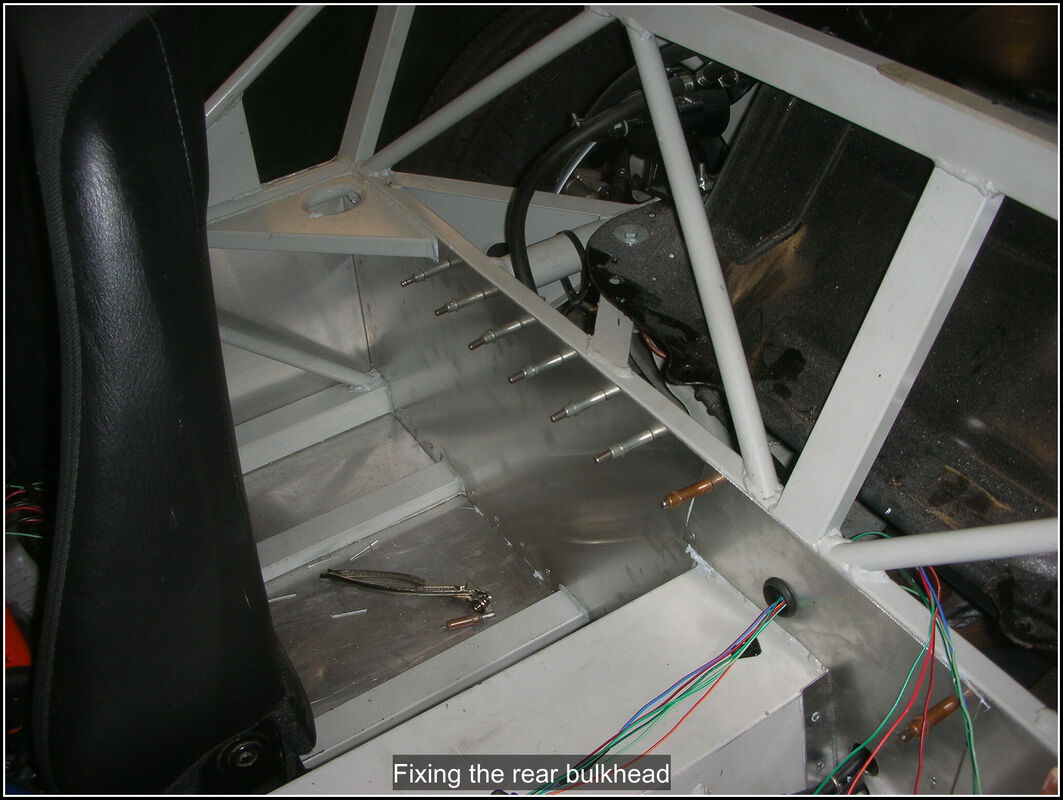
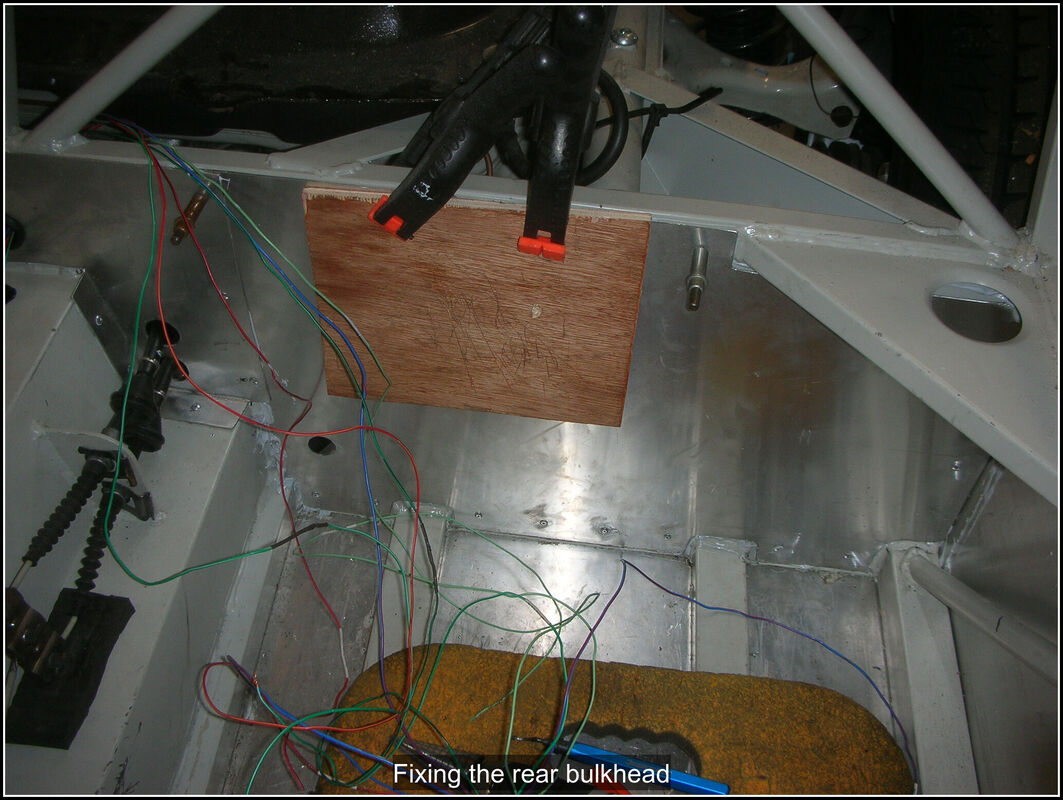
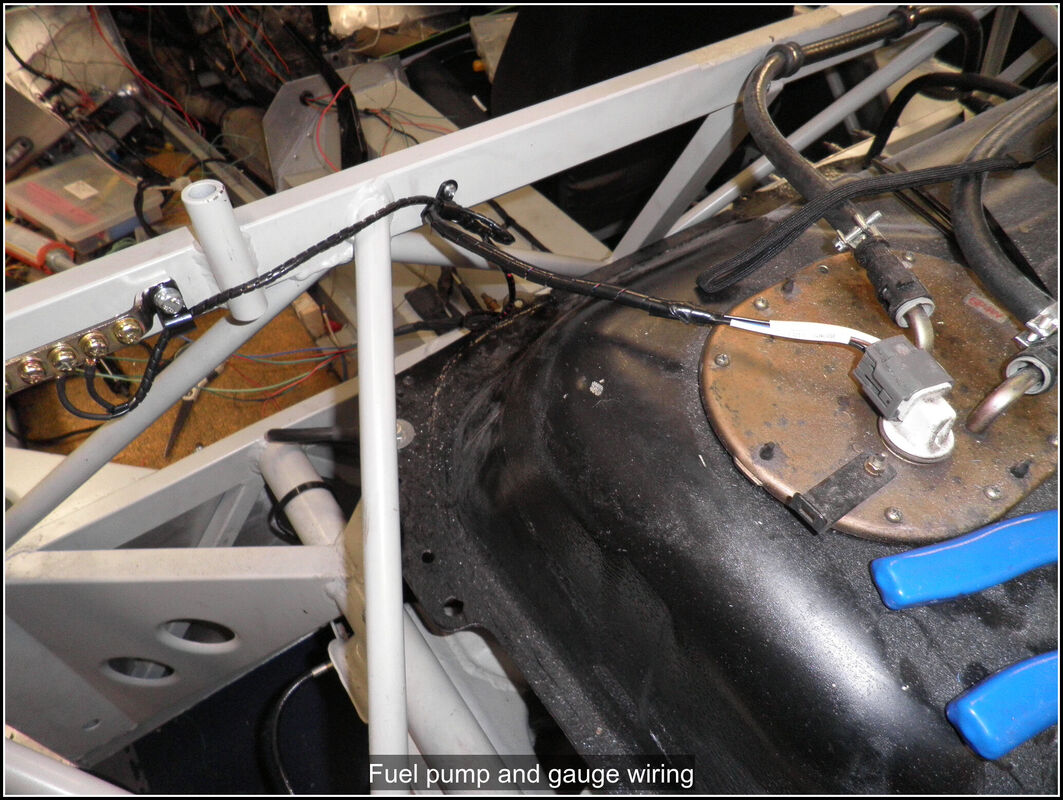
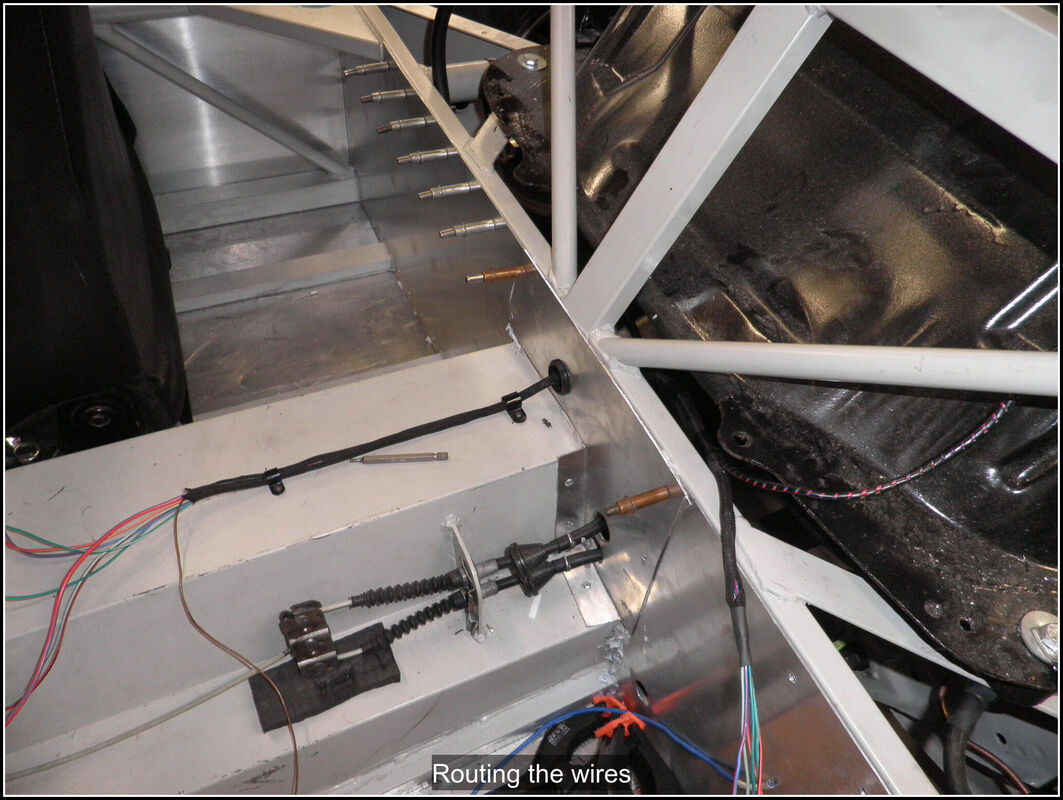
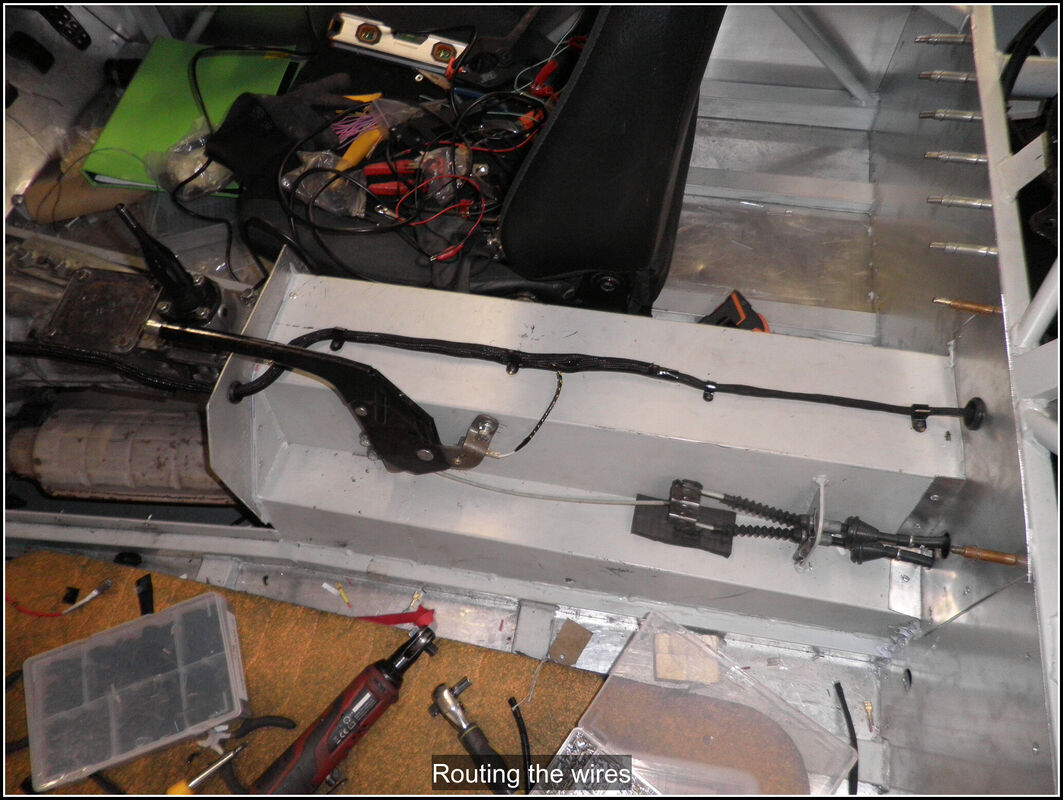
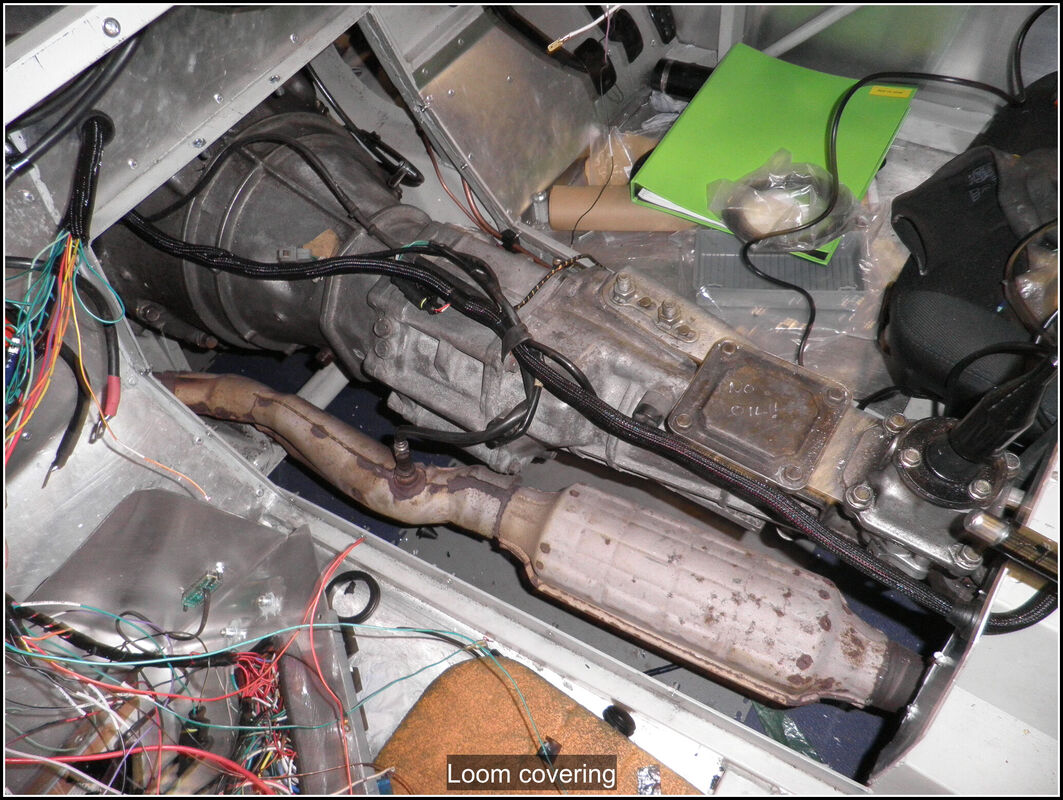
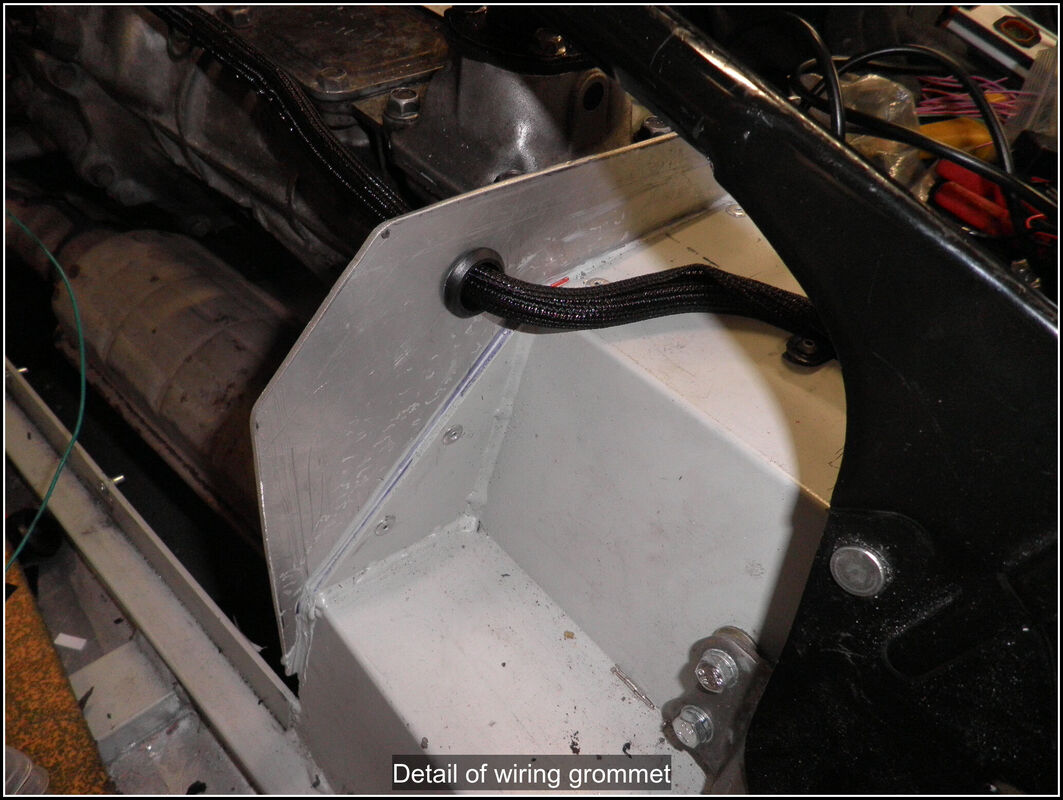
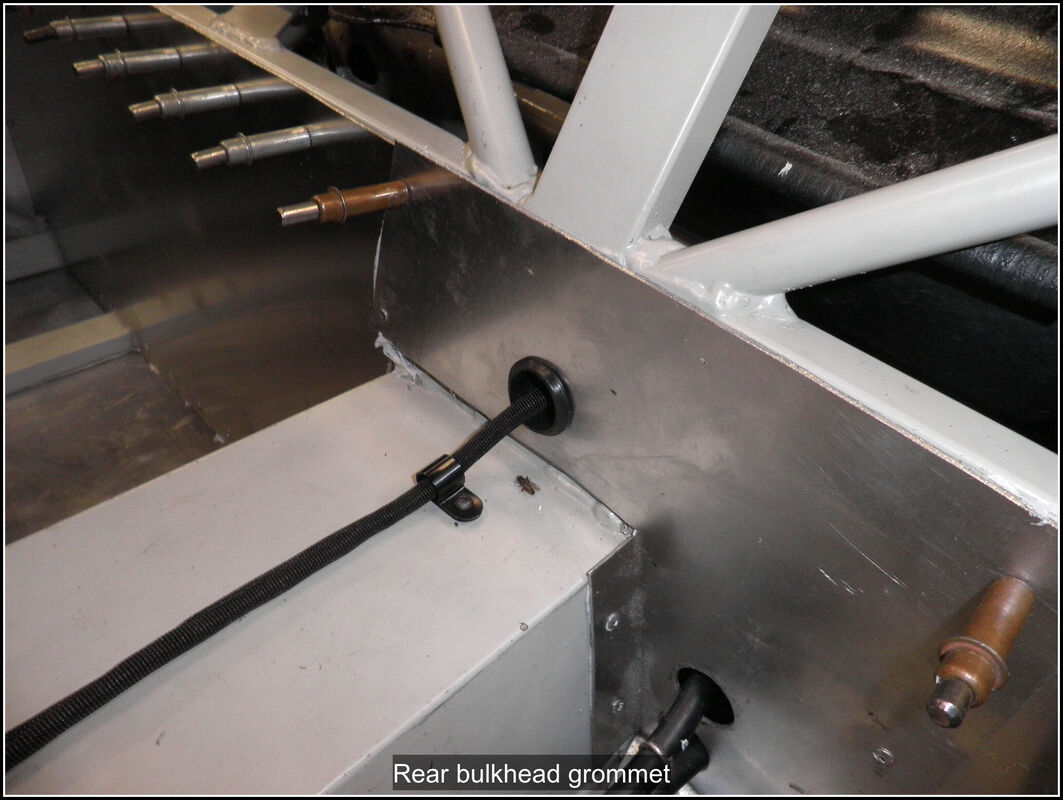
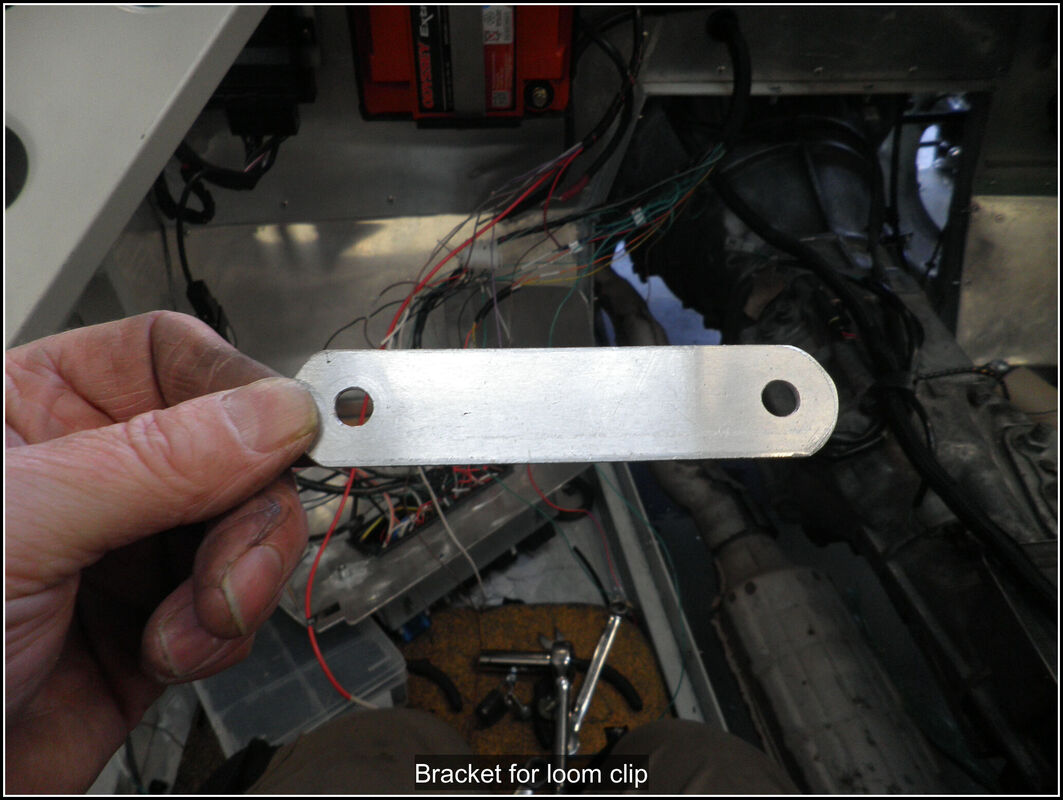
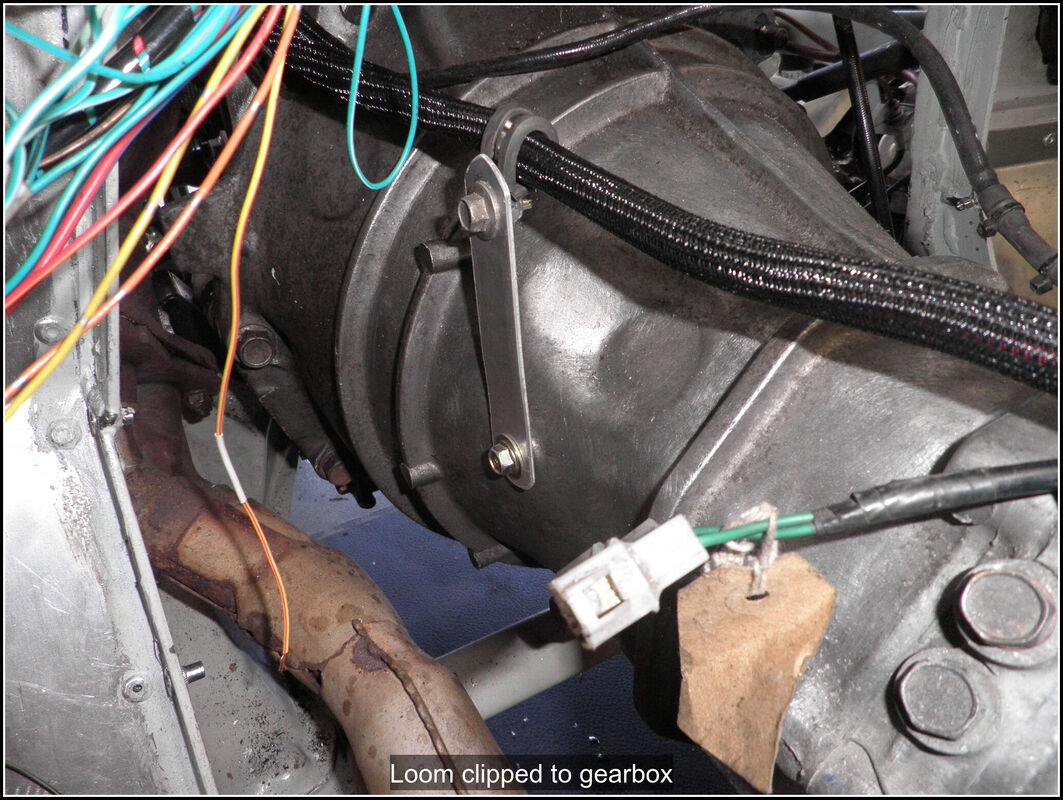
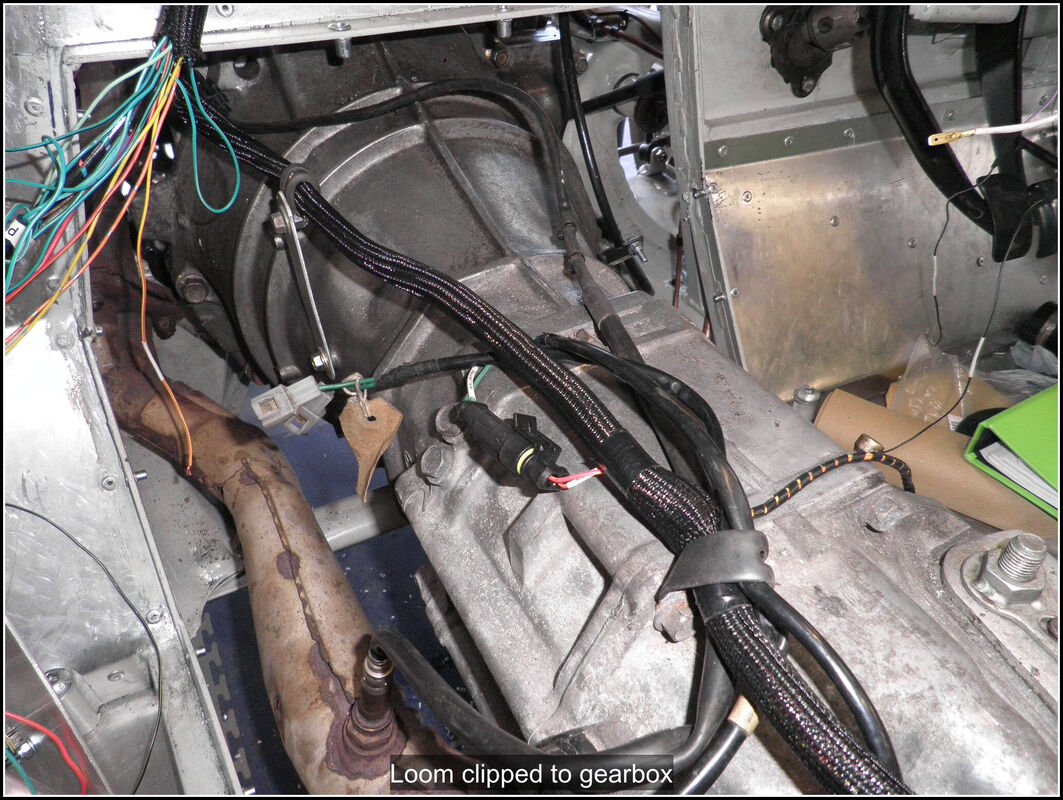
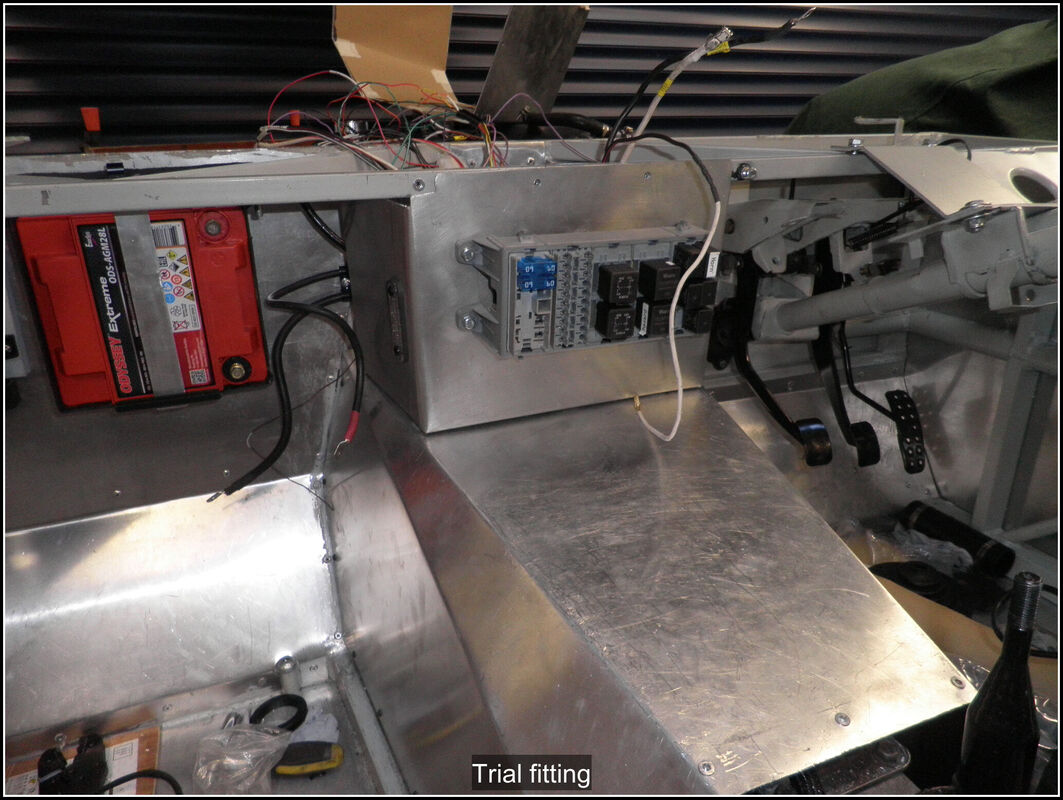
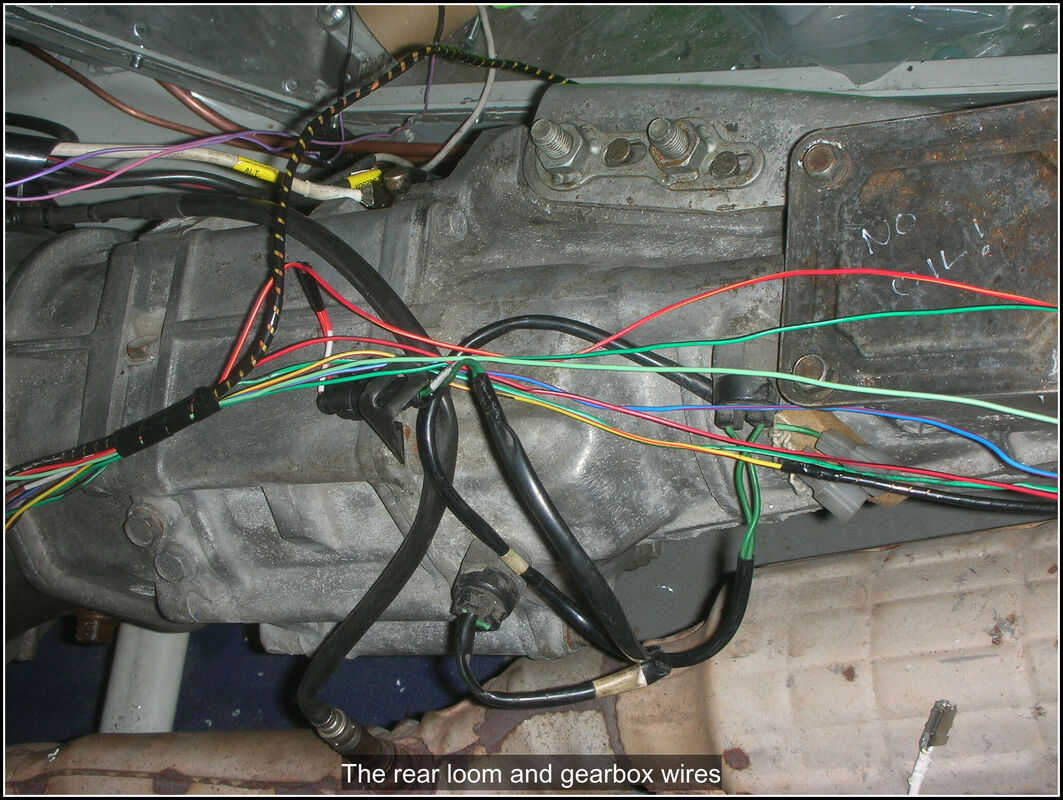
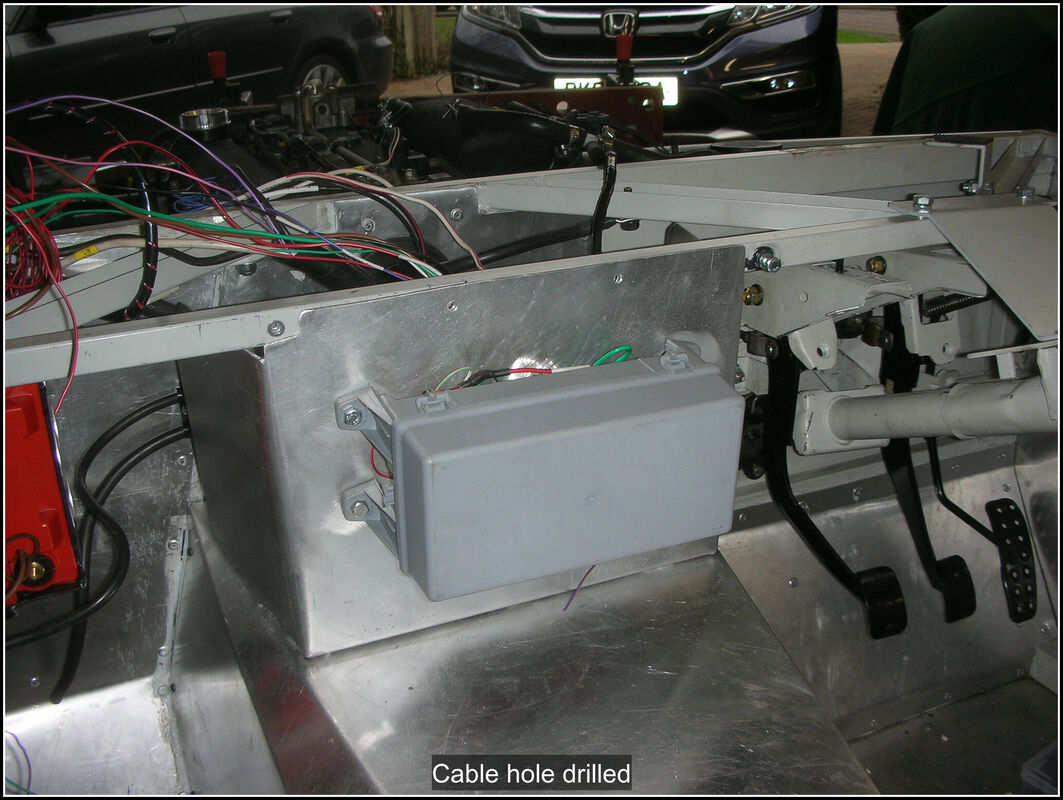
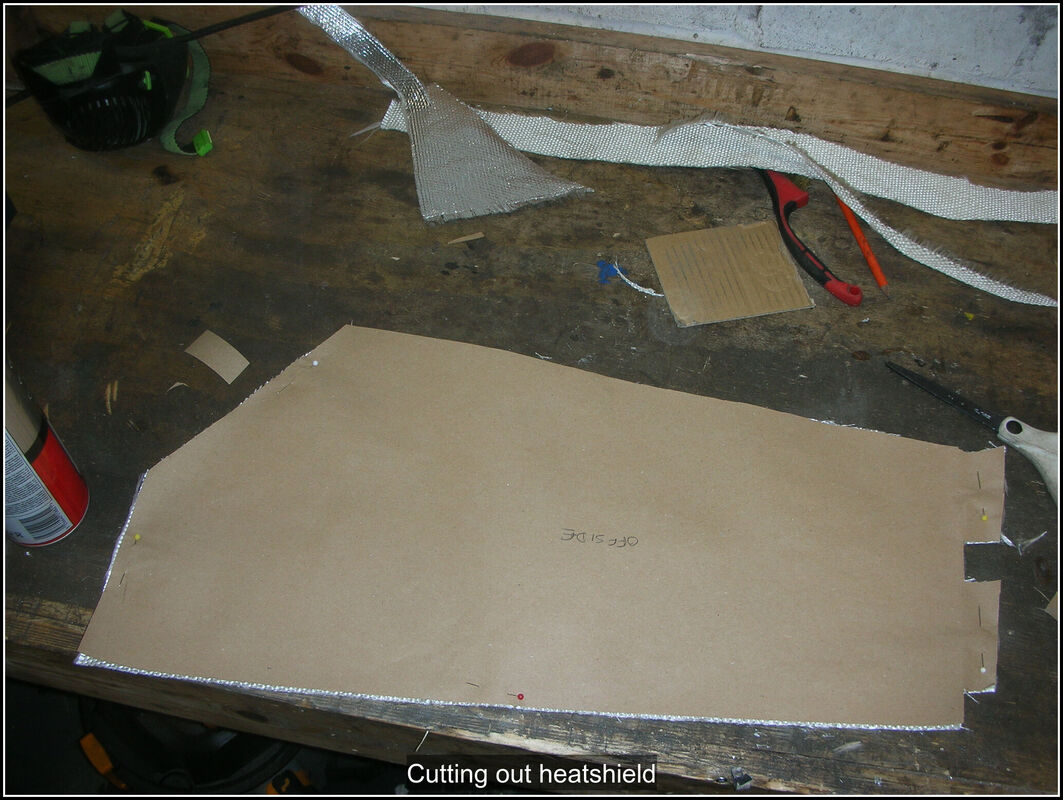
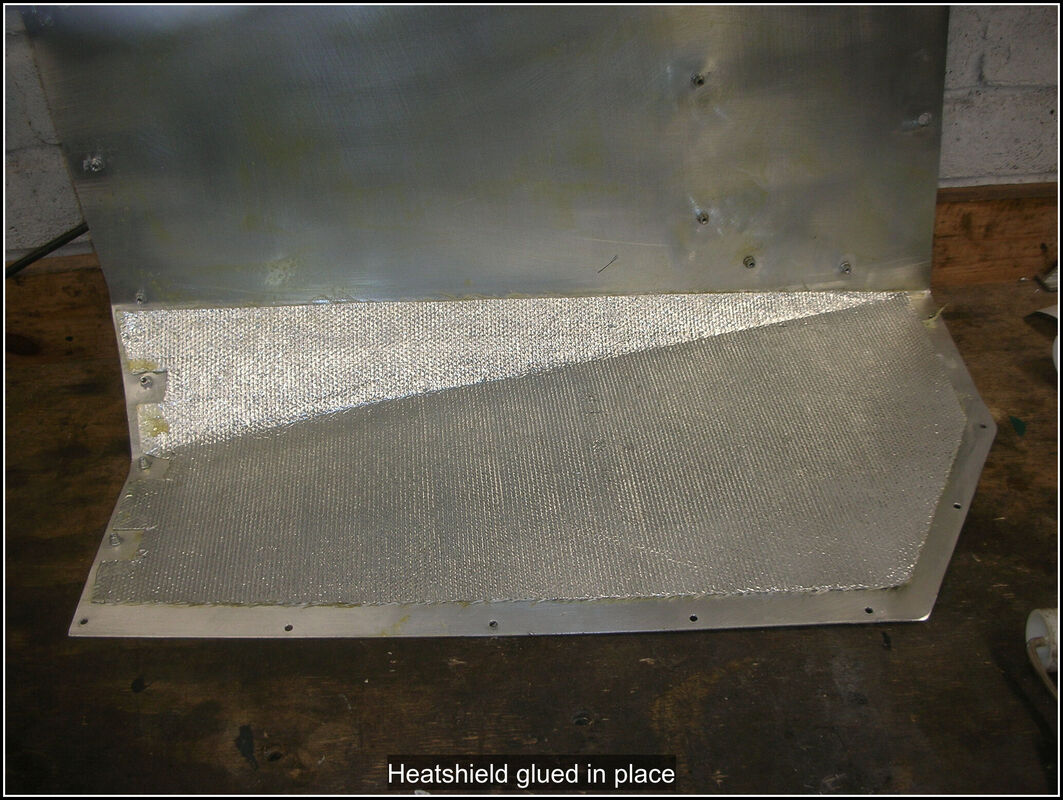
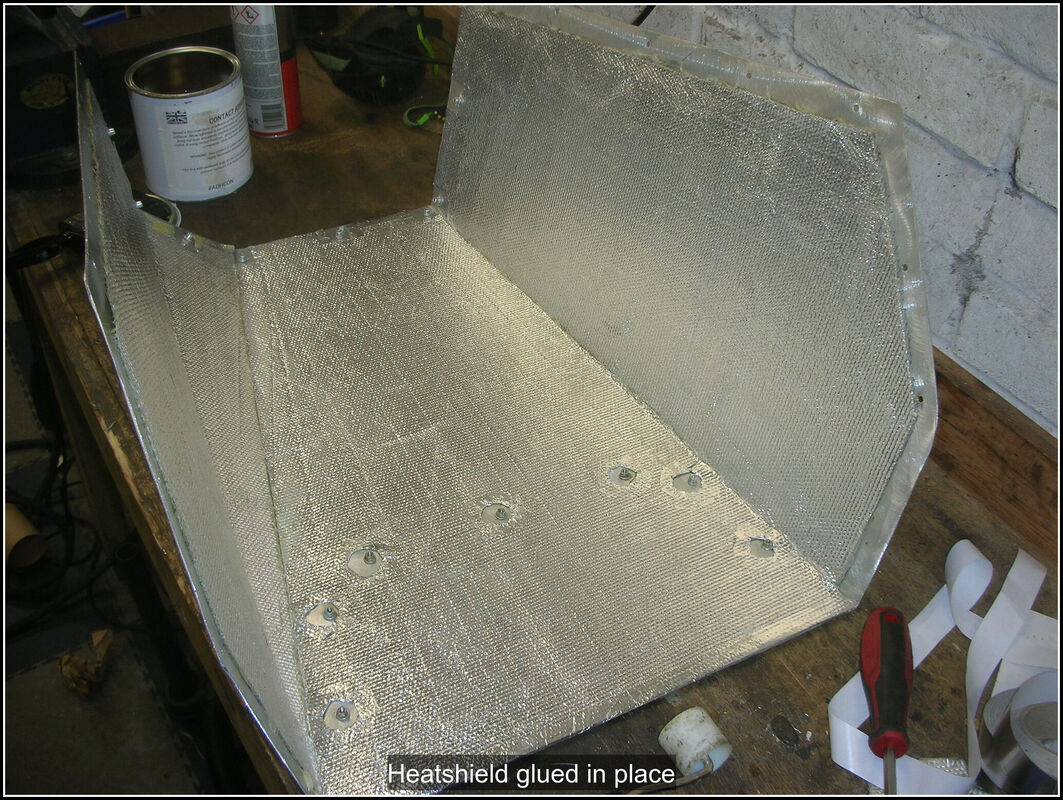
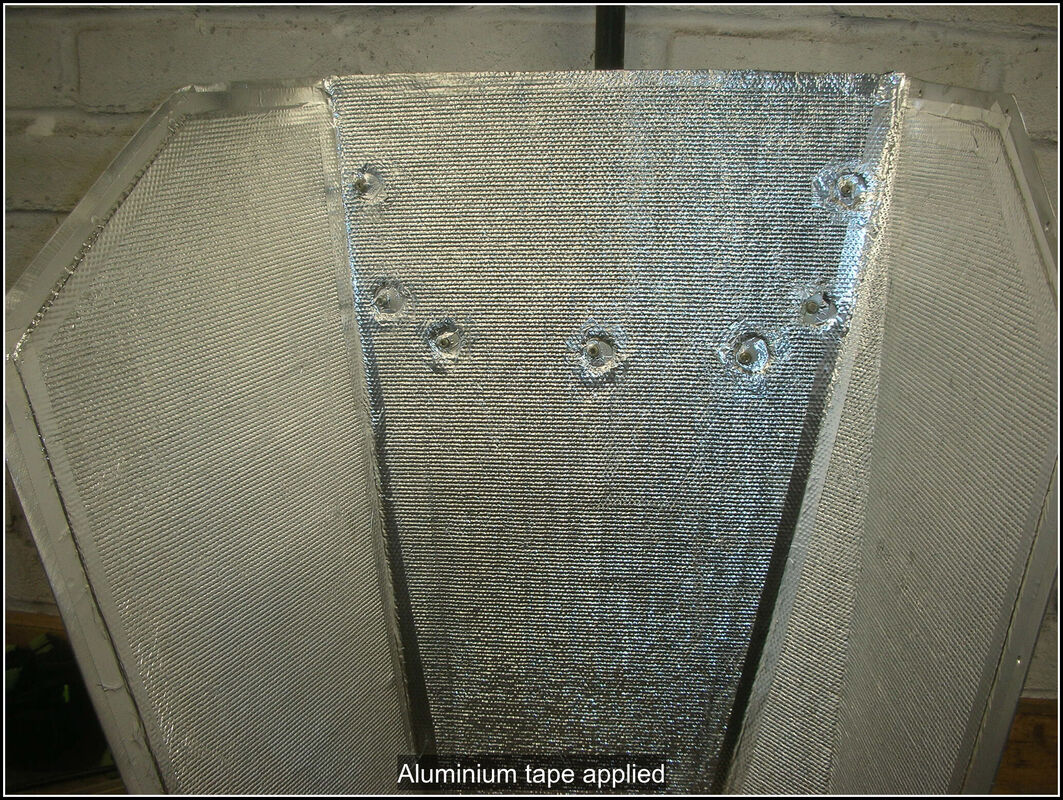
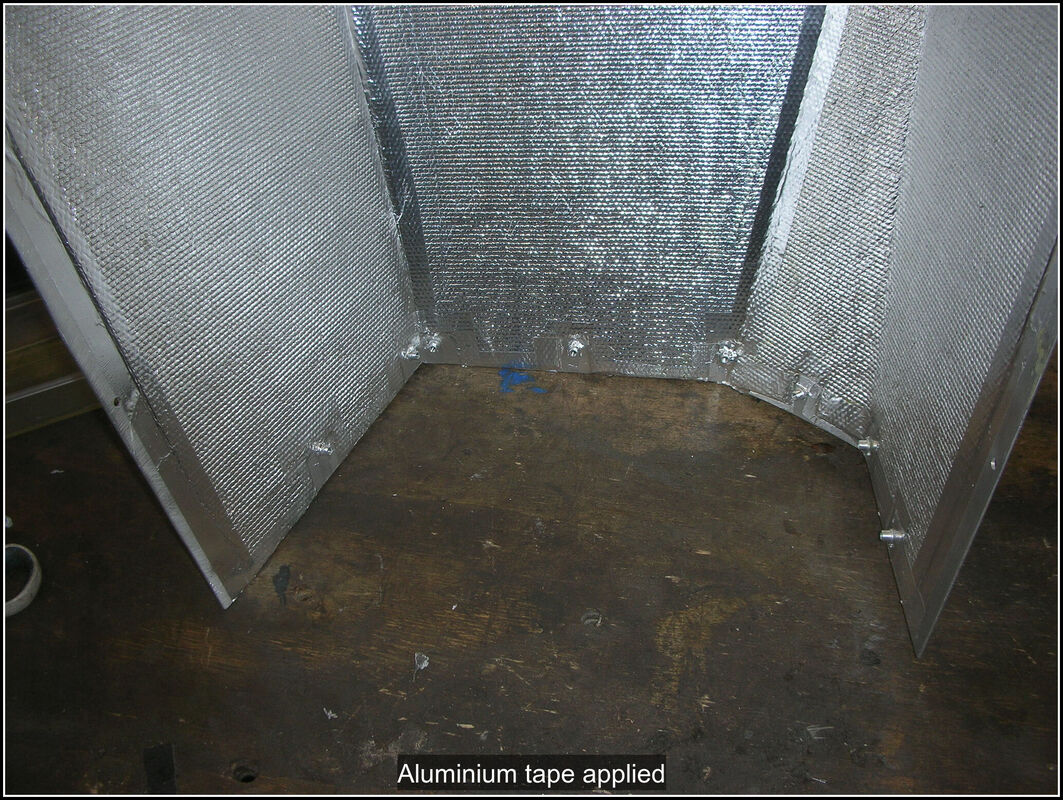
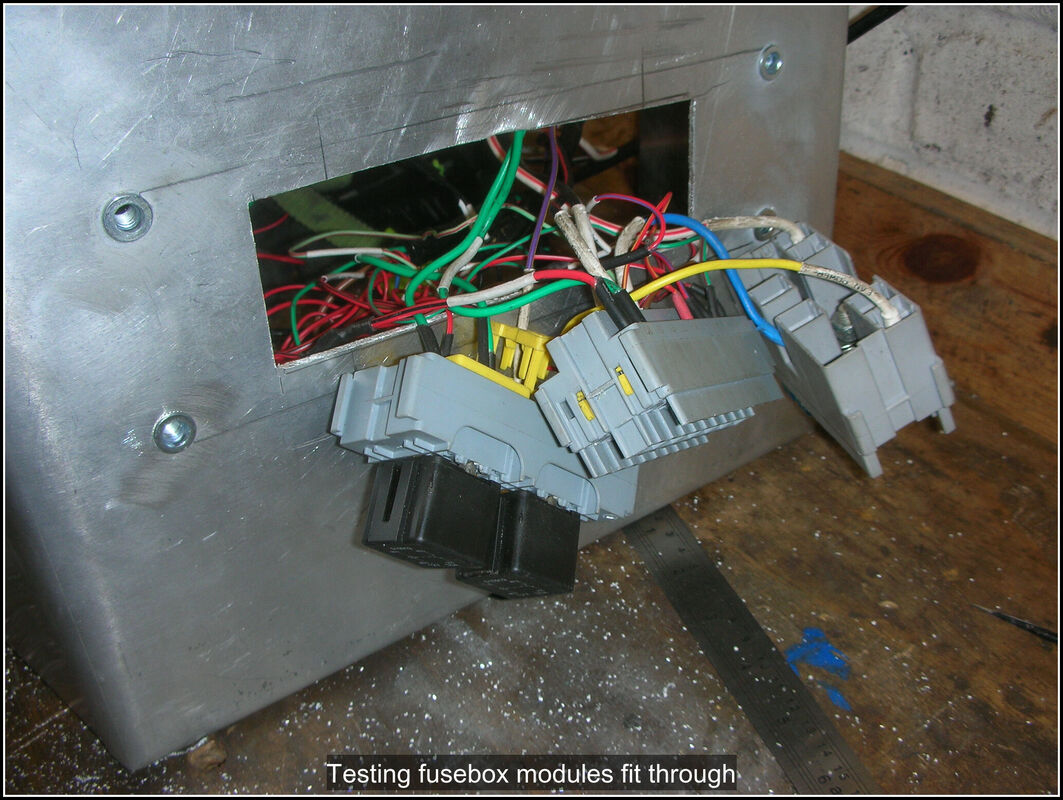
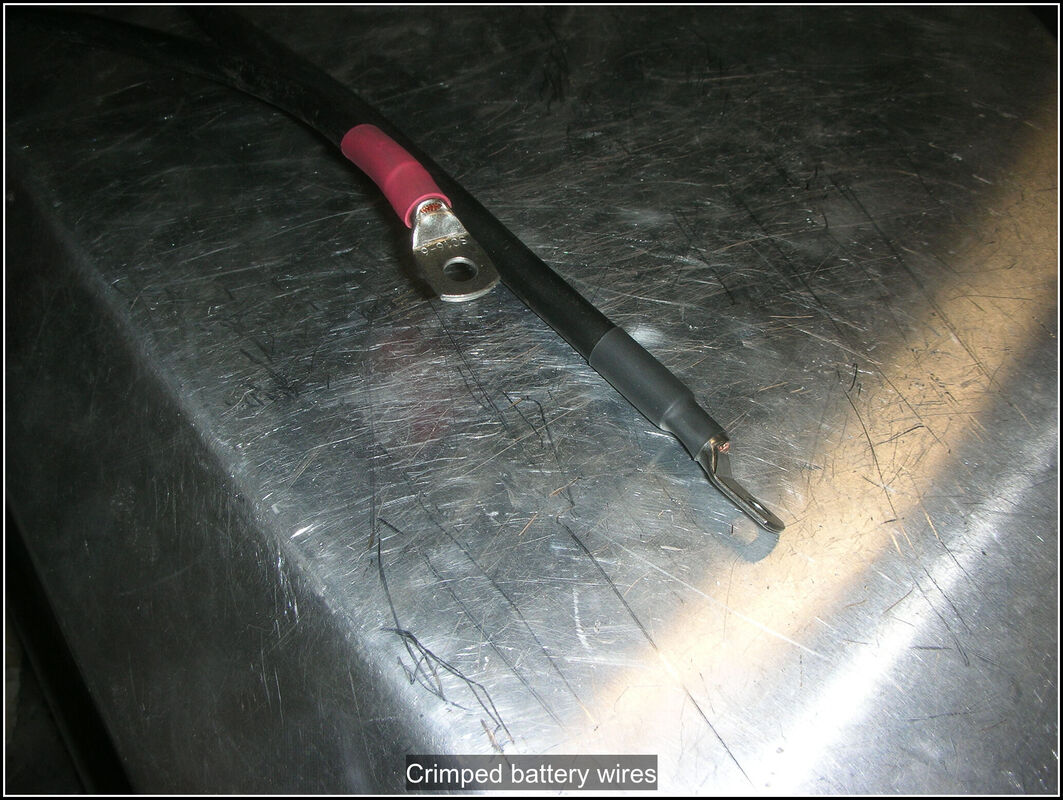
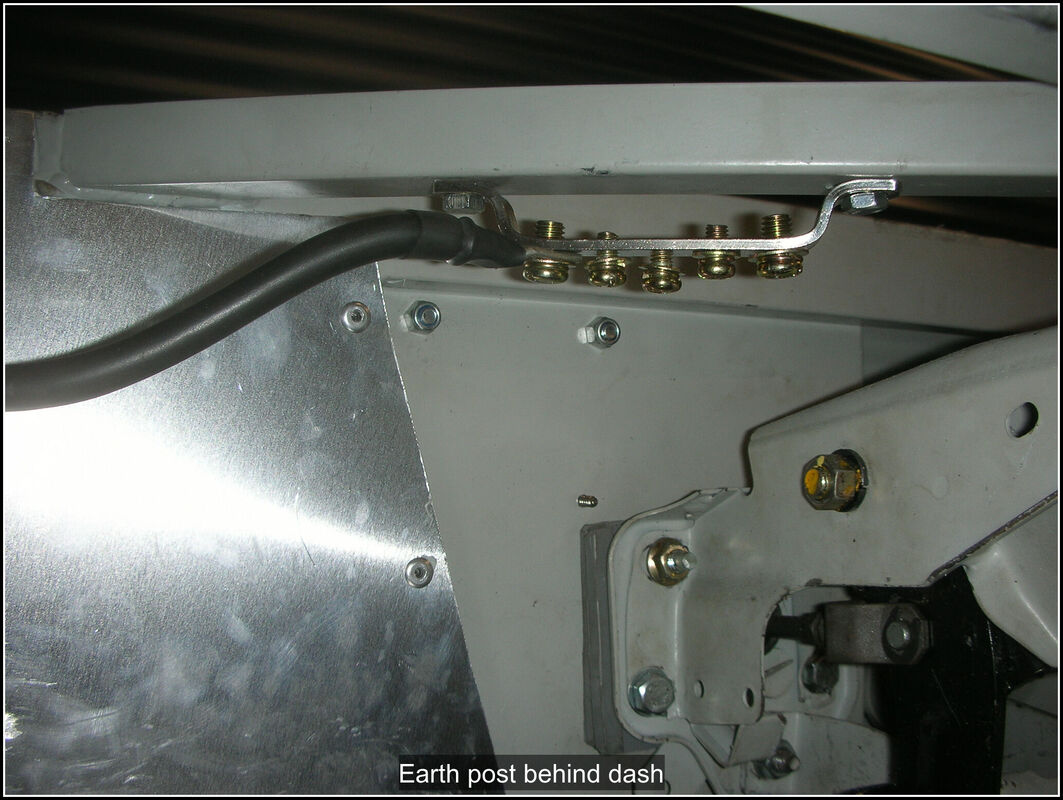
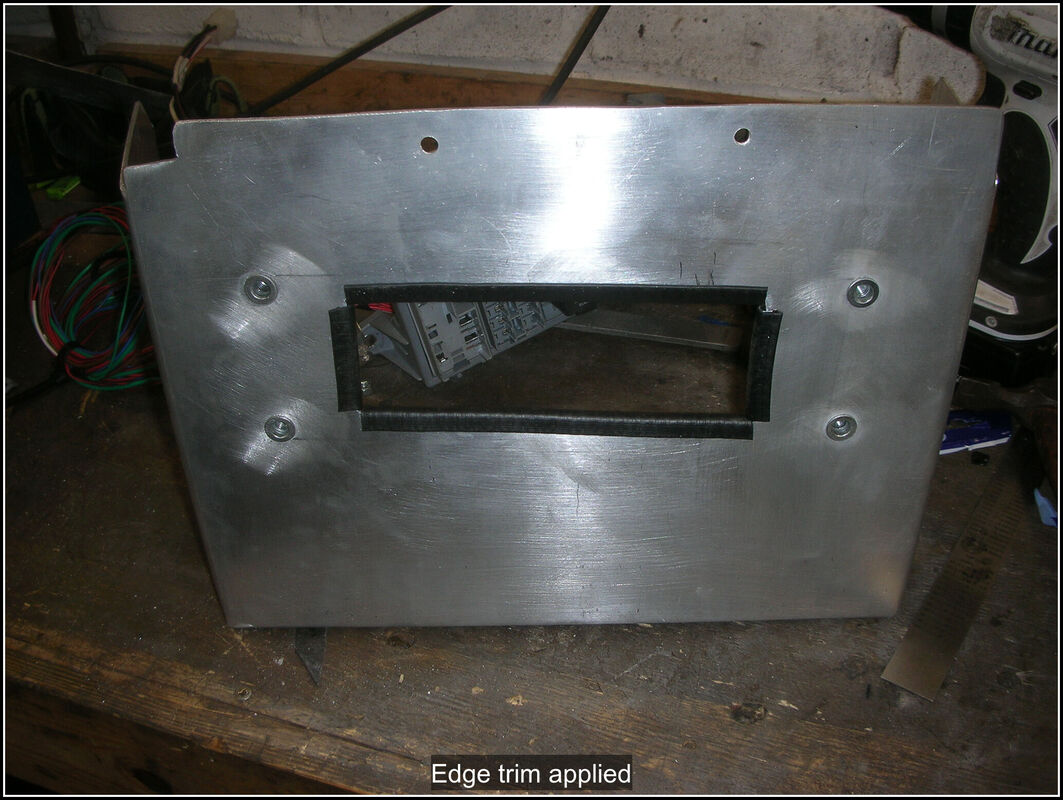
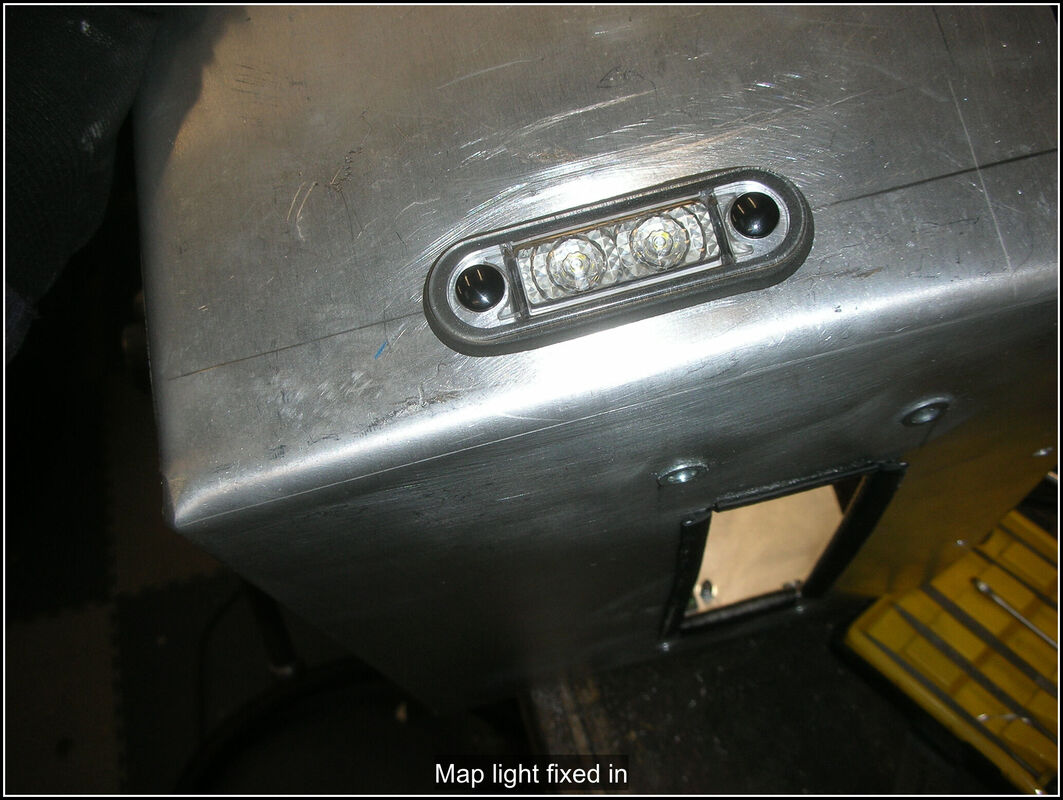
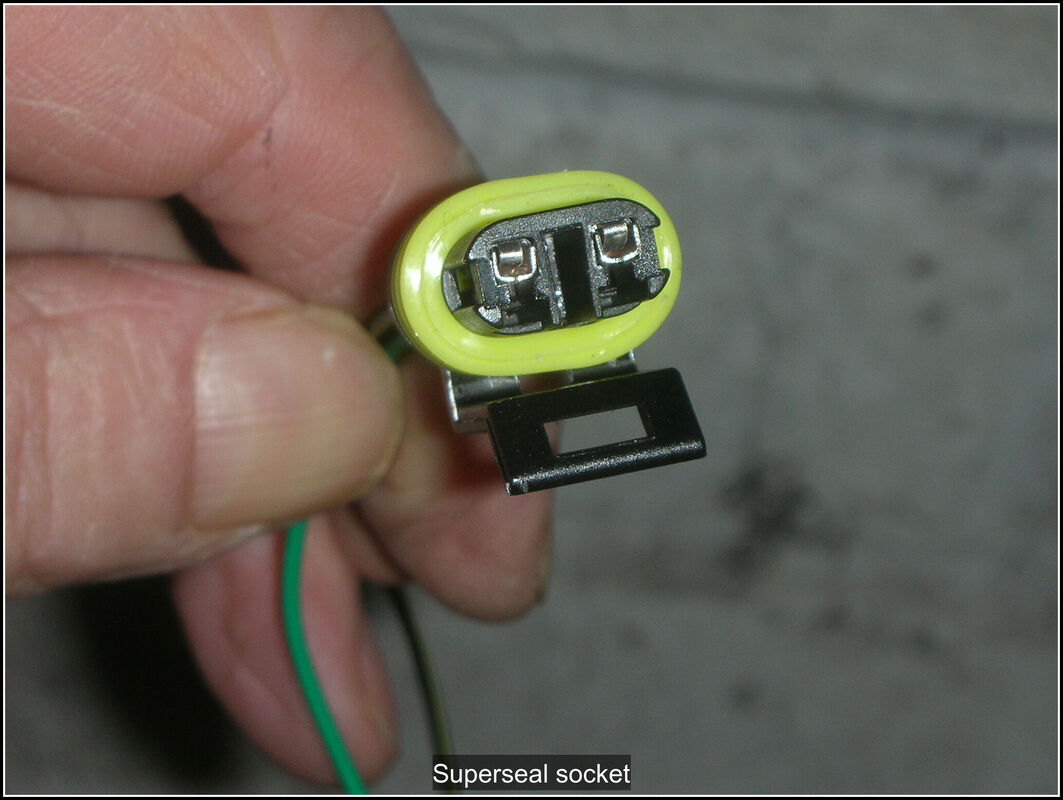
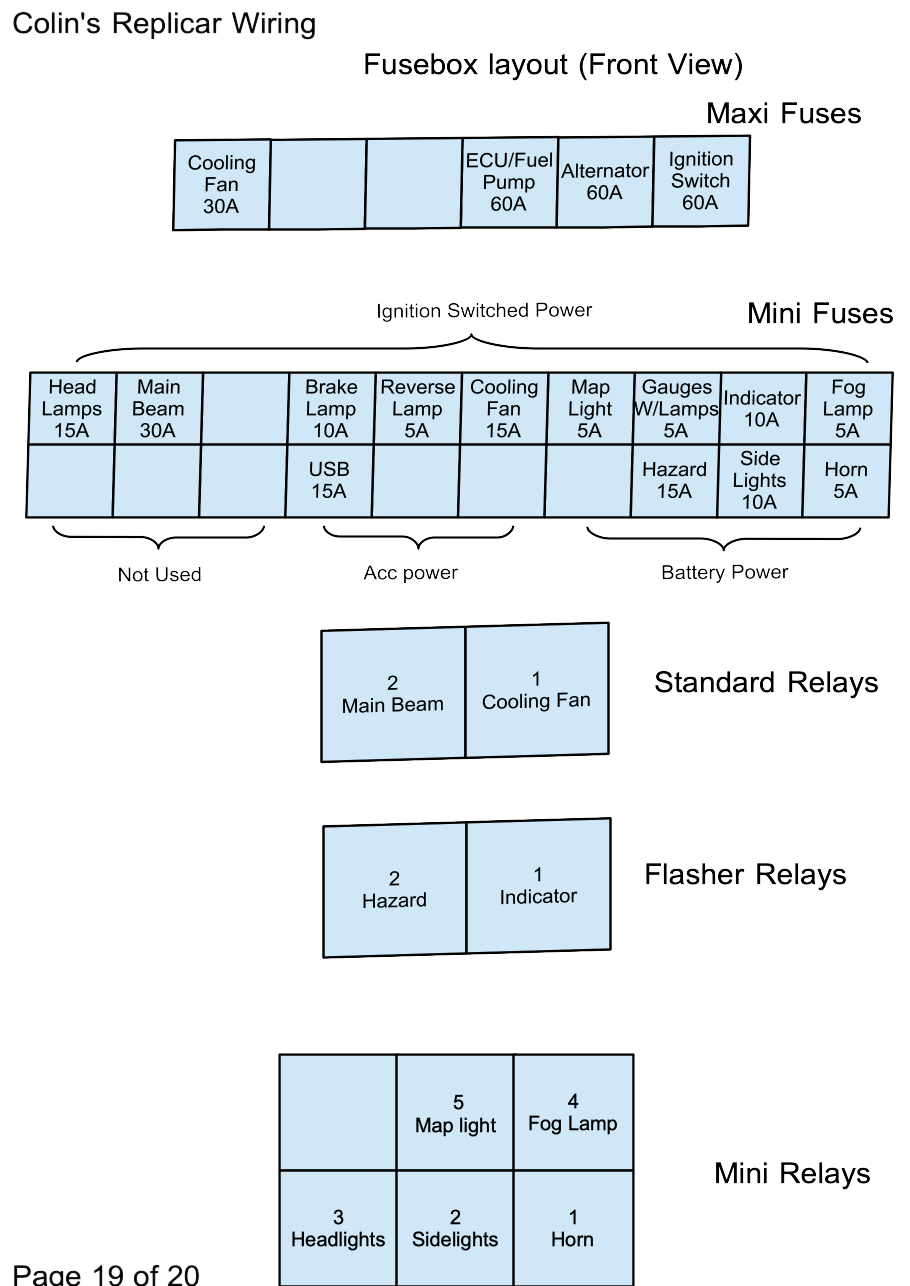
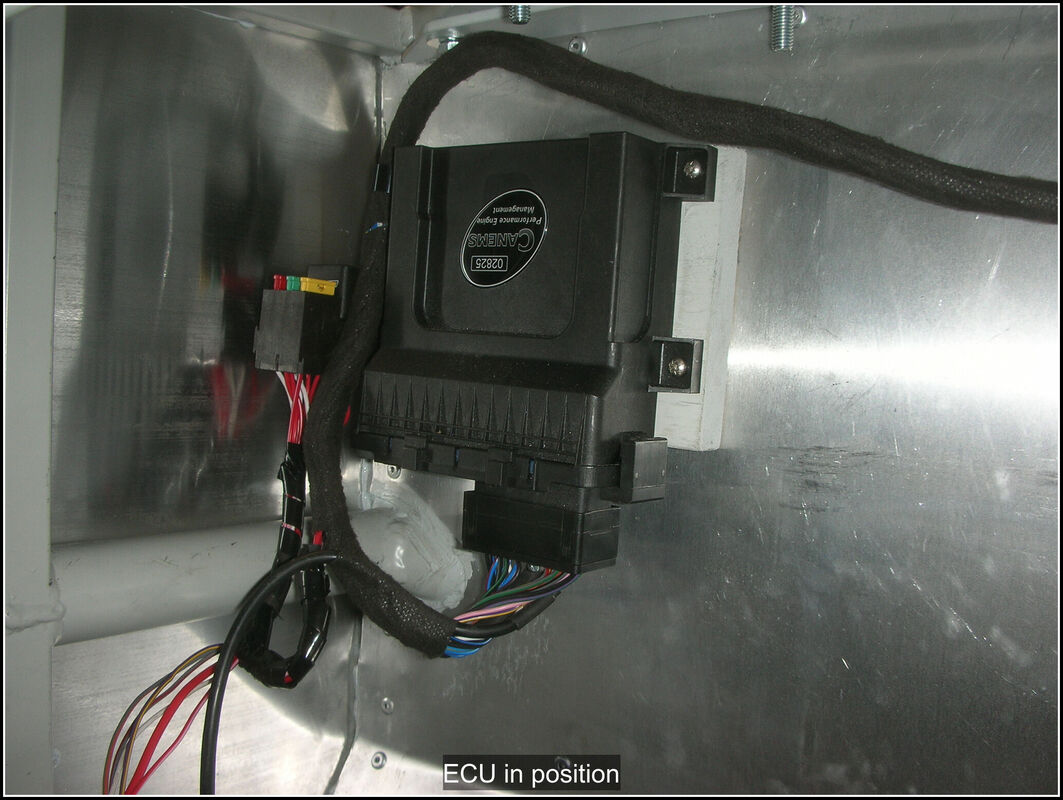
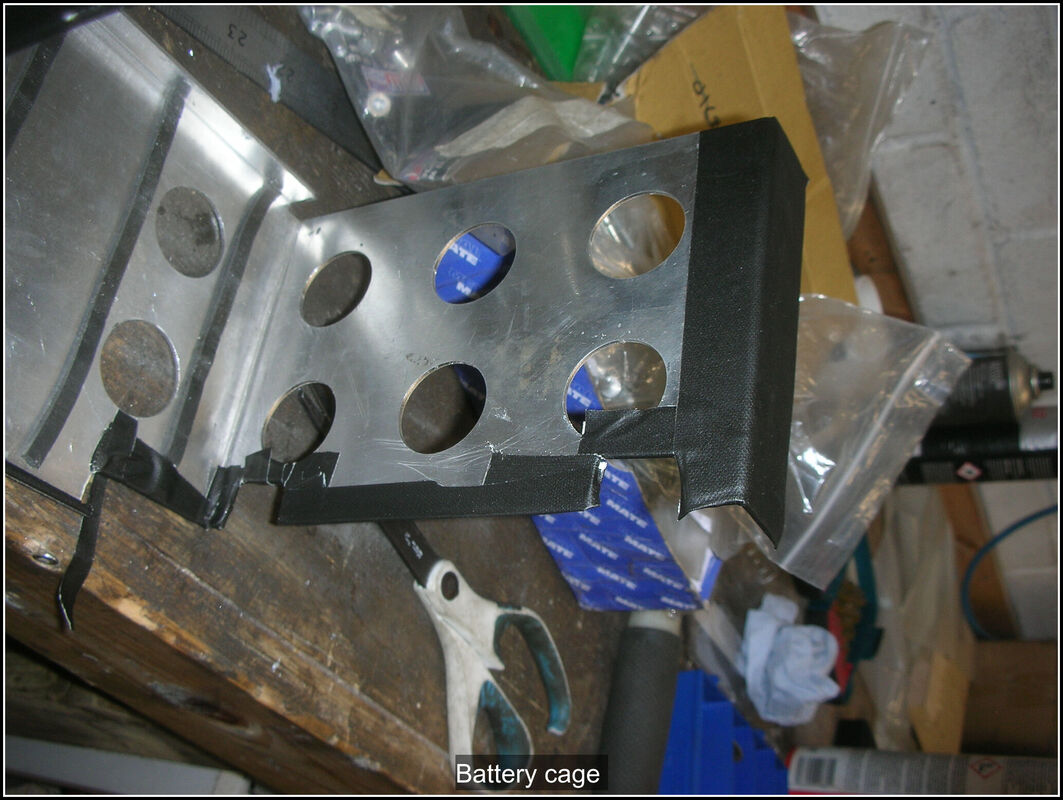
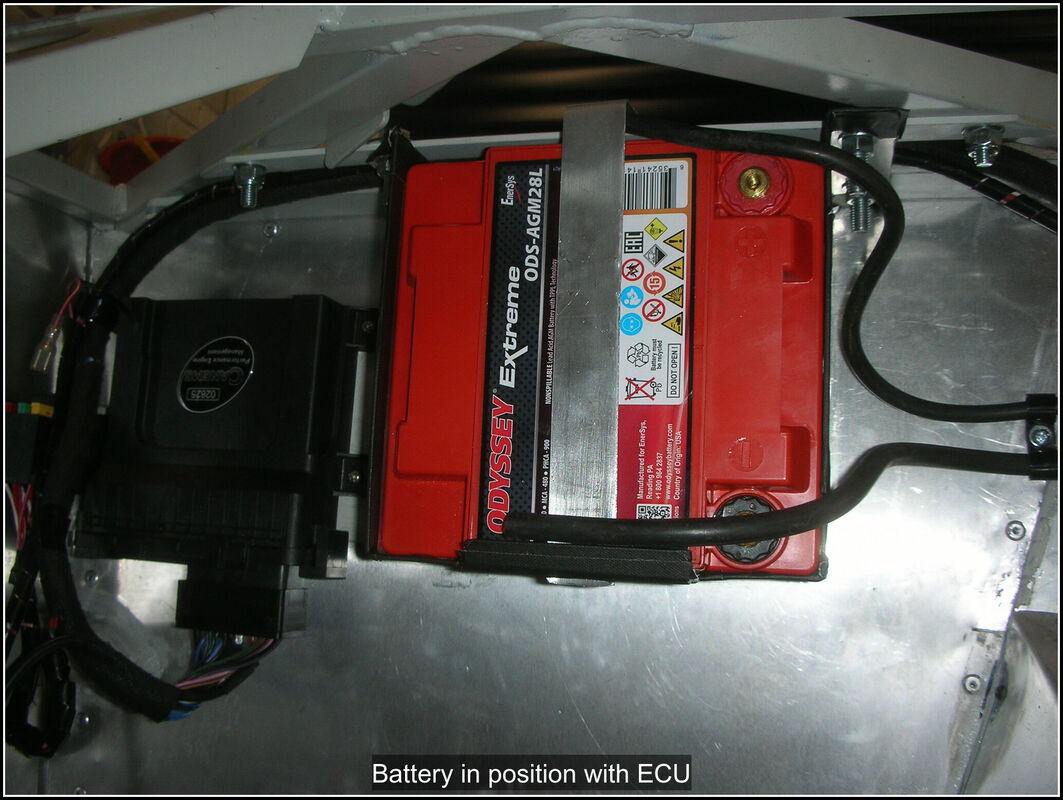
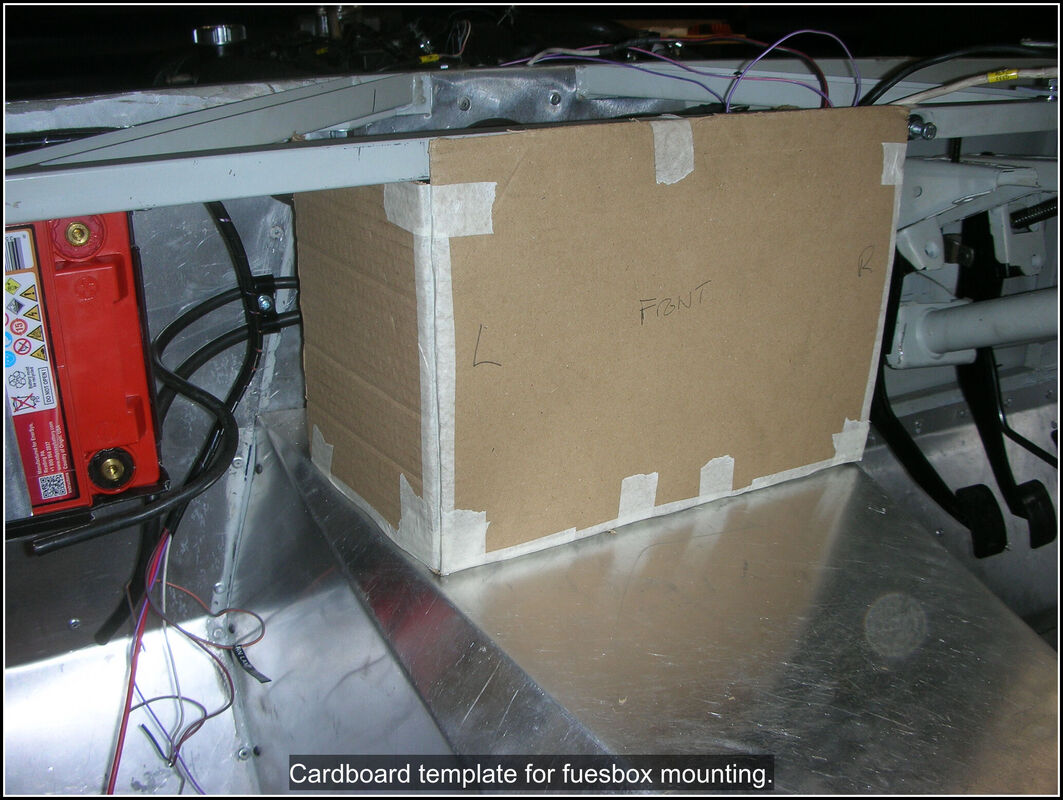
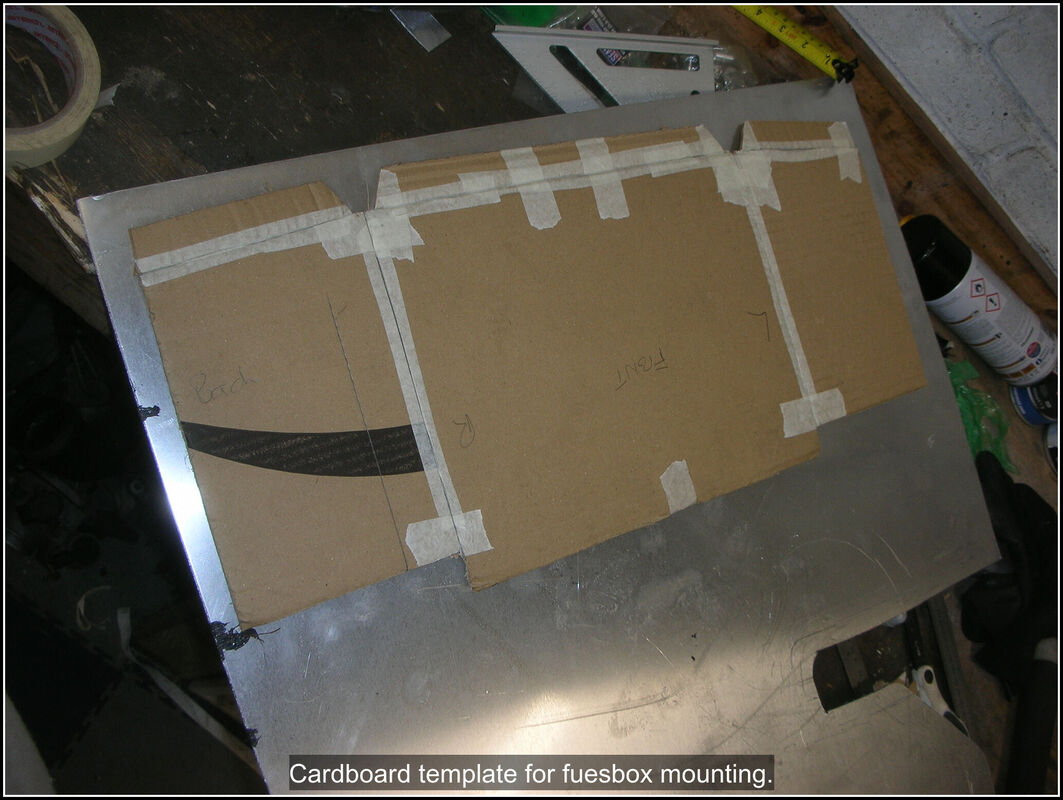
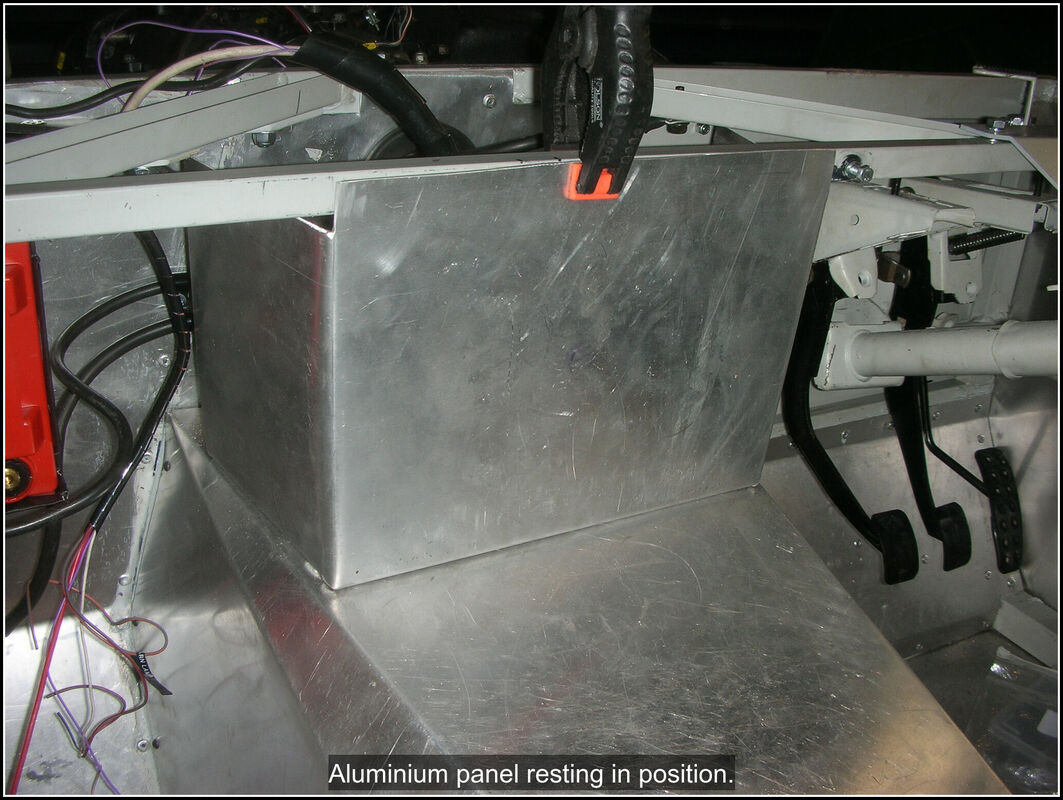
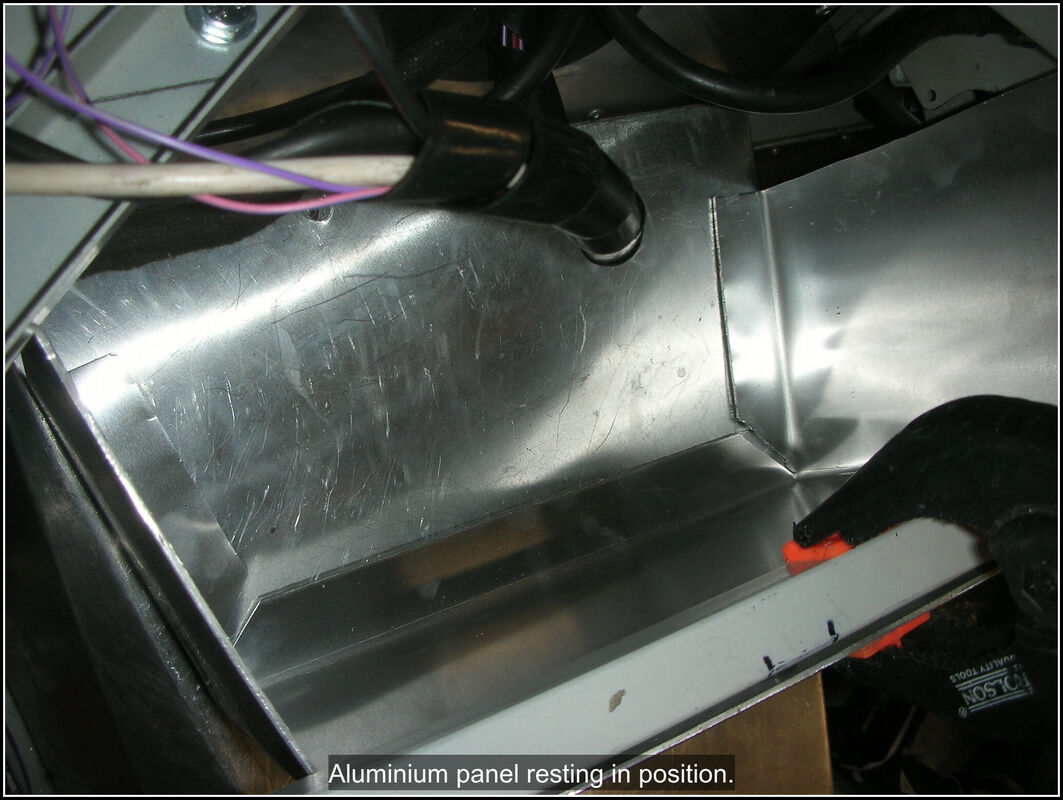
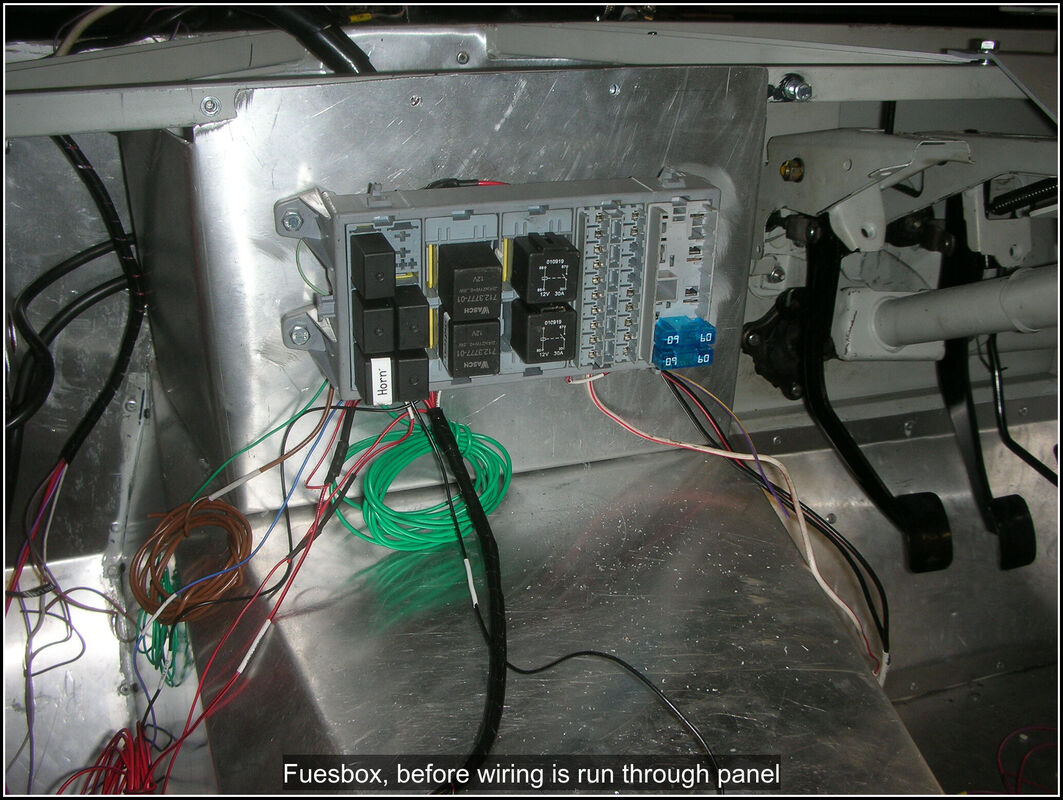
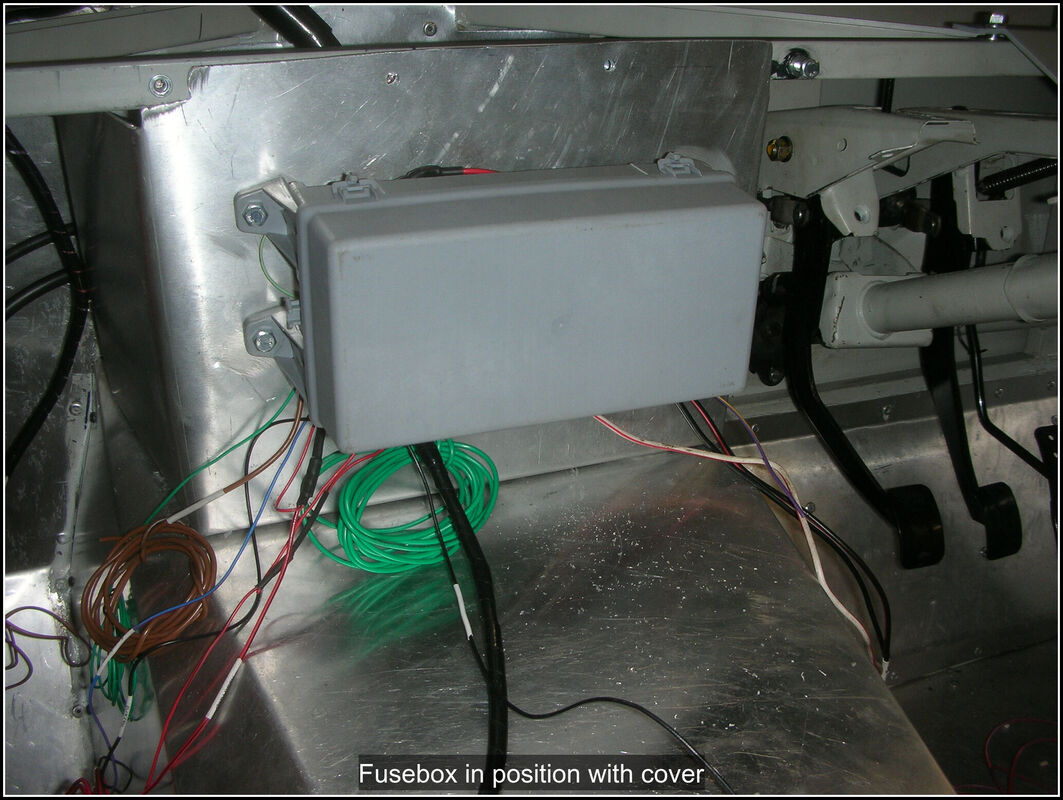
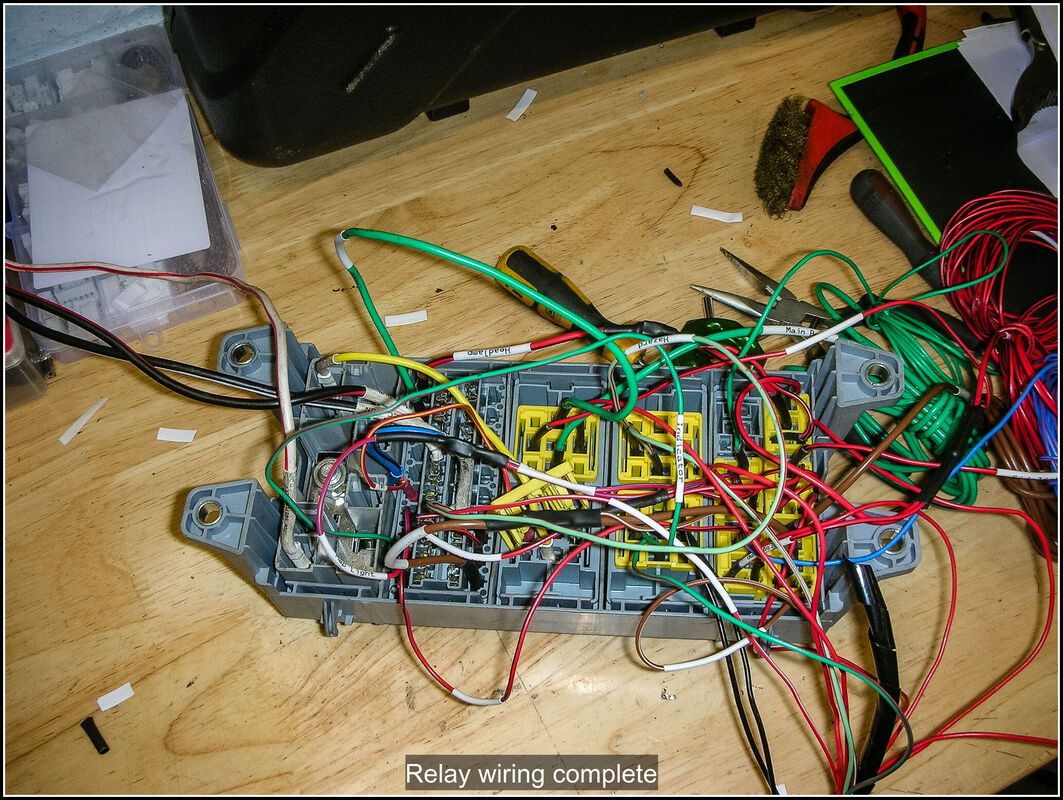
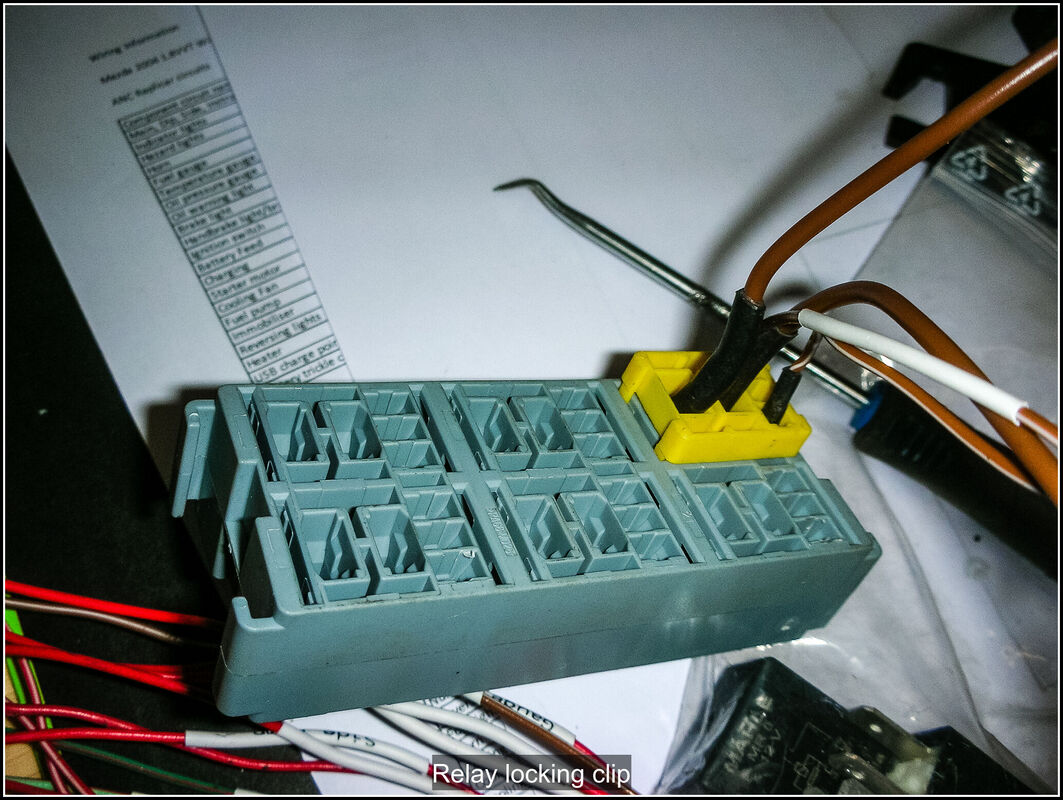
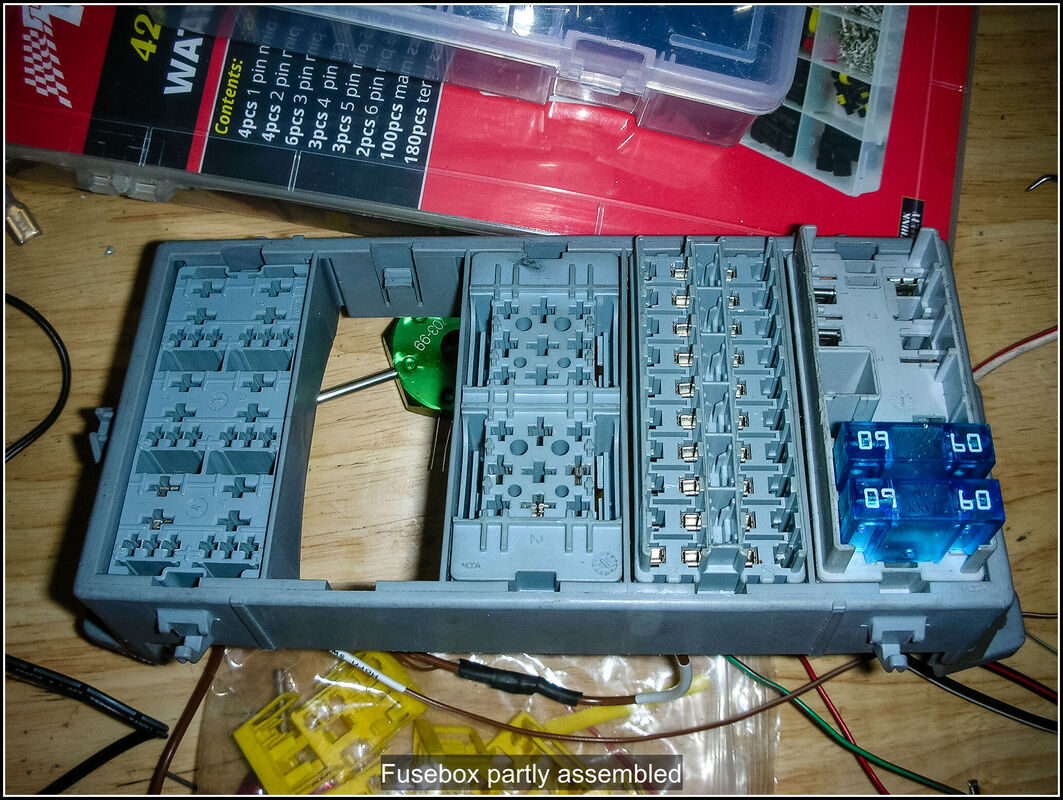
29 January 2022 A short afternoon in the garage but feels like a productive one. I ran the wires for the speedo sensor, reverse lamp switch, brake lamp and handbrake switch through the bulkhead, ready to be terminated on the fusebox. I finished routing most of the wires that need to run to the back of the car, fog lamp, reverse lamp, indicators, side lamp, brake lamp. I mustn't forget to run the fuel gauge sensor wire and the fuel pump wire. Prepared the the lower bulkhead panels for final fitting. Fitted them with Tiger Seal and pop rivets (the air riveter makes it so easy). The top edge is held with Cleco's for now because the top panels will overlap and I want to rivet through all of them together. I won't do the top panels until I've got the body back on the car. I drilled out a hole for a grommet and passed the wires through the rear bulkhead, ready to be wrapped and clipped when everything has been tested. 5 February 2022 An hour or two in the garage, I extended a couple of the wires so they would be able to connect to the lights. I then wrapped these wires in split woven nylon sheathing. I add p-clips for the loom going to the fuel tank and the wires from it going to the earth point. I had ordered more split woven nylon sheathing that would accommodate more wires for the run from the handbrake up to the fuse box, it took quite a while to get in place and covering the wires but it tidies and protects everything nicely. Just need to figure out how to get some p-clips to secure it to the gearbox. 6 February 2022 Added a p-clip to hold the loom on top of the gearbox using one of the bolts near the gearstick. Towards the front I used a tapping in the side of the gearbox a bit too close to the exhaust for my liking, I made up a length of aluminium flat bar with a hole in each end and bolted it to the side of the gearbox and on the other end bolted a p-clip to hold the wiring loom. Fitted the gearbox tunnel but found it fouled the p-clip I had installed near the gearstick. I removed the tunnel and moved the p-clip to a bolt further forward. Refitted the gearbox cover, I tried to put the fusebox panel back but that was fouling the earth bar I put in a while back. Luckily I was able to trim the corner of the panel to allow clearance for the earth bar. I checked all the wires going to the rear lights for continuity back to the fusebox. Now with the fusebox panel in place, I unbolted the fusebox from the panel and moved it onto to allow me access to the back. I spent a lot of time sorting out wires, this involved a lot of unwrapping and re-wrapping of the loom around the bulkhead area so that I could group the wires going to the fusebox and those to the dash connector together. The loom is slowly taking shape but it seems like I have been doing this for ages now. My plan is to get the remaining cables terminated and connected inside the car. I still need to run the cables to the brake switch, the coolant temperature sensor and the brake fluid level switch. Once that is done I will refit the dash and body so I can make the connections to the lights and horn. I want to move the car over onto my lift because I also need to replace the exhaust centre pipe (which also means swapping over the O2 sensor) with my new one. With the car on the ramp making the light connections underneath the body should be easier too. 24 January 2021 Not much time in the garage recently with other family commitments. Got back out today for a few hours, and re-terminated the Superseal plug on the interior light circuit. Although previously I thought the connections were good, the pins would not lock into the holder correctly because the crimp tool I was too deep and crimped the locking tabs too. I'd ordered the correct tool and this seemed to work well, but still required care to make sure the locking tabs weren't caught. I decided to finish off the wiring from the gear box and the handbrake. I dug out the speedo sensor and reverse switch wiring. The reverse switch plug was looking quite corroded so I crimped on a new waterproof plug. I made up a wire for the handbrake and terminated it. I decided that the wire for handbrake switch should join in the loom with the gearbox wires so drilled a hole in the panel I'd made to seal the gearbox tunnel and inserted a grommet. I decided to fix some cable clips on top of the propshaft tunnel to hold the switch and while I was planning that I decided this would also be a good route for the wires that need to run to the back of the car for lights, fuel pump, fuel sender etc. so I added a couple more clips to run the entire length. The wires will go through the rear central bulkhead. When I make up the cover for tunnel it will hide the wires nicely. Before I was planning to run things down the side of the car but this is a much neater solution and keeps everything together. I ran spiral cable protector over the wires and started to form the loom. I need to run all the cables that are going to go to the back of the car so I can get the gearbox cover back in place. I drilled another hole in the engine firewall and passed the wires through it (and a grommet) the loom will split here so the wires for the rear go over the top of the gearbox and the ones for the front/side of the car will go across the bulkhead and down the side of the engine. I also need to permanently mount the lower rear bulkead so the wires can pass through the panel. 1 January 2022 First day of the New Year. I added some Tiger seal between the horizontal tubes and the metal panels on the side of the cockpit to reduce panel rattles. I removed the fusebox panel and cut a hole for the wires to pass through and started mocking up where the cables would run. Then realised that once I started making these final connections that removing the fusebox would be difficult so decided that I needed to finish off the gearbox tunnel and the fusebox panel properly, including trimming them so that they could be put back in and not have to come out again. I know the vinyl I want to use but I haven't ordered it yet so that needs to be done. One thing I could get on with is adding some heat protection to the underside of the gearbox tunnel. The exhaust runs on the inside of the gearbox tunnel so I wanted to reduce the heat soak from that to the tunnel. An added benefit will be to reduce drumming from the large panel. I already had some heatshield material, left over from working on my TVR. I made some patterns from brown paper and cut out the material, being careful to get the pattern the right way up on the material. I used aluminium tape around some of the cutouts to stop them fraying. I cleaned up the inside of the tunnel with a sanding block and then wiped it clean with brake cleaner. I applied a good layer of contact adhesive to the metal and to the heat shield material. Once it had dried, I positioned each piece and pressed it down then used a roller to get it pressed on fully. I let it dry a bit more before running more aluminium tape around all the edges and again using the roller to secure it. 2 January 2021 Started to make a pattern for the gear lever panel heat-shield but decided not to line it until I have the brake lever panel made. Something that has been bothering me is that I couldn't remove the gearbox cover without removing the fusebox from the cover because the wires go through the fuse box panel I've just made. Had a long think about different ways I could mount the fusebox but then decided the easiest way was to enlarge the hole the wires go through. The fusebox is too large to pass through it but the individual modules can be unclipped and fed through without having to undo any wires. Then I turned back to the wiring, and terminated the main bettery cables on lugs. Added an earth bar to the underside of the dash bulkhead, attached the earth cable to it. I will use this to earth the various wires from the dash and fusebox. Then joined the cables for the rev counter, charge warning lamp, oil warning lamp oil gauge. Added ring terminals to the earth wires. Did some simple testing of the gauge and warning lamps to check the wiring I'd made, using a power probe. I still have a few more circuits to add to the car (temp gauge, brake light circuit, reverse light circuit as the switches for them are not in the dash. Ordered the vinyl and some scrim foam, edge trim, grommets, exhaust pipe gaskets, exhaust hanger rubbers, O2 sensor blanking plug USB charge ports and a USB panel connector for the the ECU cable. 10 January 2022 My edge trim has arrived so fitted that to the hole behind the fusebox. I decided my interior/map lights would be mounted on the sides of this panel. Checked the polarity of the LED lights I've bought and like the number plate lights white was the negative connection. Measured and cut out a hole in the panel for the lights and screwed them into position. I decided to try out my Superseal connections that I bought for the light circuits, on the map lights as I wanted to be able to disconnect them from the loom easily. Where they are shouldn't get wet but as I've not assembled this type of connection before thought it would be a safe place to try them out. Getting the terminals crimped in place was straightforward but had a bit of a problem getting the pins to push through far enough and as I wasn't familiar with how far they needed to go I ended up destroying one of the locking clips. I was going to put the fusebox back in the car so I could run the last few circuits but realised I had not mapped out which fuse position each of the circuits was connected to. Came back inside and spent some time updating my wiring diagram with the fuse box layout. I plan to print out a smaller version that can be laminated and sit inside the fusebox. 27 December 2021 Back into the garage and cut the nearside panel for the cockpit, got it cut to size and all the holes drilled. 28 December 2021 Got the nearside panel glued and riveted in place, the air powered riveter is a great tool. Mounted the ECU on the board I previously glued to the bulkhead. There is a small relay and fuse block that is part of the ECU loom that needs to be mounted near the ECU so I made up a small bracket that I have primed and painted. Once it's fully dry, I will screw it to the same pice of wood as the ECU. Had a look at options for the fuse box mounting. I had previously mounted it behind the dash but I wasn't happy that it was secure or would be readily accessible when the car is finished. I tried several different locations but wasn't happy with them for one or other of these reasons. I am currently seeing if I can make some mounts out of wood so that I can secure it to the passenger side of the dash and then create an opening in the dash for it. If that doesn't work I will see if I can build a centre console to sit between the gearbox tunnel and the dash bulkhead and mount it there, hidden behind a panel. 29 December 2021 Mounted the ECU relay and fuse block next to the ECU using the bracket I made yesterday. Spent some time routing the ECU loom cables round the battery box and adding some p-clips to secure it. There are a number of ECU wires that run to the dash and fuse box which required wrapping, I routed these over the top of the battery as well. Next I wanted to complete the battery installation, the position and fixing for the cage was already done but I needed to add a securing strap and route the main battery cable. I cut a slot in the bottom of the battery cage and then cut a strip of aluminium to run down in front of the battery into the slot. I then added a bend to the strip and secured it to the metal cross bar at the top with a self tapping screw, I filed down the end of the screw to ensure it didn't damage the battery. I then cut the battery leads to the approximate length, and secured them to the bulkhead with p-clips and a self tapping screw. I made some cutouts in the cage so the cables can reach the terminals without rubbing on it. I put gaffer tape around all the edges to cover all the metal edges and to help reduce rattles. 30 December 2021 Back in the garage and ditched my plan to mount the fusebox behind the dash. Decided to make a panel to run from the dash bulkhead down to the gearbox cover. Made a cardboard template and then cut it out of aluminium sheet. A few bends and it was pretty much done. I feel I'm getting better at the fabrication work now I've done a few more panels. I had to think a bit about the order to make the bends to make sure I could do them all but as it's aluminium it is quite easy to bend; a hammer, strong straight edge and some clamps seemed to work very well. Did a bit of fettling at the corners but pretty happy with the outcome. I will mount the fusebox on the front, facing into the cockpit. I have a cover for it so it will look neat, where it is on the gearbox tunnel it will be set back from the line of the dash and won't be immediately visible but it will still be accessible. I'll cut a hole in the panel so the wires can run straight back and out of sight, to the dash and the rest of the car. It will be mounted with brackets on the wings, screwed to the dash bulkhead at the front and screwed down to the gearbox tunnel. 31 December 2021 Last few hours of 2021 in the garage were spent securing the fusebox panel to the gearbox tunnel and dash bulkhead using M4 bolts and riv-nuts. I positioned the fusebox on the secured panel and marked the mounting holes. Then I removed the panel from the car and drilled and riv-nutted it with m6 riv-nuts. Put it back on the car for a test fit. I'm waiting for some grommets to arrive before I drill the hole in the panel for the wires to run through. I've also got some edge trim on order ready to tidy up some of the edges on the gearbox tunnel and the fusebox panel. So that's it really for 2021, I started this project in September 2020 by stripping the MX5 down. The kit arrived in January 2021 and I've been building it almost constantly since then, some weeks more than others but I've tried to do something every week. Even if it's just crimping a few wires or drilling a few holes it helps to keep the project moving. I put together this little video of how far things have come in just a year to hopefully keep me motivated. Happy New Year to anyone reading this, I hope you have a better 2022. I've not done any work on the build since my last update. Christmas preparations and general family life preventing me from getting into the garage,
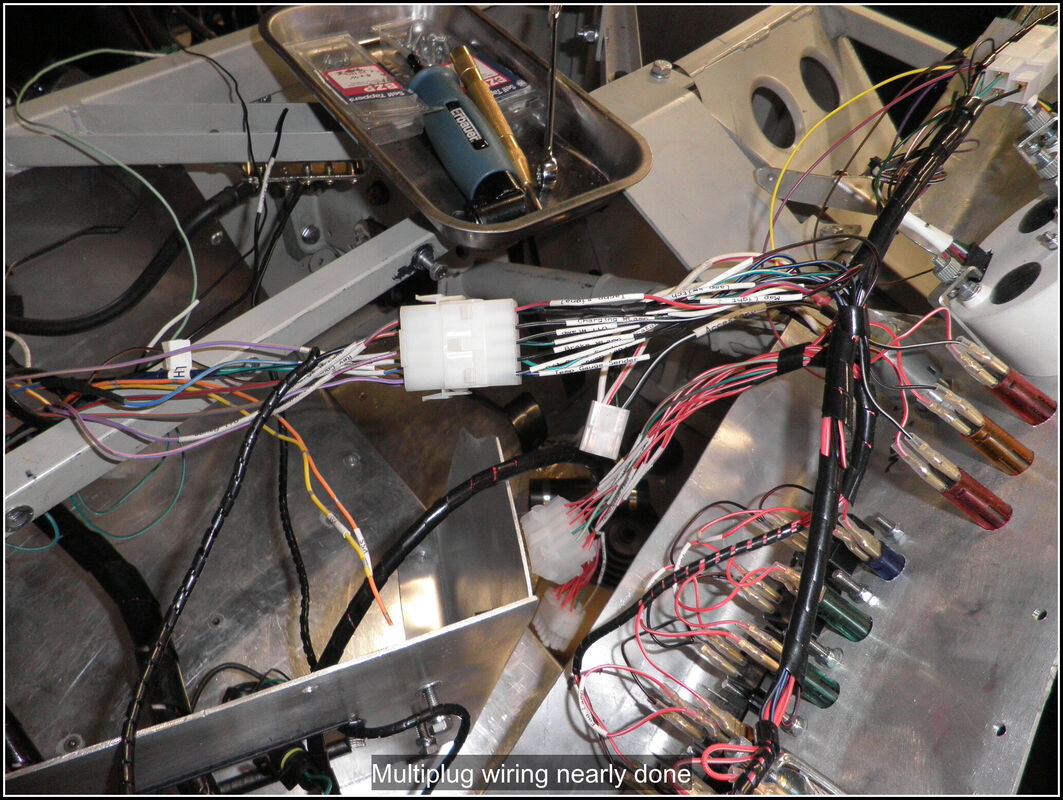
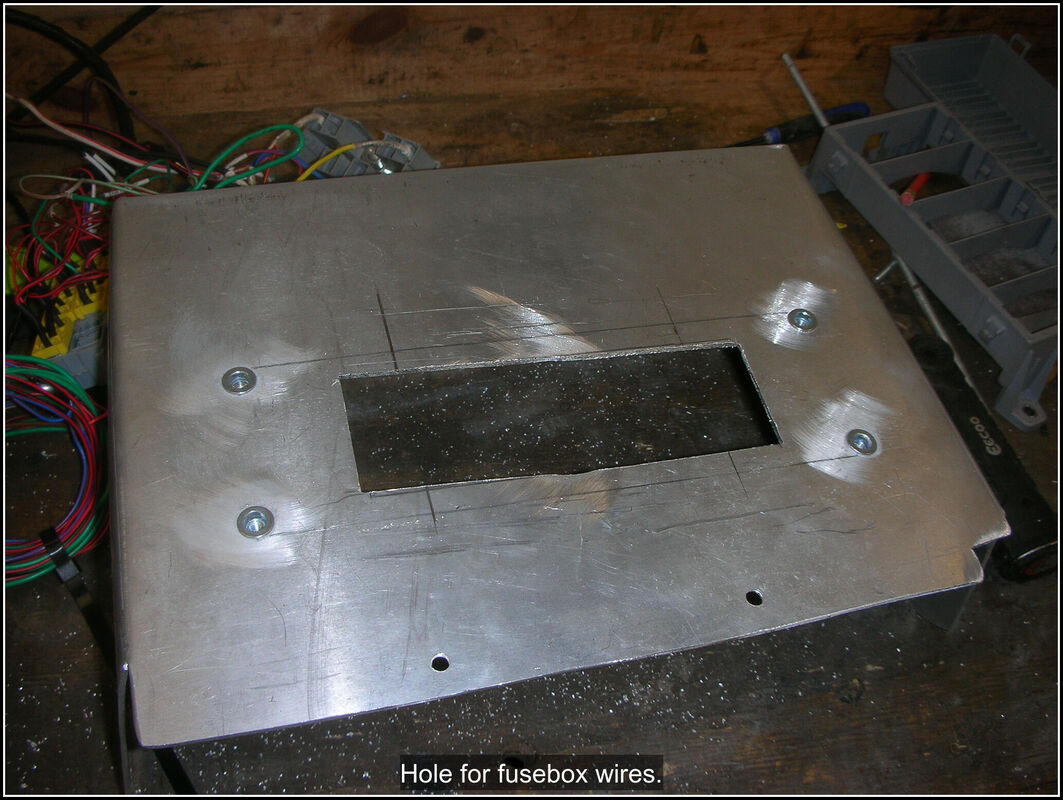
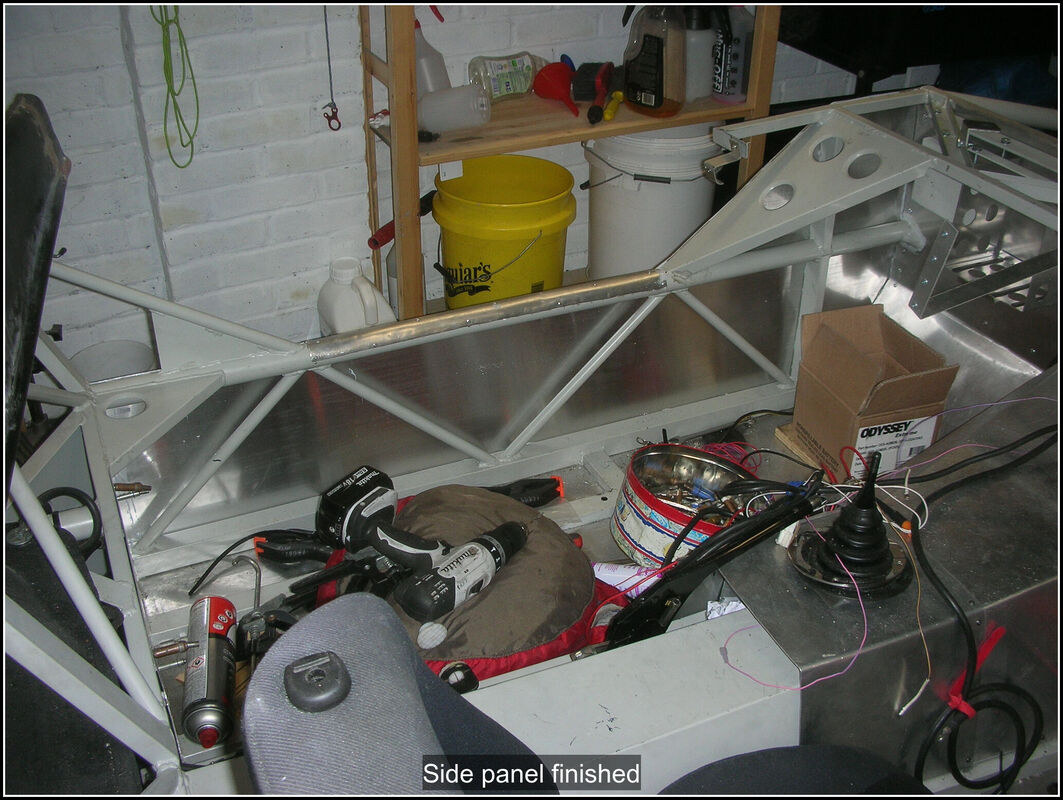
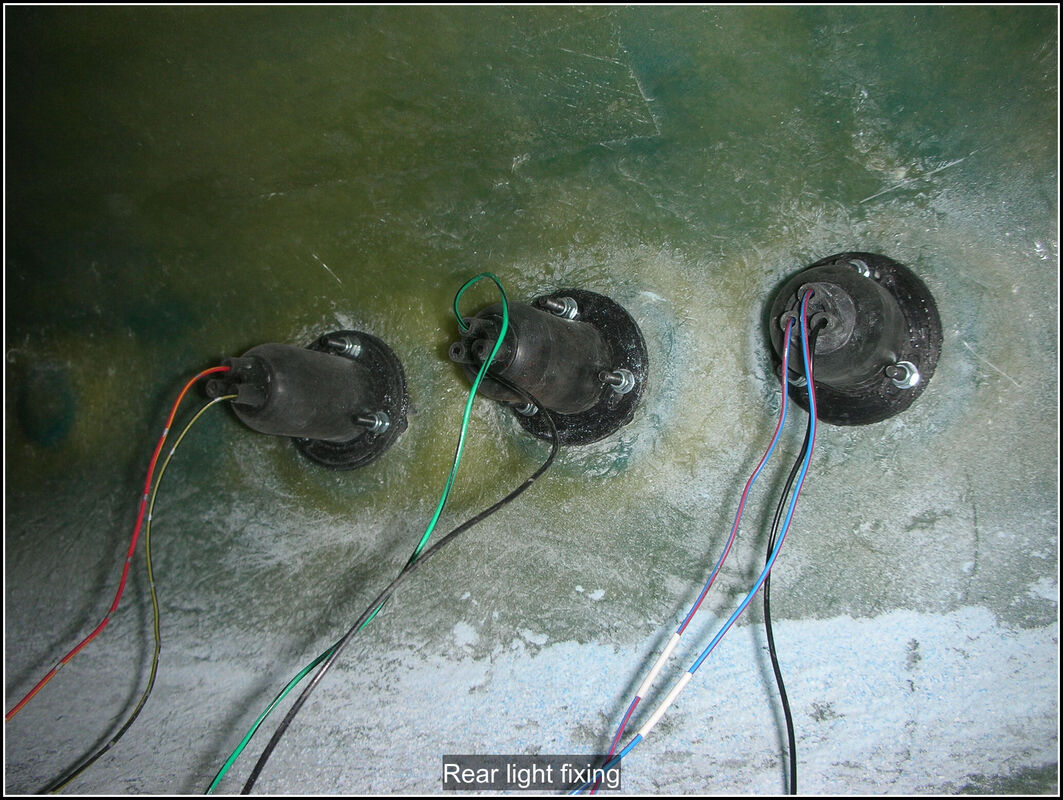
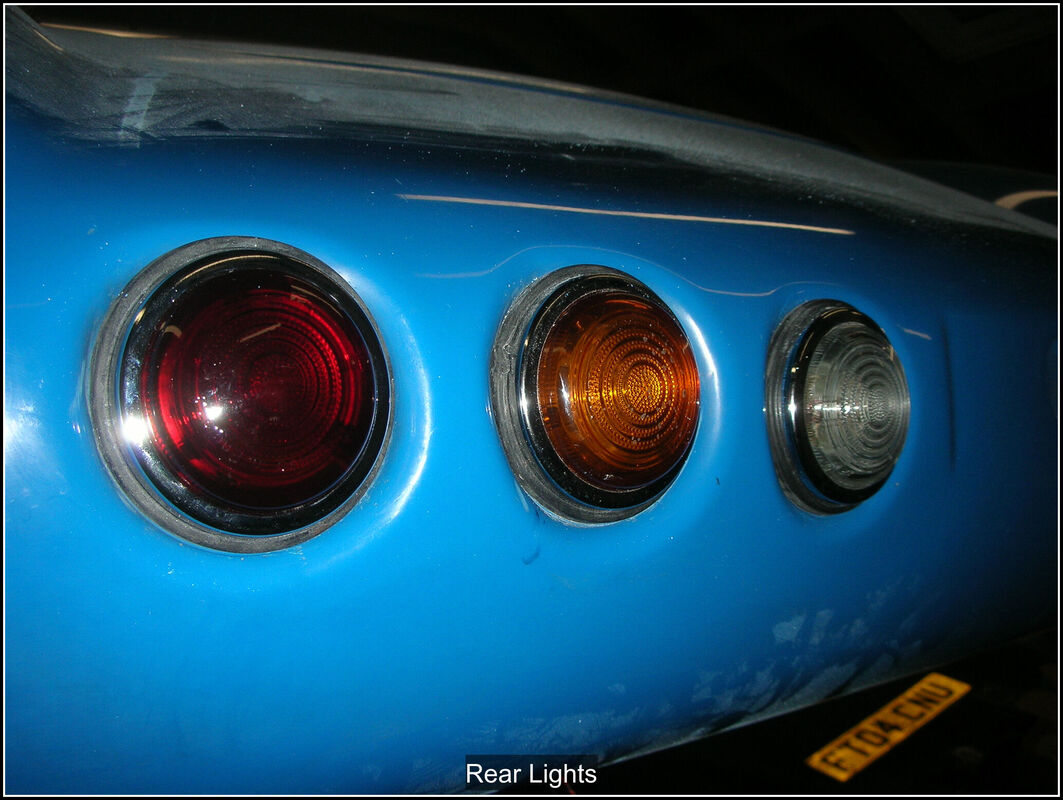
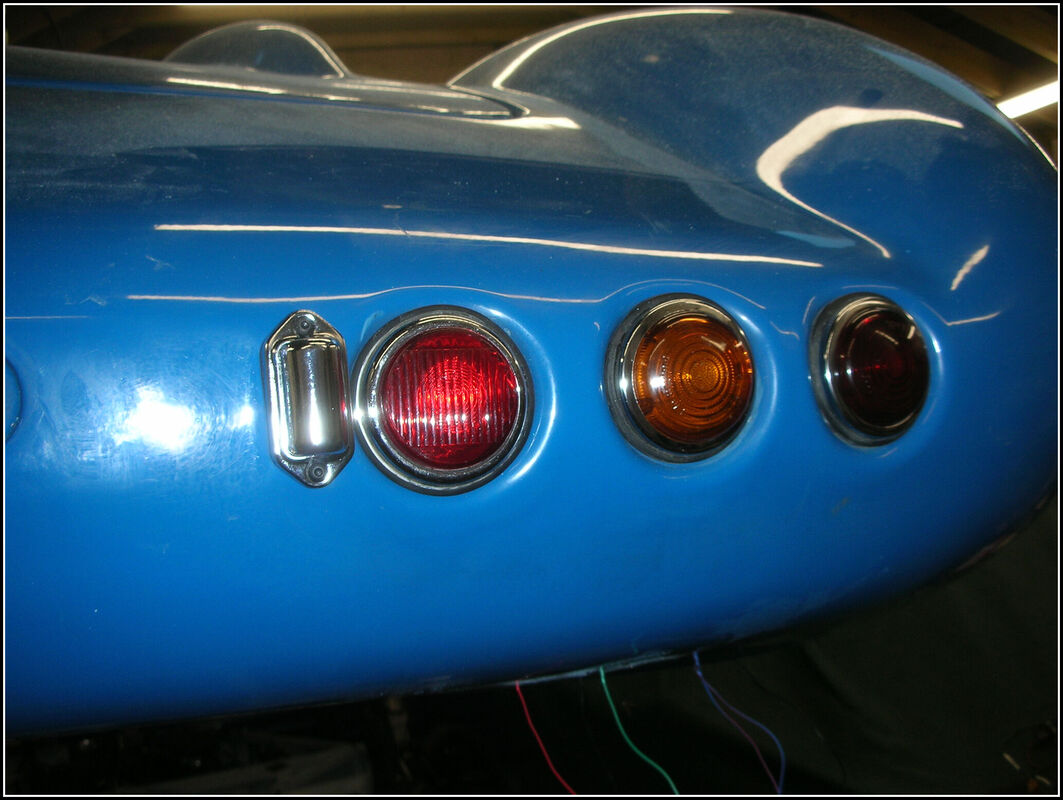
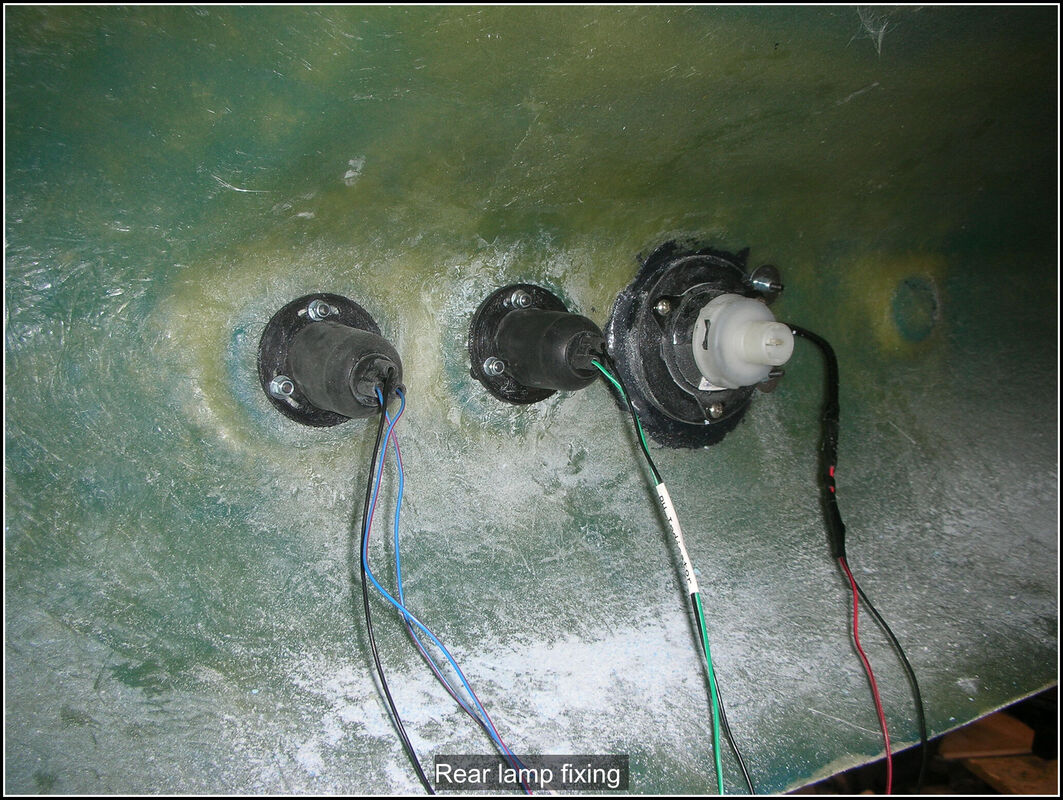
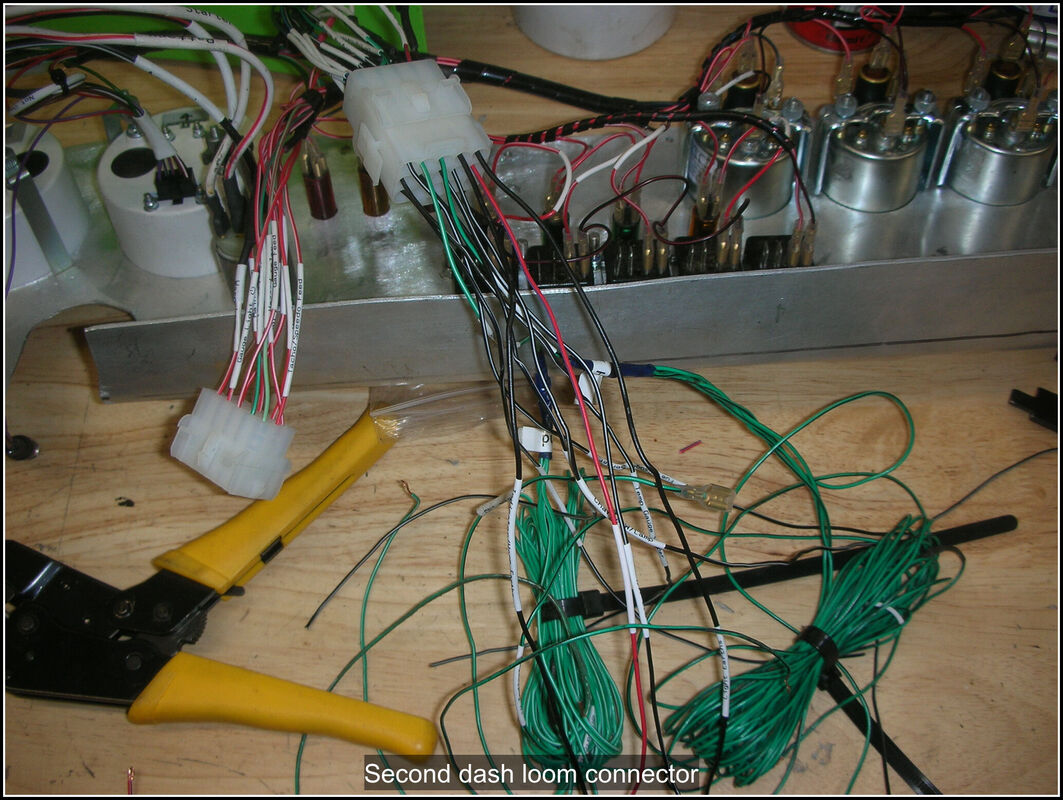
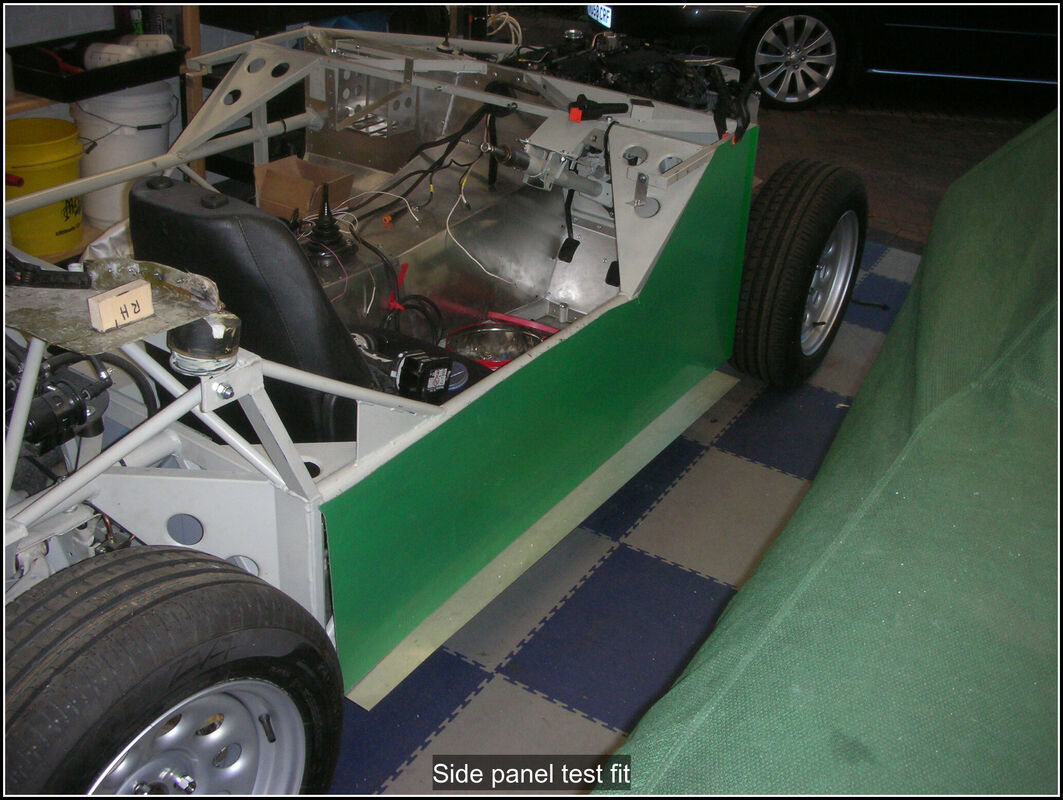
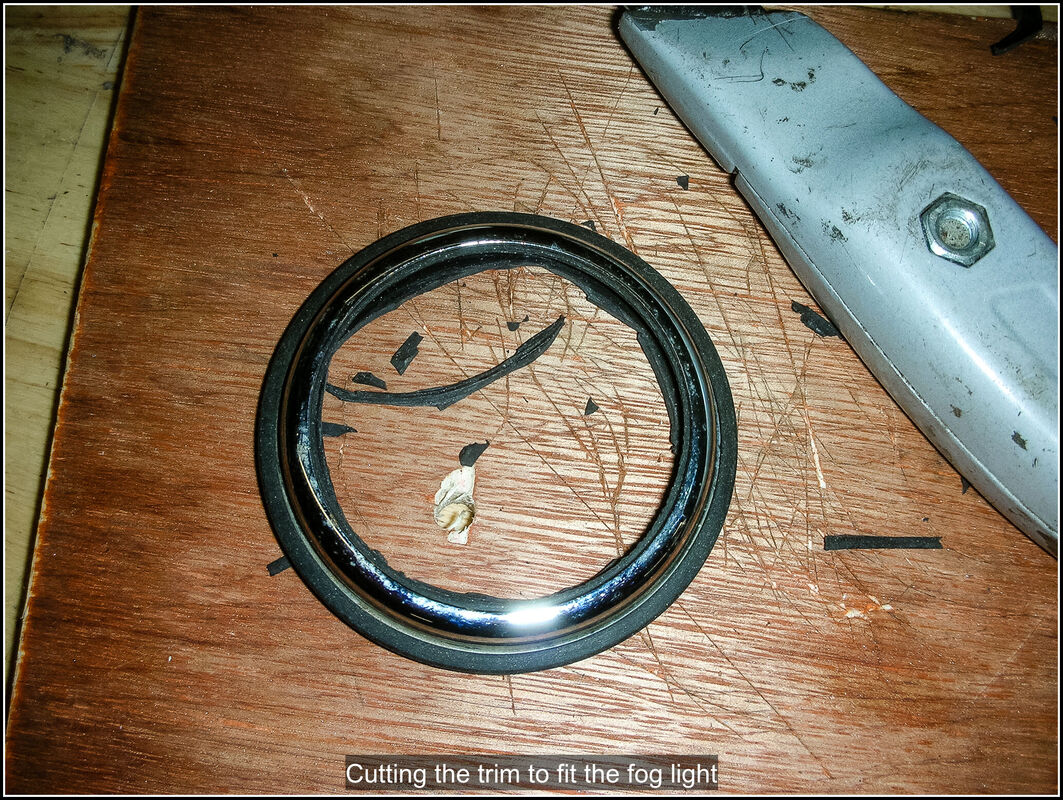
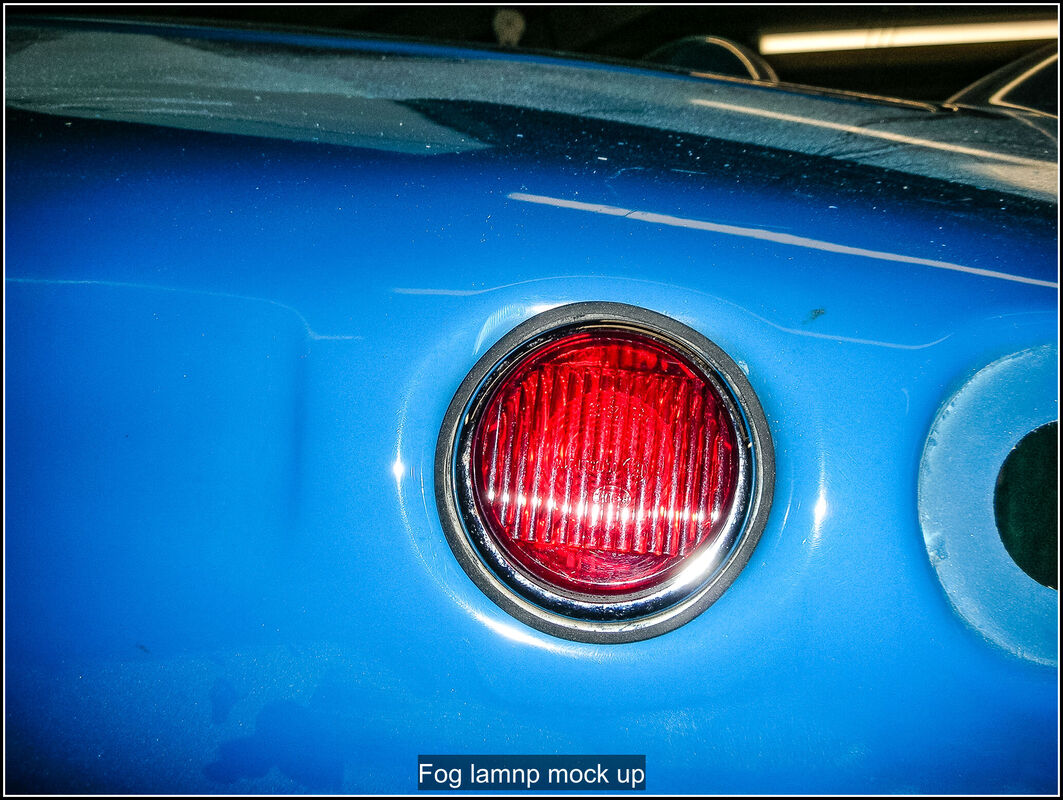
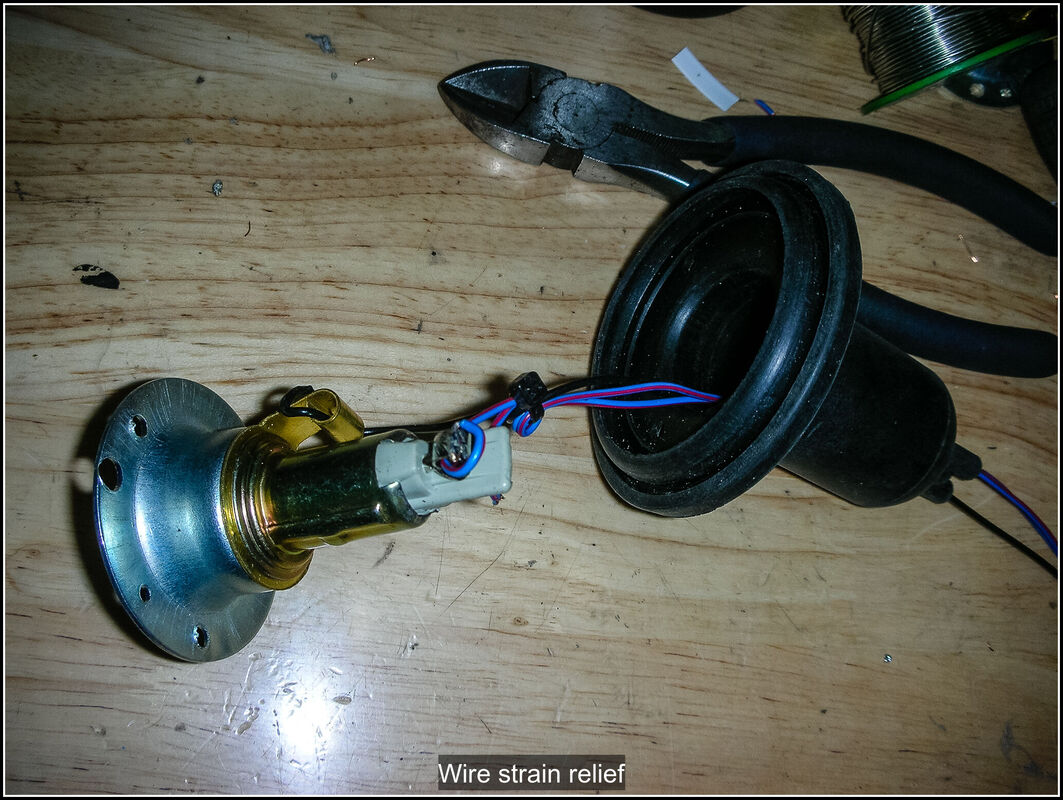
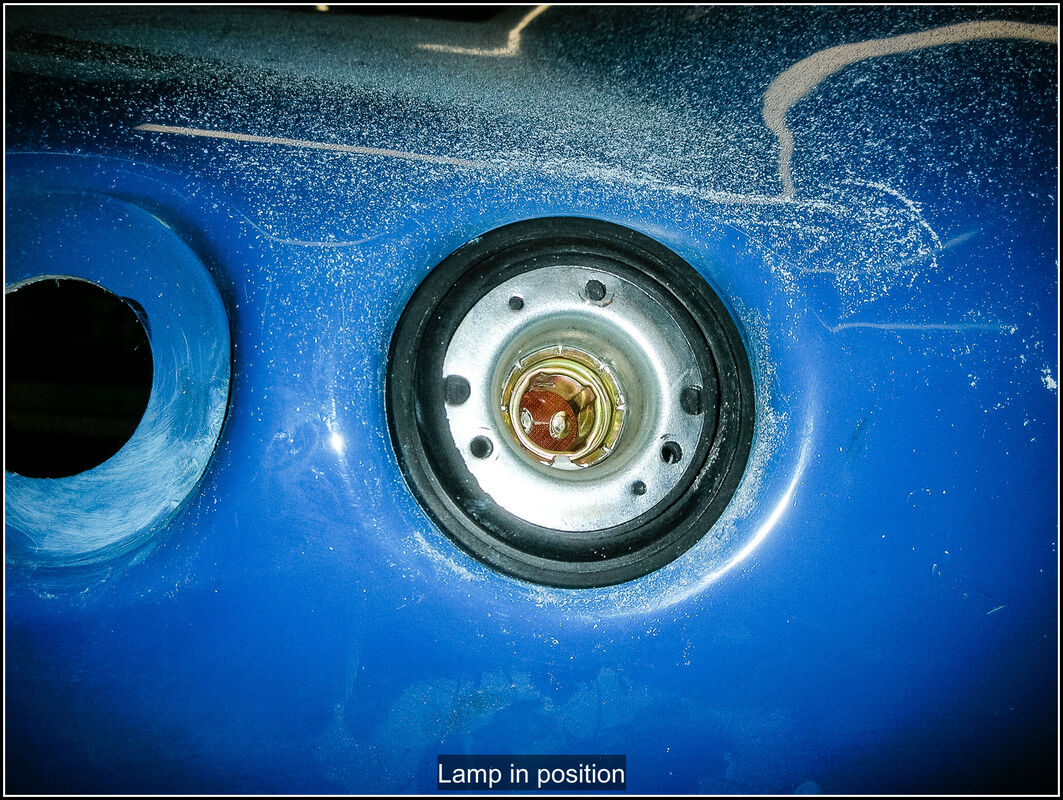
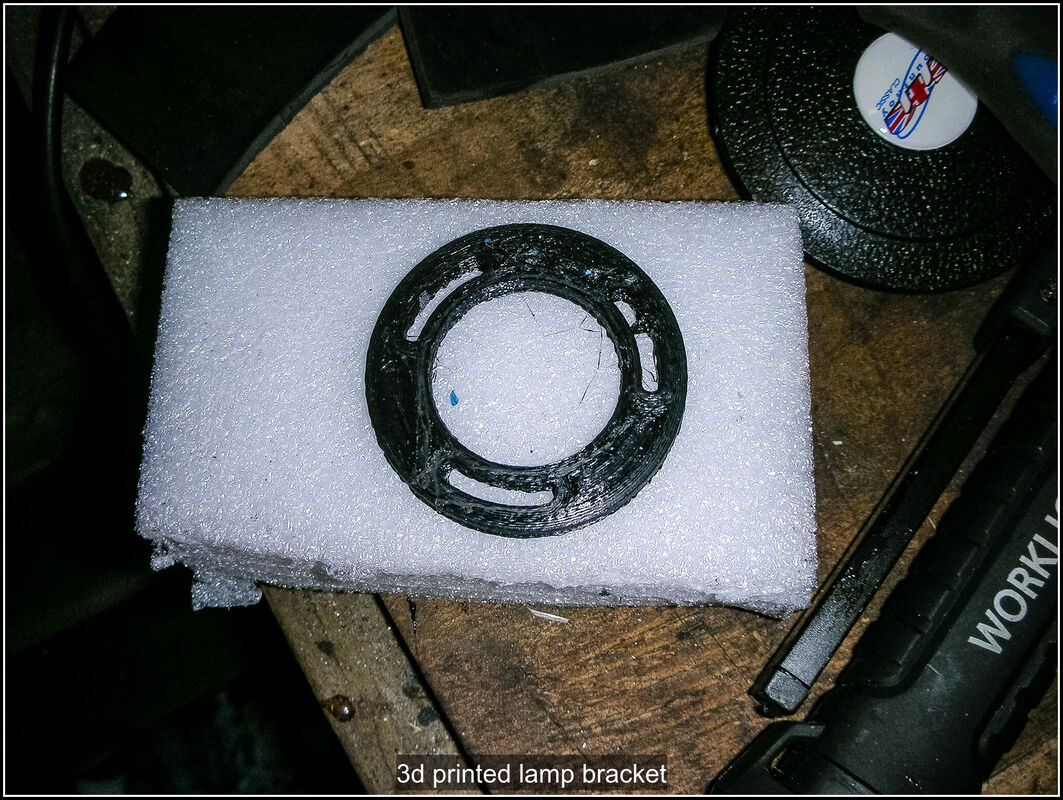
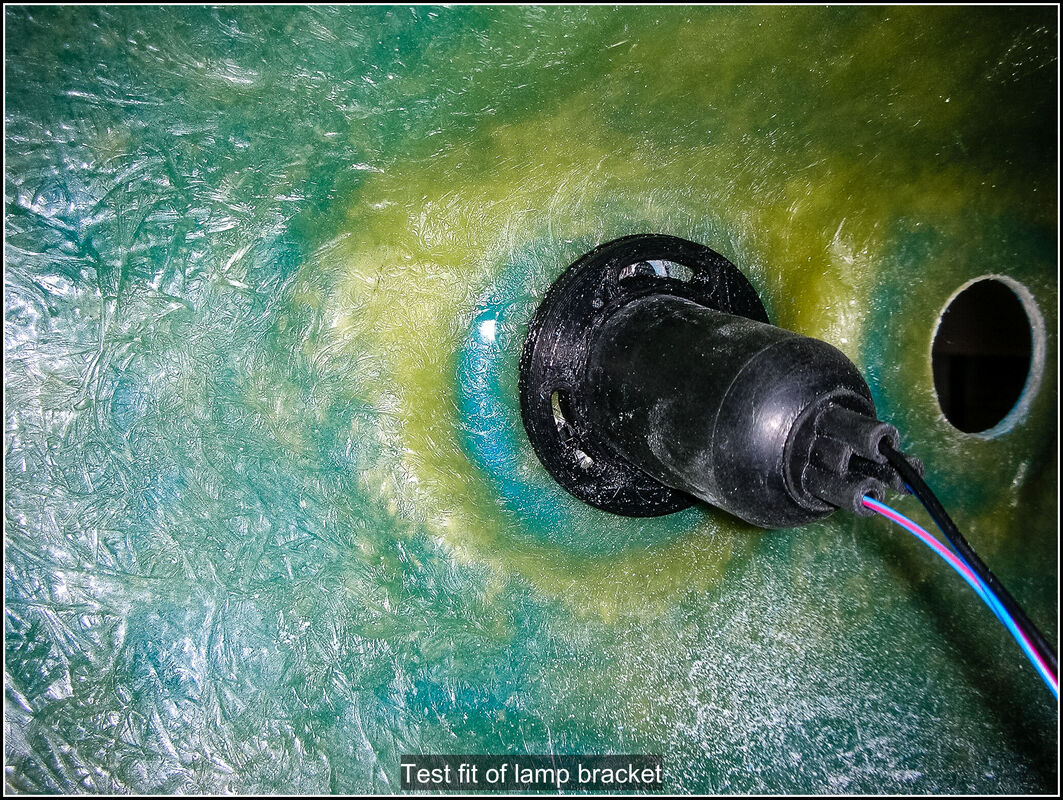
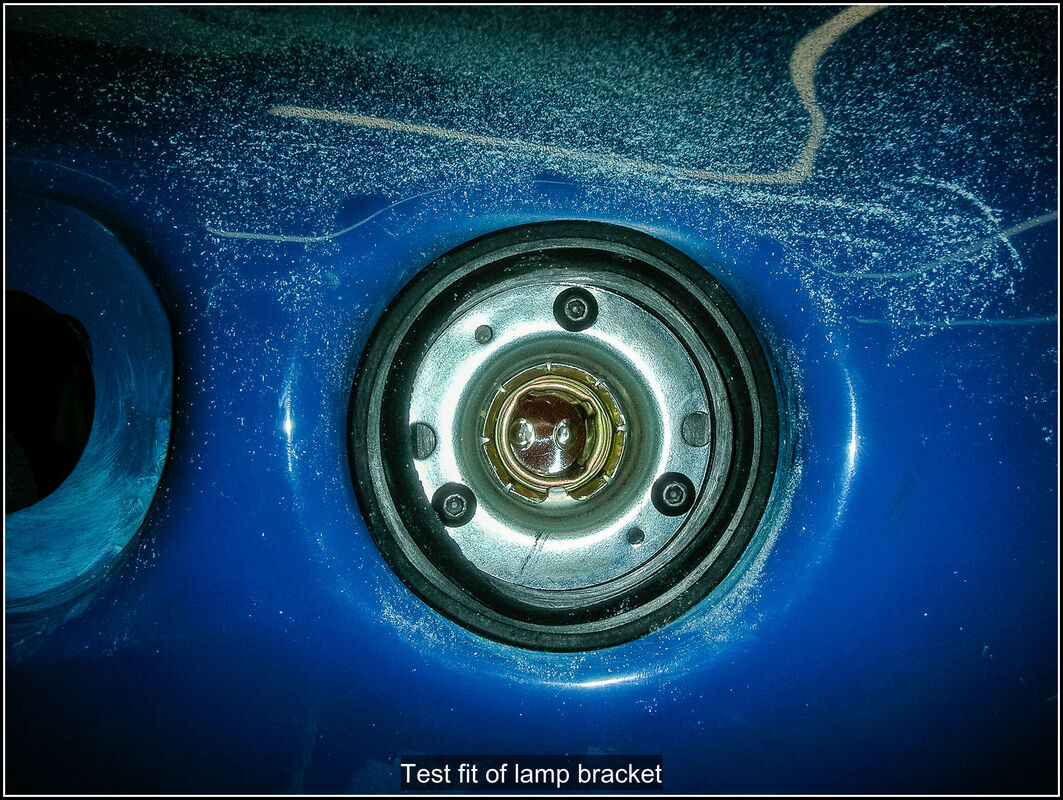
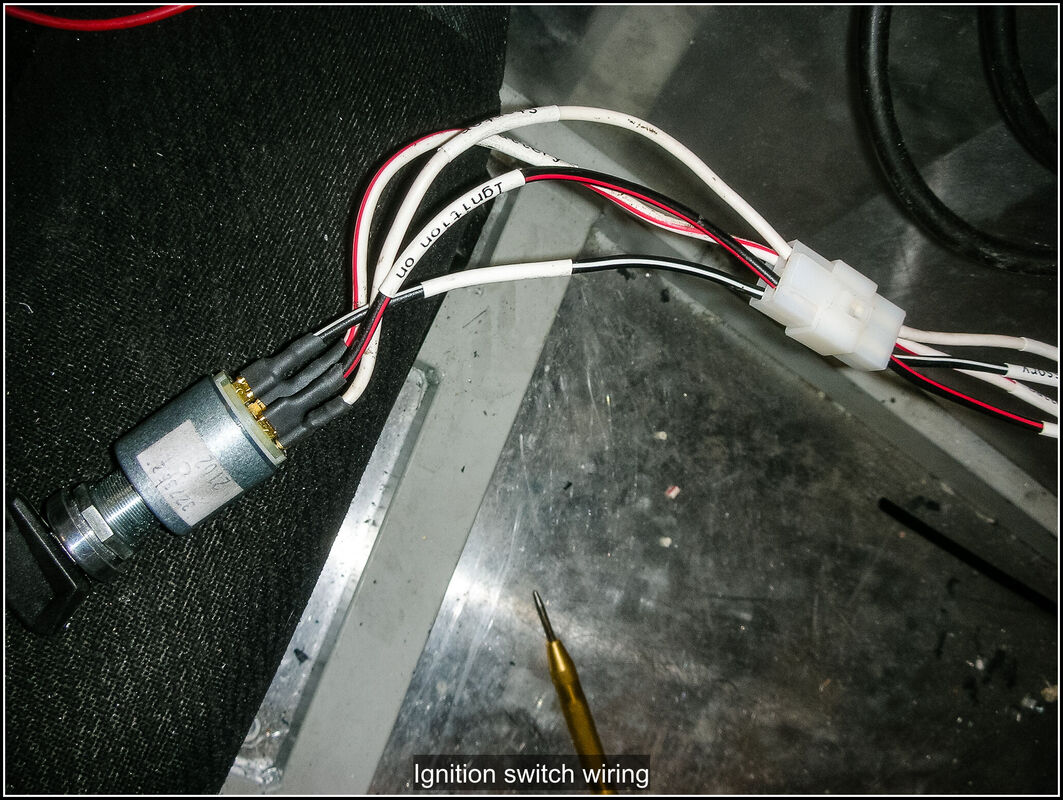
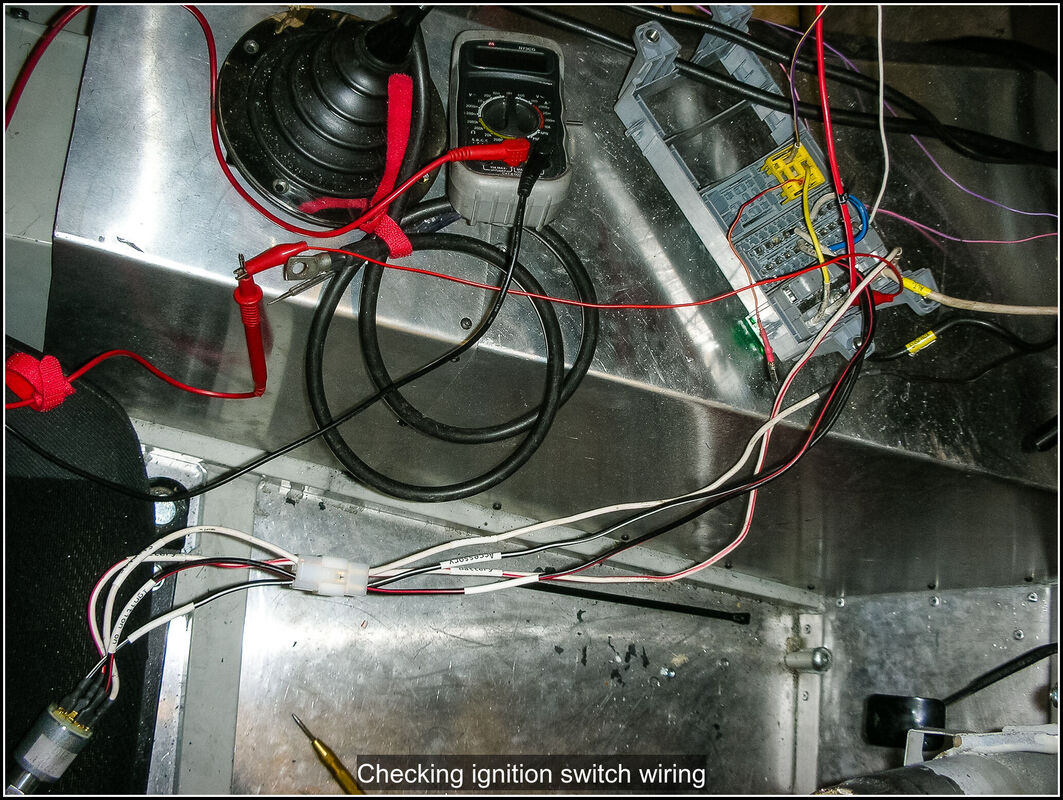
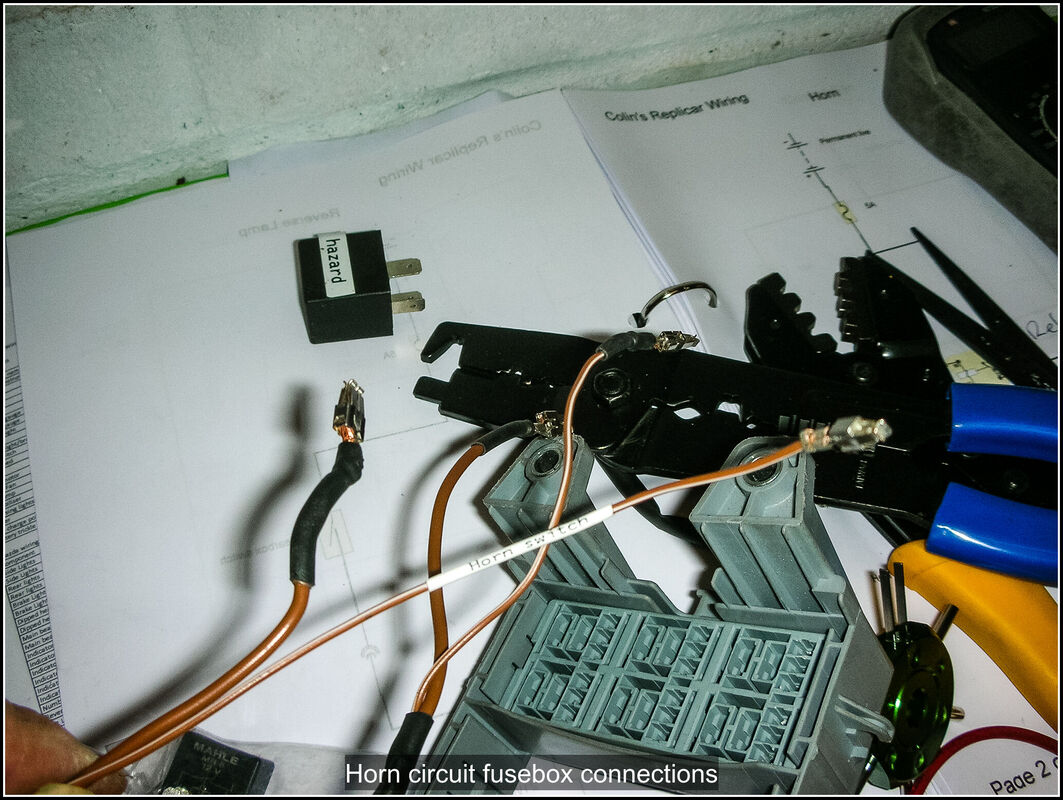
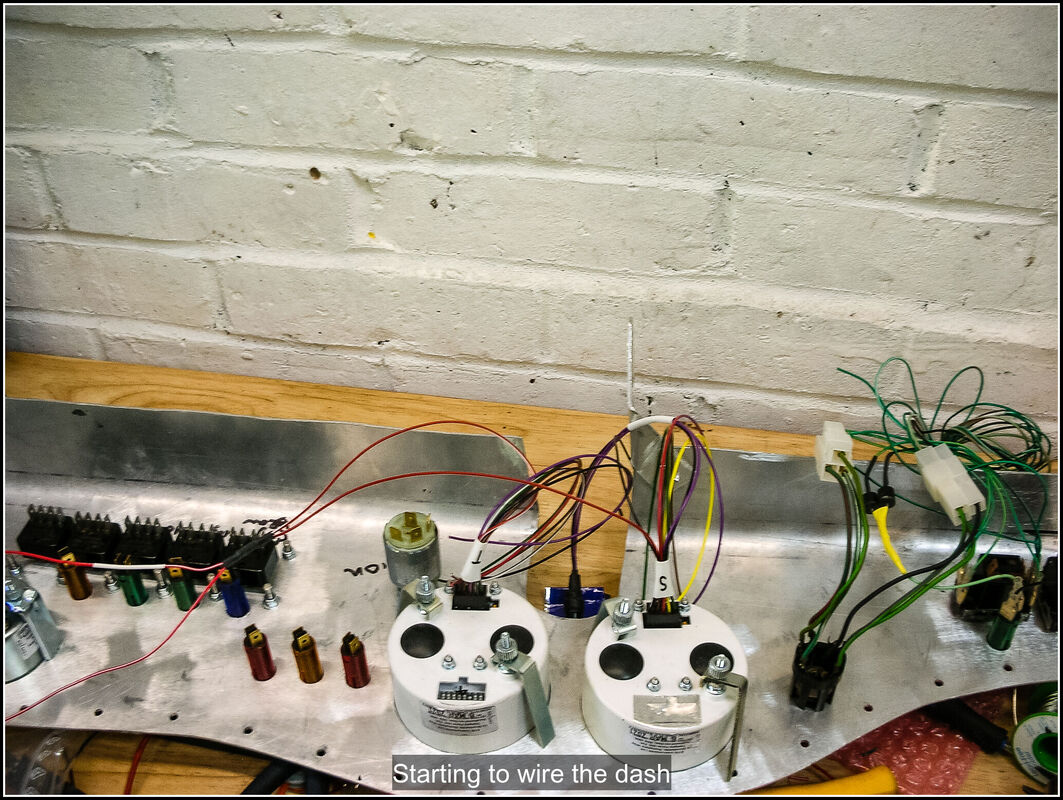
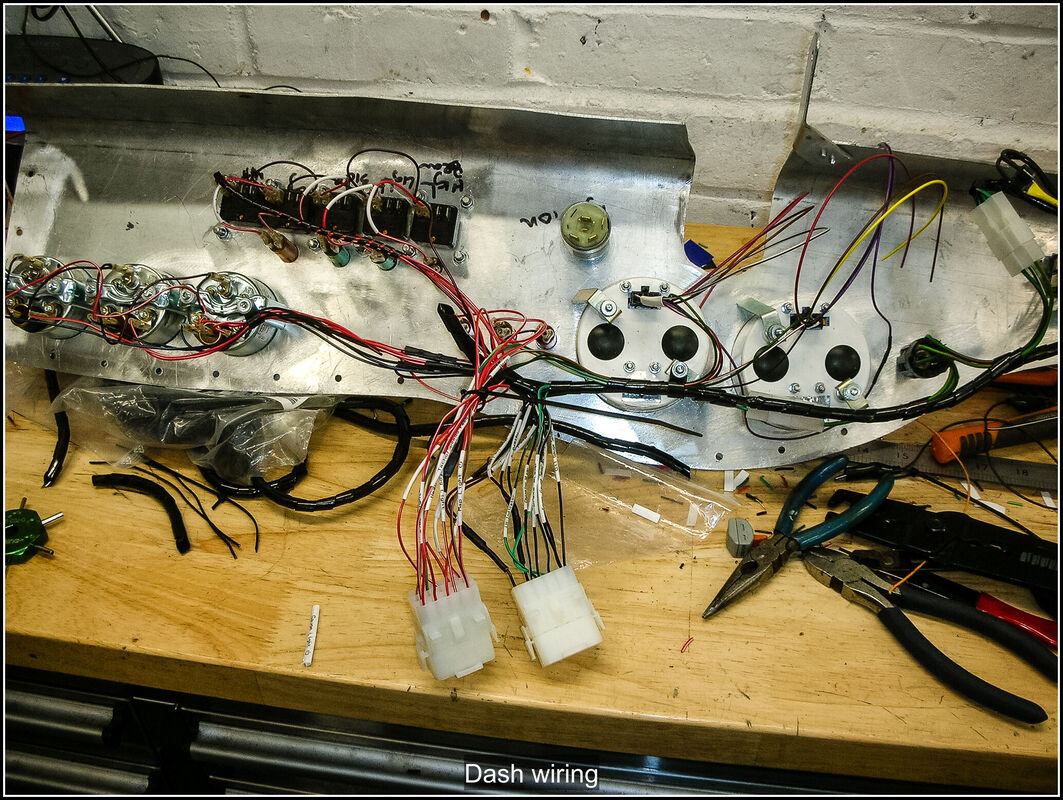
However I will be back with updates soon. Merry Christmas and Happy New Year 29 November 2021 Cleaned up the 3d printed mounting rings for my lights and finished them all off this afternoon. Spent some time over thinking how to mount the number plate lights involving fabricating brackets. Before I went too far down the rabbit hole I went back indoors and looked at what other people had done. I decided to keep it simple and just bolt them to the body shell at either end of the number plate. I trial fitted them and added an additional thickness of neoprene underneath so they would conform to the slight curve. 4 December 2021 Finished off the rear lights by putting the number plate lamps on which was straightforward. Secured them with m4 allen headed bolts, penny washers and nyloc nuts on the inside. Made up the loom tail for the second dash connector that provides the earths, gauge sensor and feeds out to the indicators. That was after I had a forced tidy up trying to find the pins for the connectors which had fallen on the floor. I think next up will be back inside the car to finalise the fusebox fixing and the connecting up the wires in the car to the fusebox and the dash. Starting to think about trimming, as I want to cover the dash top I'll want to get that done before I finish fitting the body. When I was at Beaulieu earlier in the year had a talk with the guys from Martrim who had some 4 way stretching vinyl which would be perfect and comes in a nice dark blue that I think would look good with the body colour. 5 December 2021 Having said all the above...... Today I had a bit of a tidy up and started making the panels for the sides of the cockpit. It's not entirely random, the wires for the loom need to pass through the sides of the chassis and so I really want the side panels in place before I run the wires, otherwise I would have to take all the wires out again to put the panels in. Got the offside panel roughly cut to shape and most of the holes drilled and attached with Cleco's. 6 December 2021 After a bit more cutting to size, a bit of shaping, drilling lots of holes I then finished off the panel and secured it with Tiger seal and pop rivets. 20 November 2021 Wiring is a time consuming business it seems. Made up the fuse and relay connections for the sidelights and headlight circuits today. 27 November 2021 Finished off the high beam, indicator, hazard and map light wiring in the fusebox. Still need to wire up the wires out to the loads and the links from the dash to the various sensors. Soldered wires onto the lamp units and tested the lights so I could correctly label the brake a side light wires. I made a start on getting the lights fitted. I did some trial fitting to figure out how to secure the lights to the body. I decided the best way would be to screw through the light. I didn't think the bodywork would be enough to secure the light and decided to make up something to go inside the bodywork to screw into. I designed a simple ring and printed it on my 3d printer. For the fog lamp which is different to the other lights, it screws from the back, so I needed to mount something inside the bodywork to screw into. A larger ring of plastic was designed and drawn. I cut down the spare rubber light trim I had bought before and fitted it on the outside. Very happy how it looks, the fog light now looks very similar to the other lights. 28 November 2021 Glued the ring of plastic to the inside of the bodywork, I used the light and trim ring to hold the plastic ring in place while the glue set. I tried fitting one of the brake, side lamps with the plastic ring, but my initial design didn't really work. I made some changes to the design to include slots that I could bolt through, rather than using a self tapping screw. I printed off the new design and with a bit more filing and sanding round the hole I was able to get it fitted. The chrome ring wouldn't initially fit in the rubber trim, so I had to file the hole a bit more to ensure the light was central in the depression. Even then it was difficult to get the trim ring in, but eventually I managed too. I to printed off the remaining few rings in the evening. 13 November 2021 Made up the connector with 60cm tails (all labelled) for the feeds between the fusebox and the dash. Changed the fusebox wiring to delete the start/run wiring which my new starter switch doesn't need. Prepped the cables for the starter motor but realised I didn't have the right size of connector block. Made up the tails for the back of the ignition switch. Body and dash mounting off the car ready to start wiring into the fusebox. Reviewed the wiring diagrams again to make sure I've not forgotten anything. 15 November 2021 Made up the connector block for the ignition switch, double checked with my multimeter that I had got the connections correct for each key position. Disconnected some of the existing wires from the fusebox (thank goodness for pin removal keys). This was so I could make up the fusebox connections on the bench. I started with an easy circuit, the horn. Made up the terminations for the dash loom on to the relay, the fused connections to the relay and the wire that will feed out to the horn. While I was doing this I was also thinking about the fusebox layout and how to keep track of what was connected to what. All the wires have heat shrink labels on them but I also want a schematic of the fusebox for my wiring diagrams with the connections marked. 1 November 2021 Had a productive day in the garage doing more wiring on the dash. Made up all the wires for the gauges, lighting, light switches, horn, and feed for the warning lights. Got them loosely arranged into the bundles that will connect to the multi-pin plugs. 7 November 2021 Morning trip to Goodwood Breakfast Club ate in to my project time today. Added the last few wires to the warning lights. Then terminated the wires and inserted them in to the multi-pin plugs. Added some cable wrap to tidy things up a bit. Still a few more wires to sort out – the ignition switch, rev counter and speedo signal wires. The speedo signal wire will have to wait until I can get the car running again as there are a couple of wires depending on the feed. |
AuthorThis is my first kit car although I've messed about with cars all my life. Archives
November 2023
Categories |


 RSS Feed
